
Eclassify
Documentation
Setup Admin Panel
Prerequisite
Eclassify Admin panel is built using Laravel Framework 10.0 so you need PHP version upto 8.1.0 or higher version installed on your server.
Upload Admin Panel code on server
1. Unzip the code you will see the Admin Panel inside the zip.
2. Upload this folder content on your server in subdomain folder.
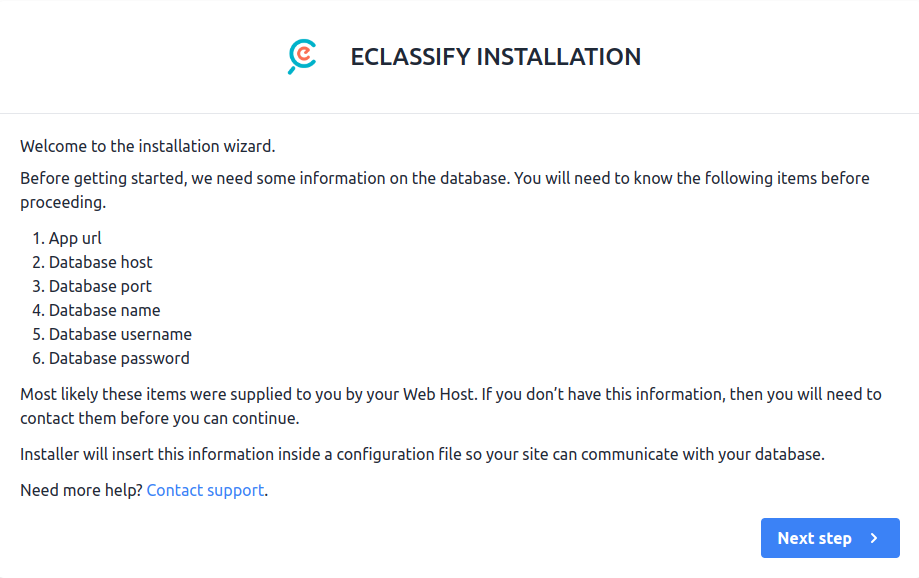
3. After uploading visit your domain url. You will see the installation wizard.Follow the instructions.
Installation Steps
1. Installation Screen
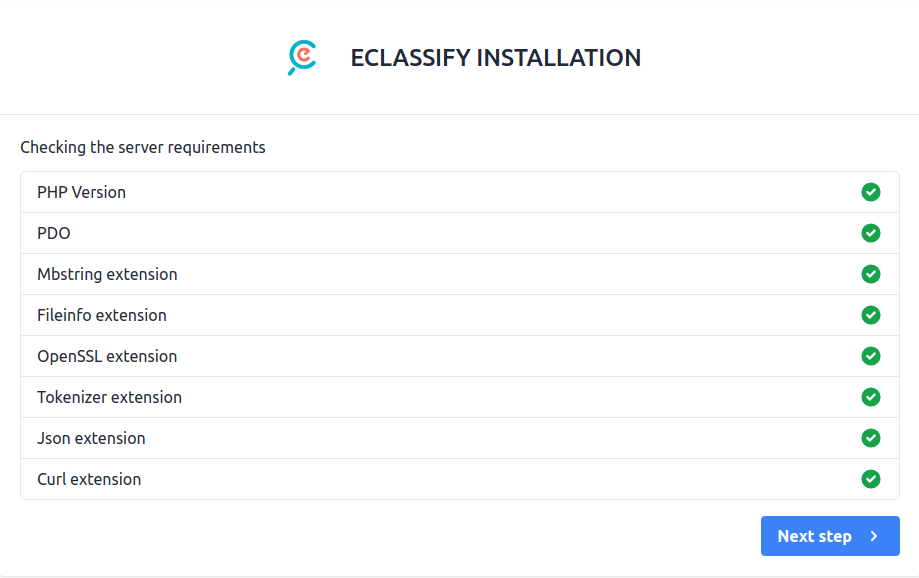
2. Server Requirements & Extensions
If PHP version is lower than 8.1 or any extension is not installed then it will be highlighted using Red color. So you need to make sure that your server meets the all requirement.
* nd_pdo_mysql extension is also required
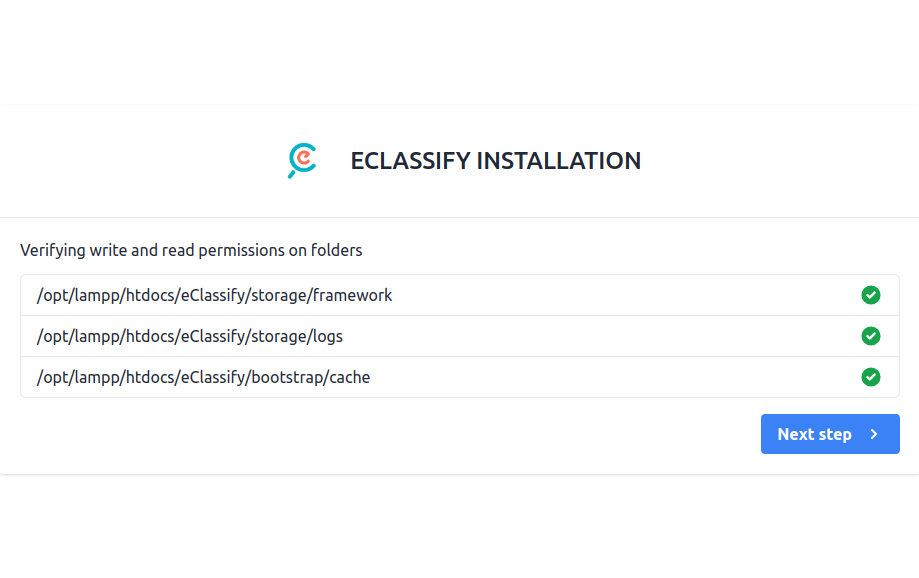
3. Permission Screen
Make sure this folder have read & write permissions. If not then assign this folders read & write permissions.
4. Purchase Code Validation
Here you’ll have to insert the purchase code obtained from CodeCanyon to authenticate your purchase and authorize your server to access the services.
To find your Purchase code you can visit this link: Where is My Purchase code?

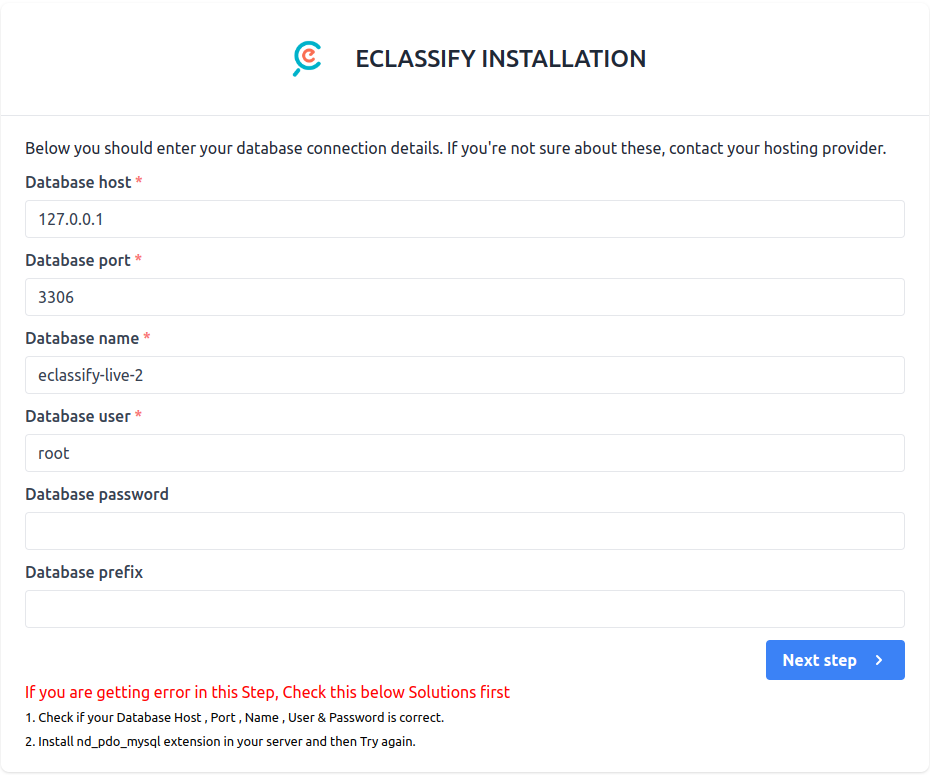
5. Database Configuration Screen
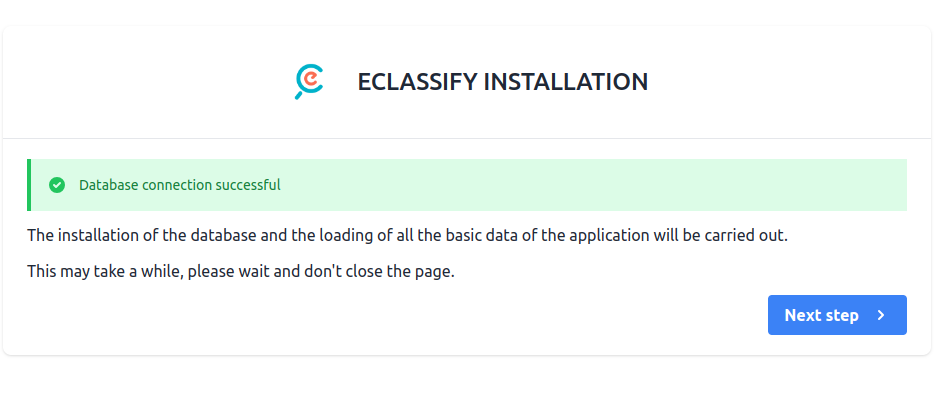
6. Database Connection Status
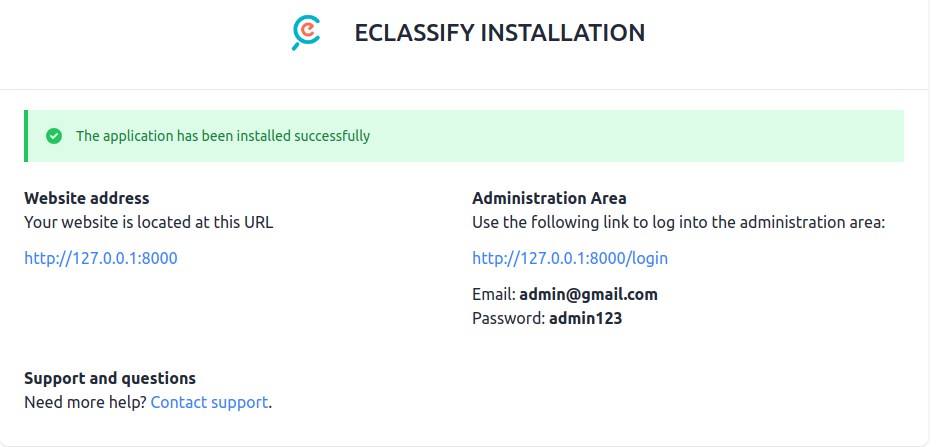
7. Final installation Screen
If everything is configured successfully then your Admin panel has been installed successfully.You can login as Super Admin using the credentials provided here.
Additional Configurations (Admin Panel)
After Installation you need to setup some settings before using the system.
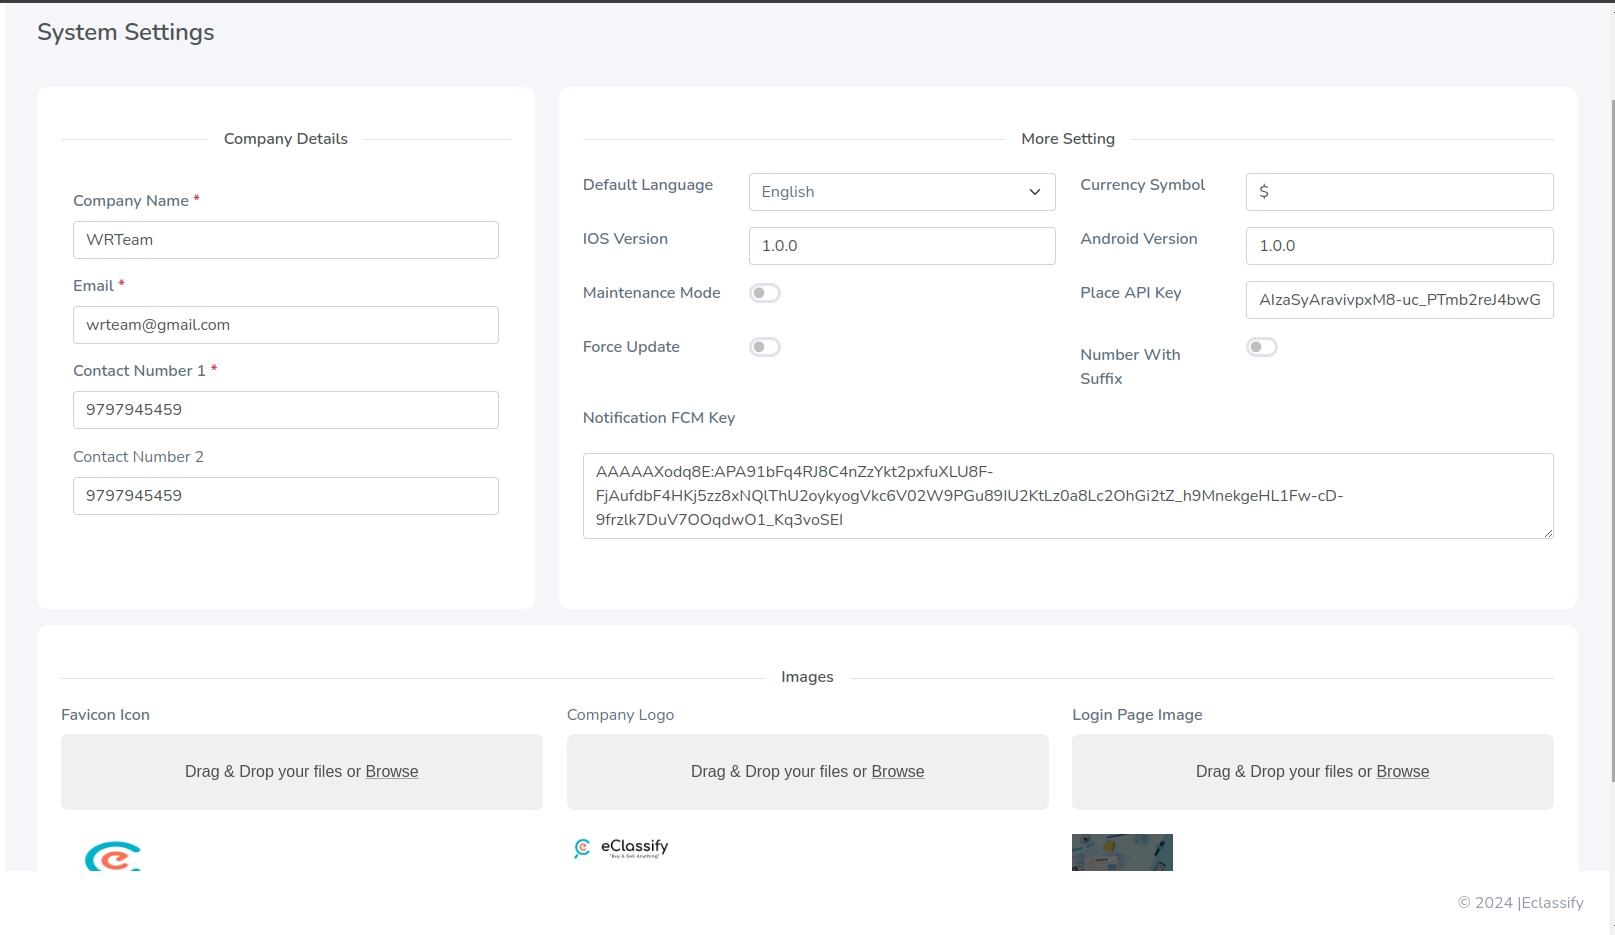
1. General Settings
This settings will be used by Admin Panel.You can set your current session year here.
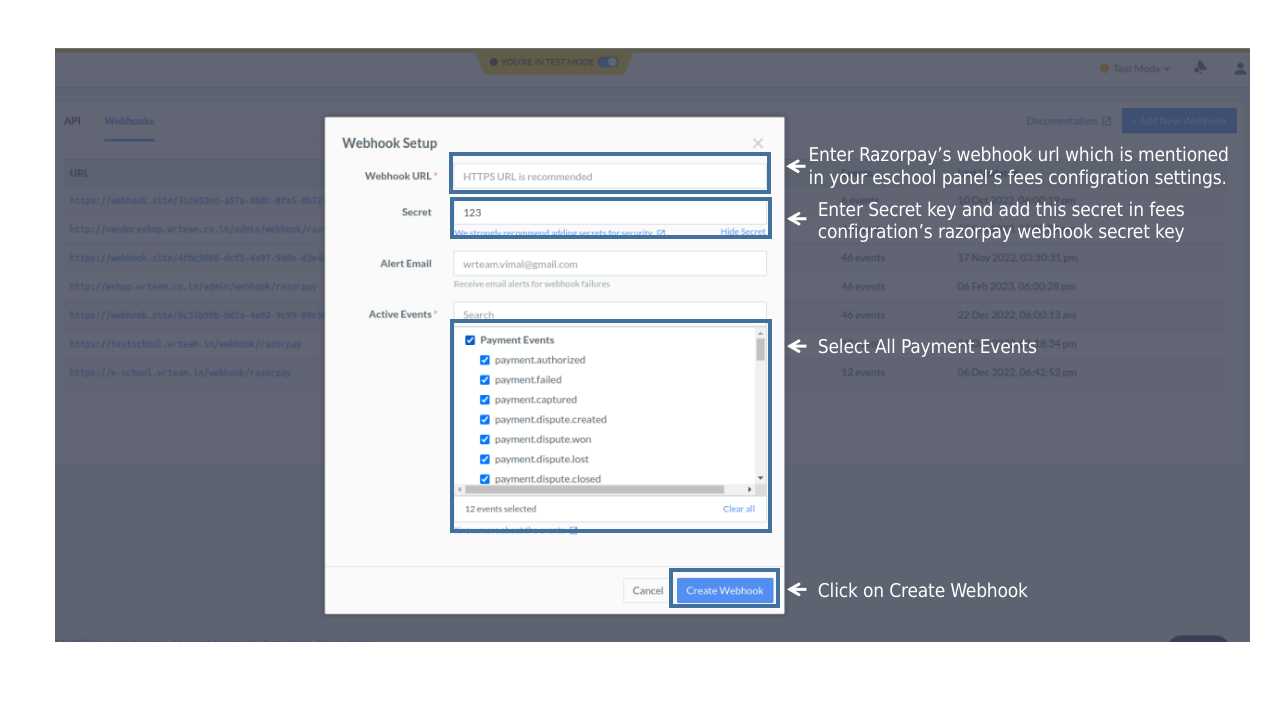
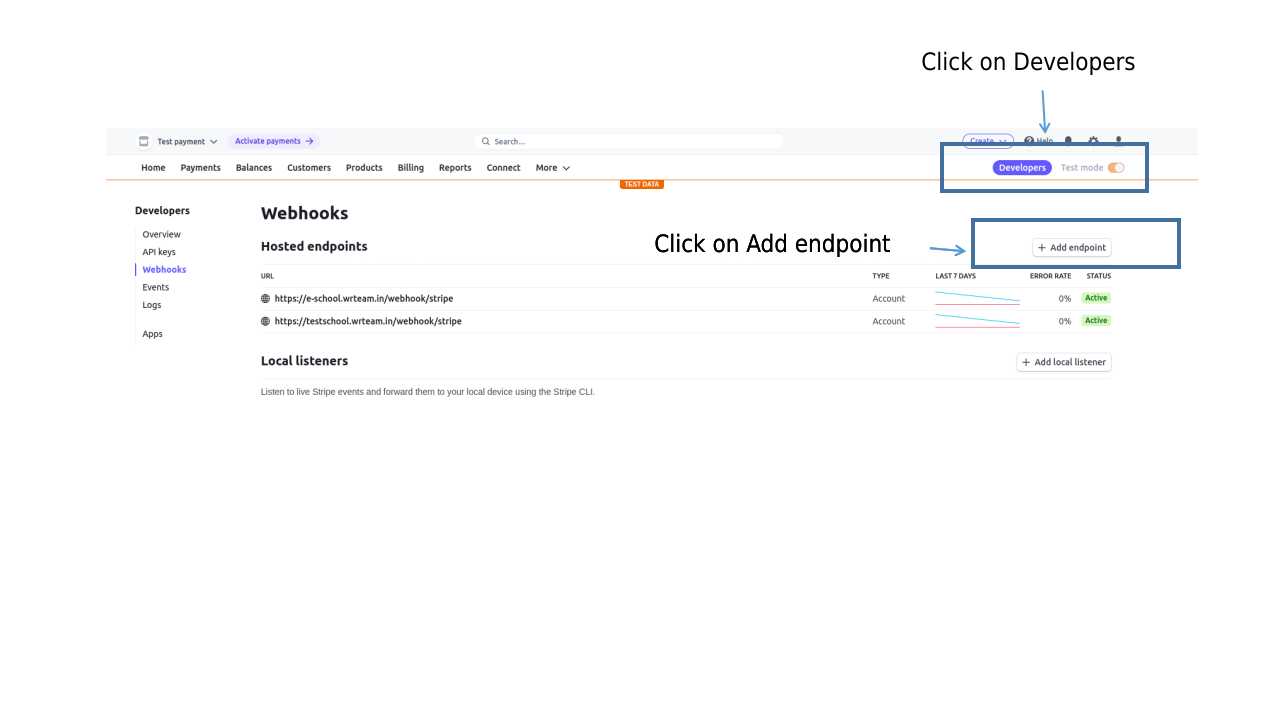
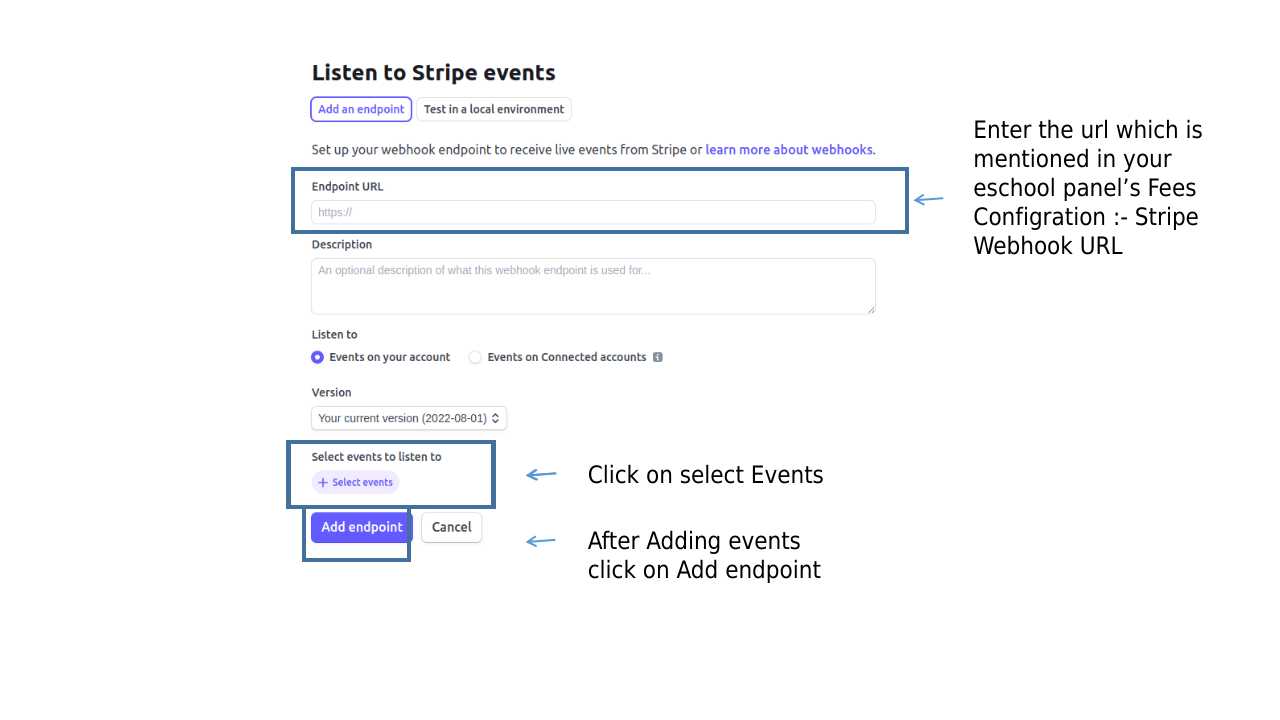
7. Payment Gateway’s Webhook Configuration
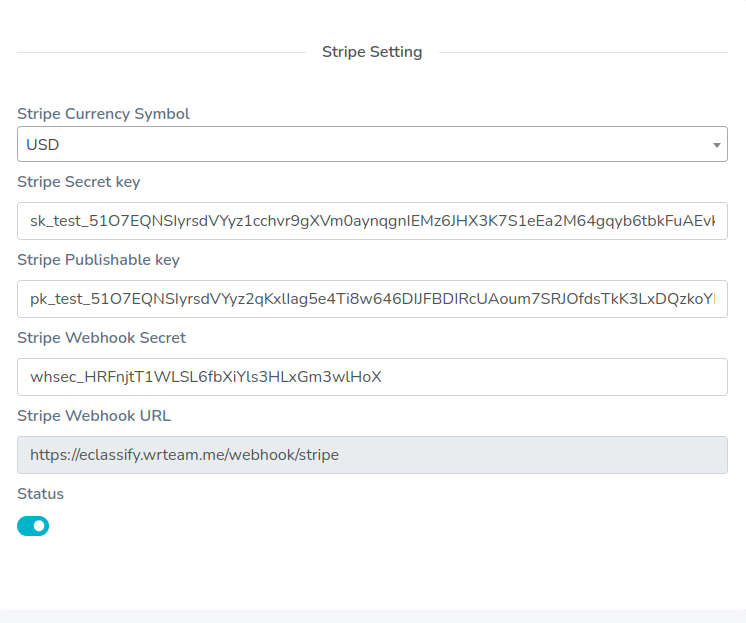
1. Webhook Configuration for Stripe
How to Setup latest Java jdk on windows
Setup JDK in your system
-
- If your System already have latest Java jdk installed then you can skip this step.
- Download latest Java jdk by clicking below link.
(JAVA jdk) - Download latest Java JDK for your version 32 bit or JDK download 64 bit.
-
- Please prefer video tutorials, we recommend this playlist for set environment variable for java in Windows 10 – https://www.youtube.com/watch?v=zzfHPGyjoWw
- Please prefer video tutorials, we recommend this playlist for set environment variable for java in Windows 11 – https://www.youtube.com/watch?v=zAyIqbBAUxQ
Setup flutter
Setup flutter in your system
-
- Visit flutter official website :
https://docs.flutter.dev/get-started/install
-
- for full install guide.
-
- If you prefer video tutorials, we recommend this playlist for the full installation process
https://www.youtube.com/playlist?list=PLSzsOkUDsvdtl3Pw48-R8lcK2oYkk40cm
How to change package name
- Unzip the downloaded code. After unzipping you will have Eclassify – Flutter Code zip folder. Unzip that folder and open it in Android Studio or Visual Studio Code.
- Open ide terminal go to your project path and execute command
flutter pub get
- If you are running this app for ios then run these following commands in terminal.
cd ios
pod install
cd ..
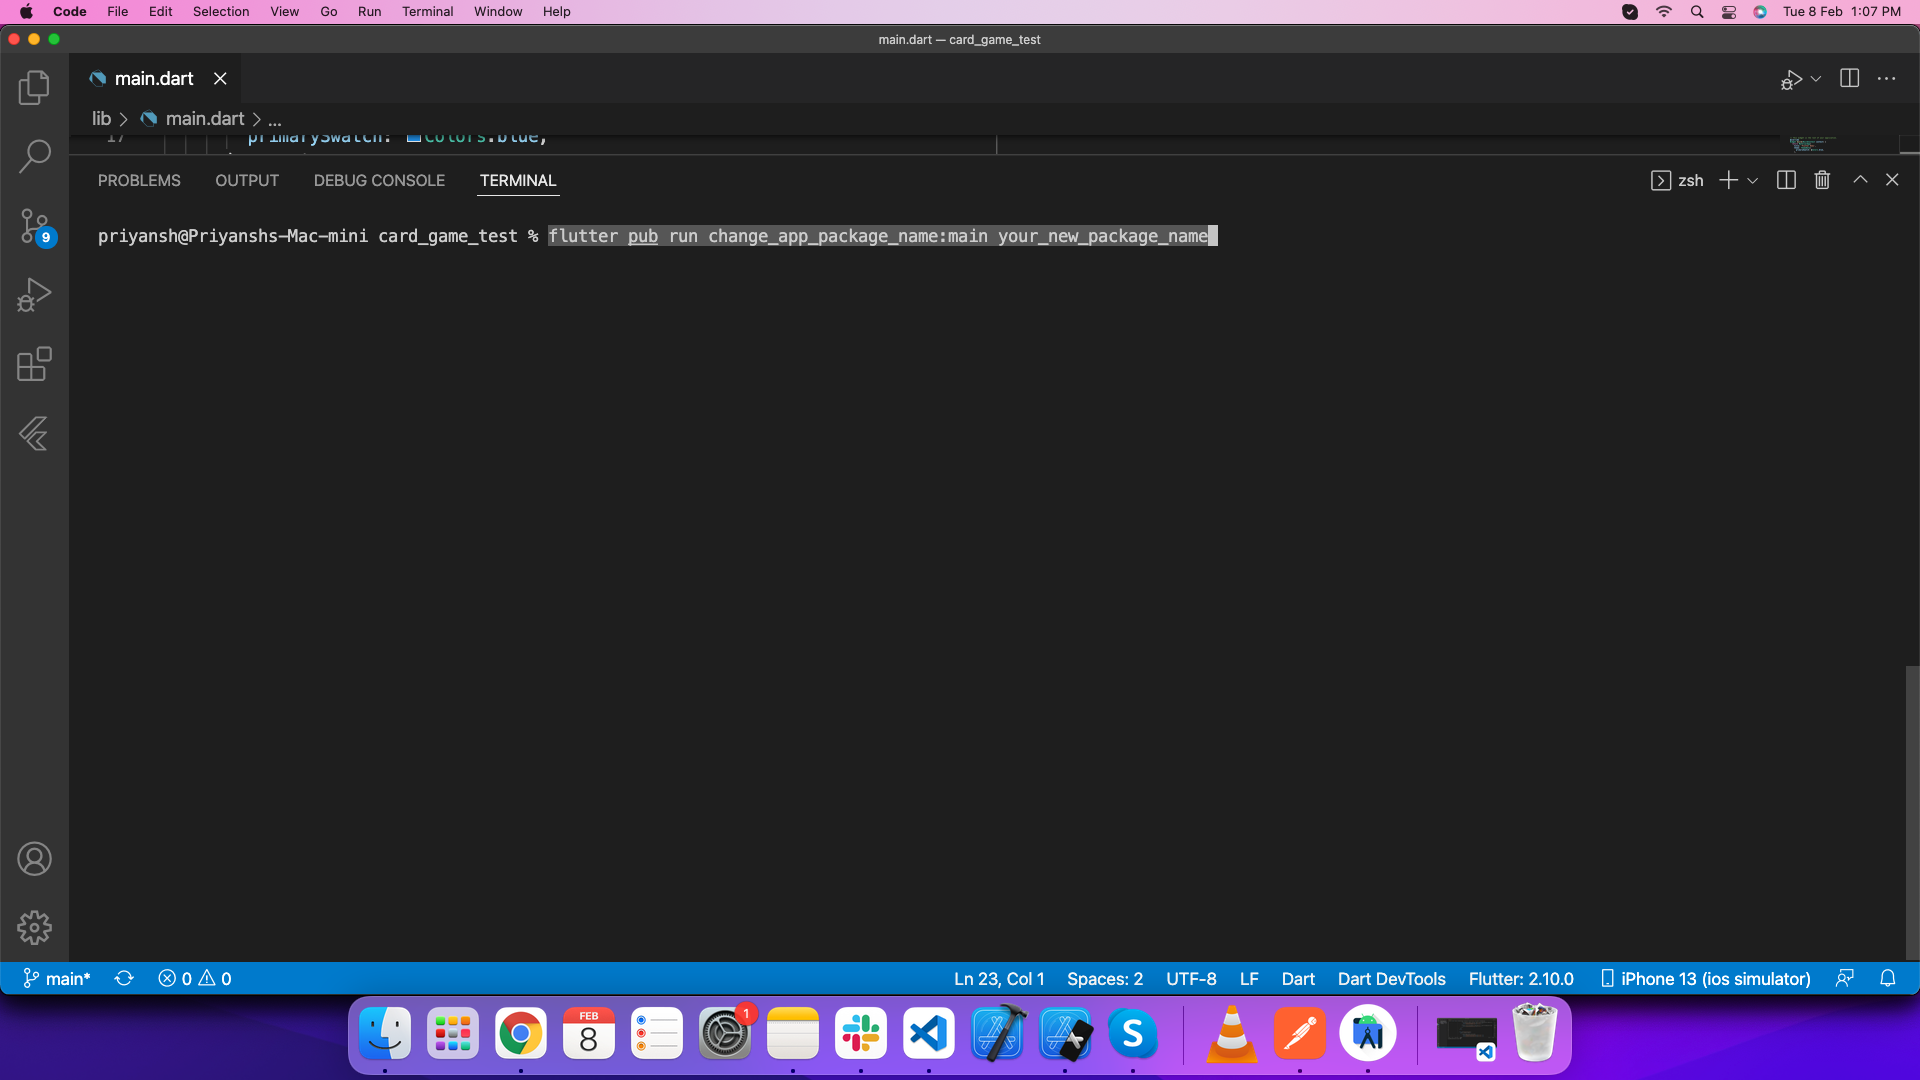
- Change package name of android app
Execute this command in your terminalflutter pub run change_app_package_name:main your_new_package_name
- Change package name of ios app
Open ios folder of this project in xcode. Go Select Runner->Targets->General->Identity and enter new package name in Build Identifier.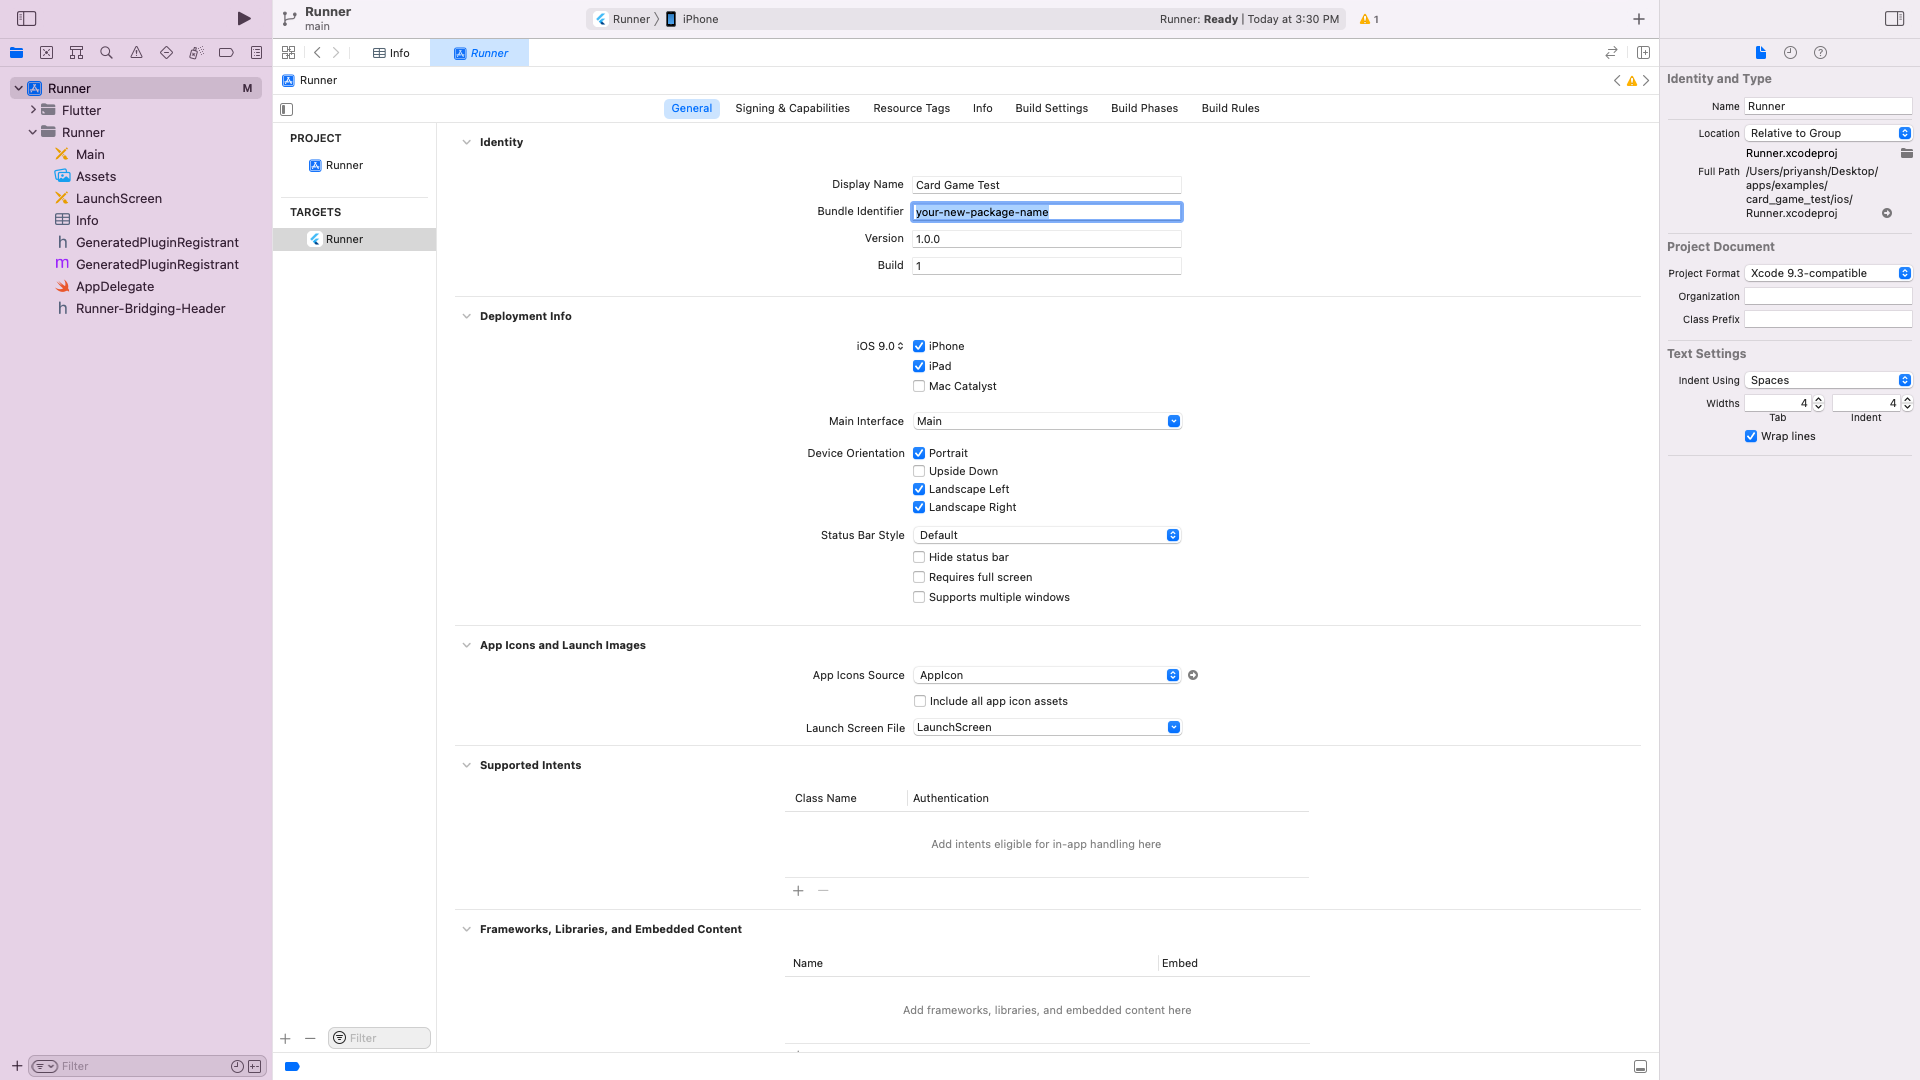
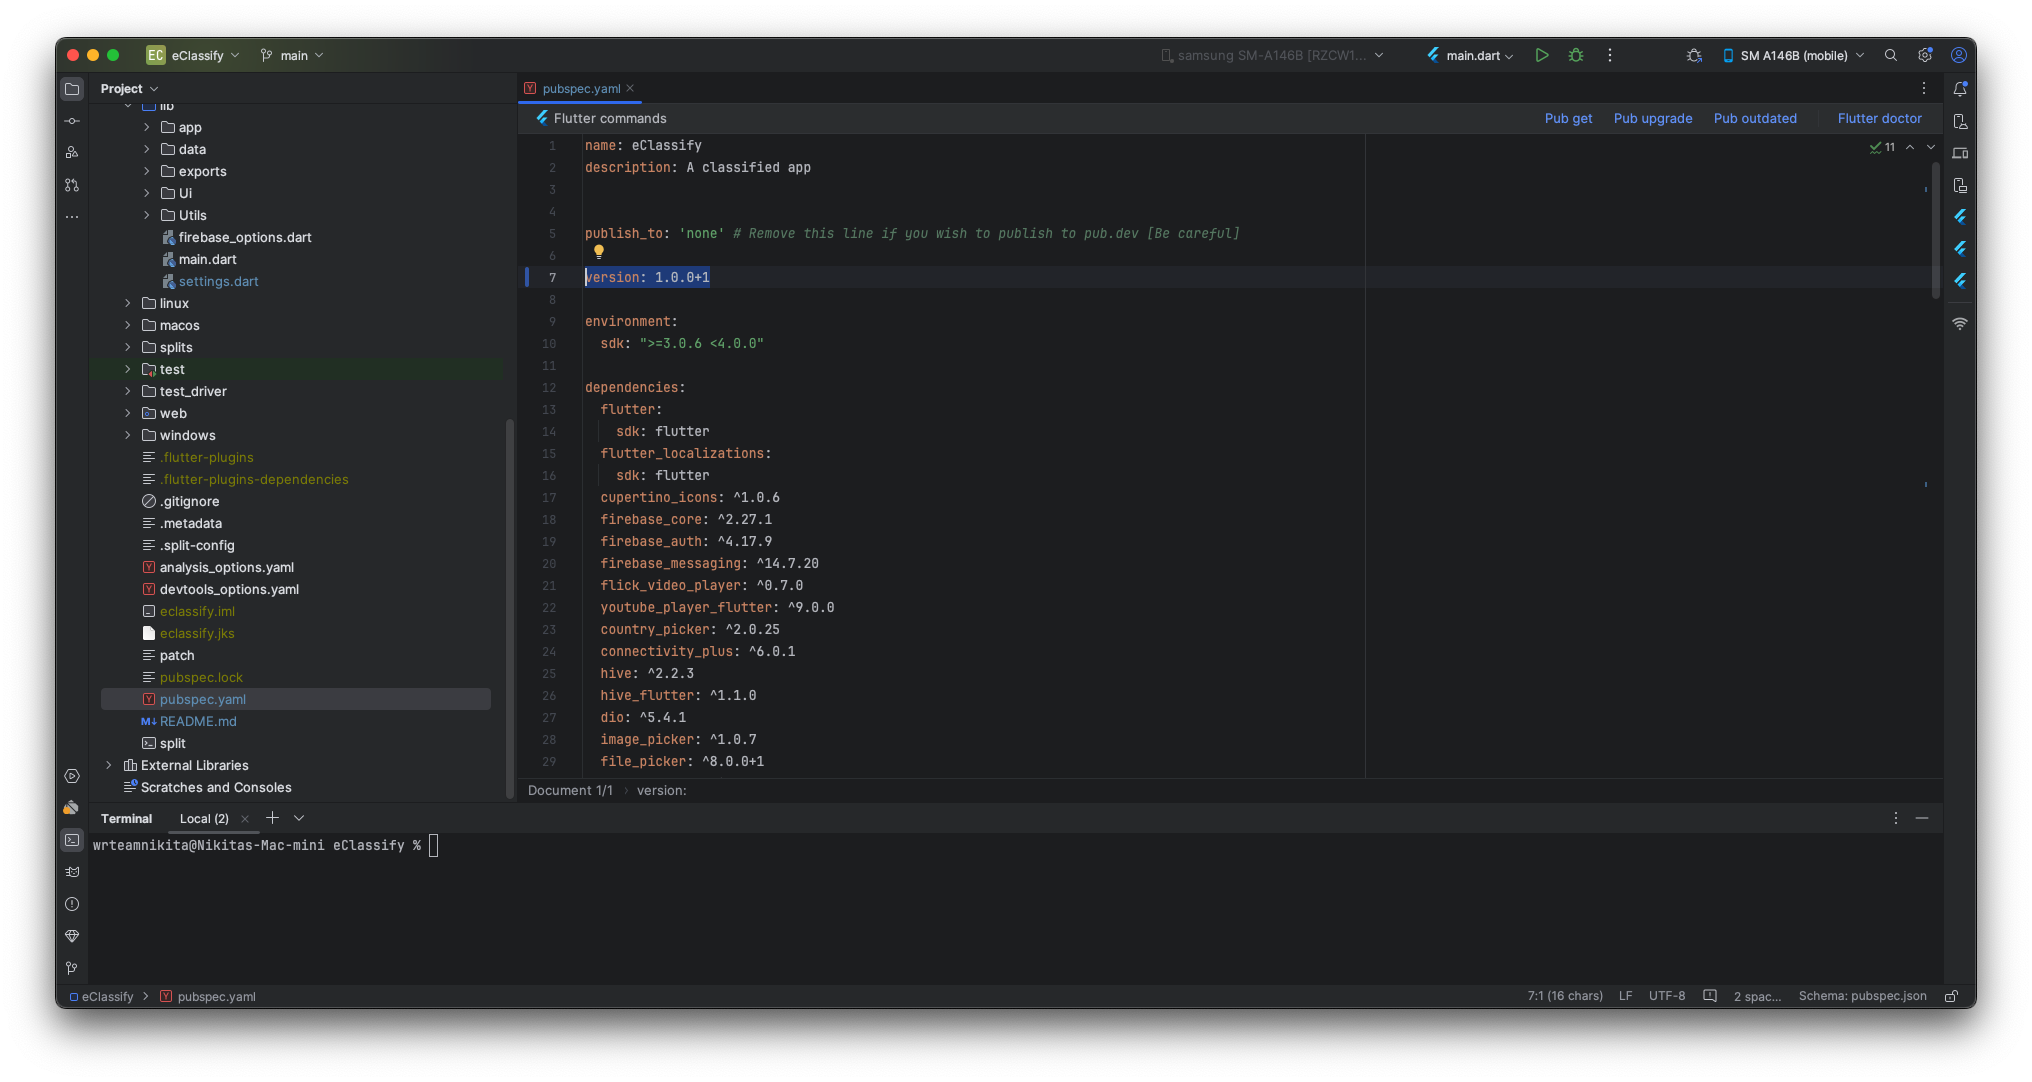
How to change app version
-
- Go to pubspec.yaml
- EX. Update version:A.B.C+X in pubspec.yaml.
- For Android:
- Do not forget to execute flutter packages get, flutter build or flutter run after this step
A.B.C represents the versionName such as 1.0.0. X (the number after the +) represents the versionCode such as 1, 2, 3, etc.
-
- For iOS
- A.B.C represents the CFBundleShortVersionString such as 1.0.0. X (the number after the +) represents the CFBundleVersion such as 1, 2, 3, etc.
- Do not forget to execute flutter packages get, flutter build or flutter run after this step

Integrate with firebase
-
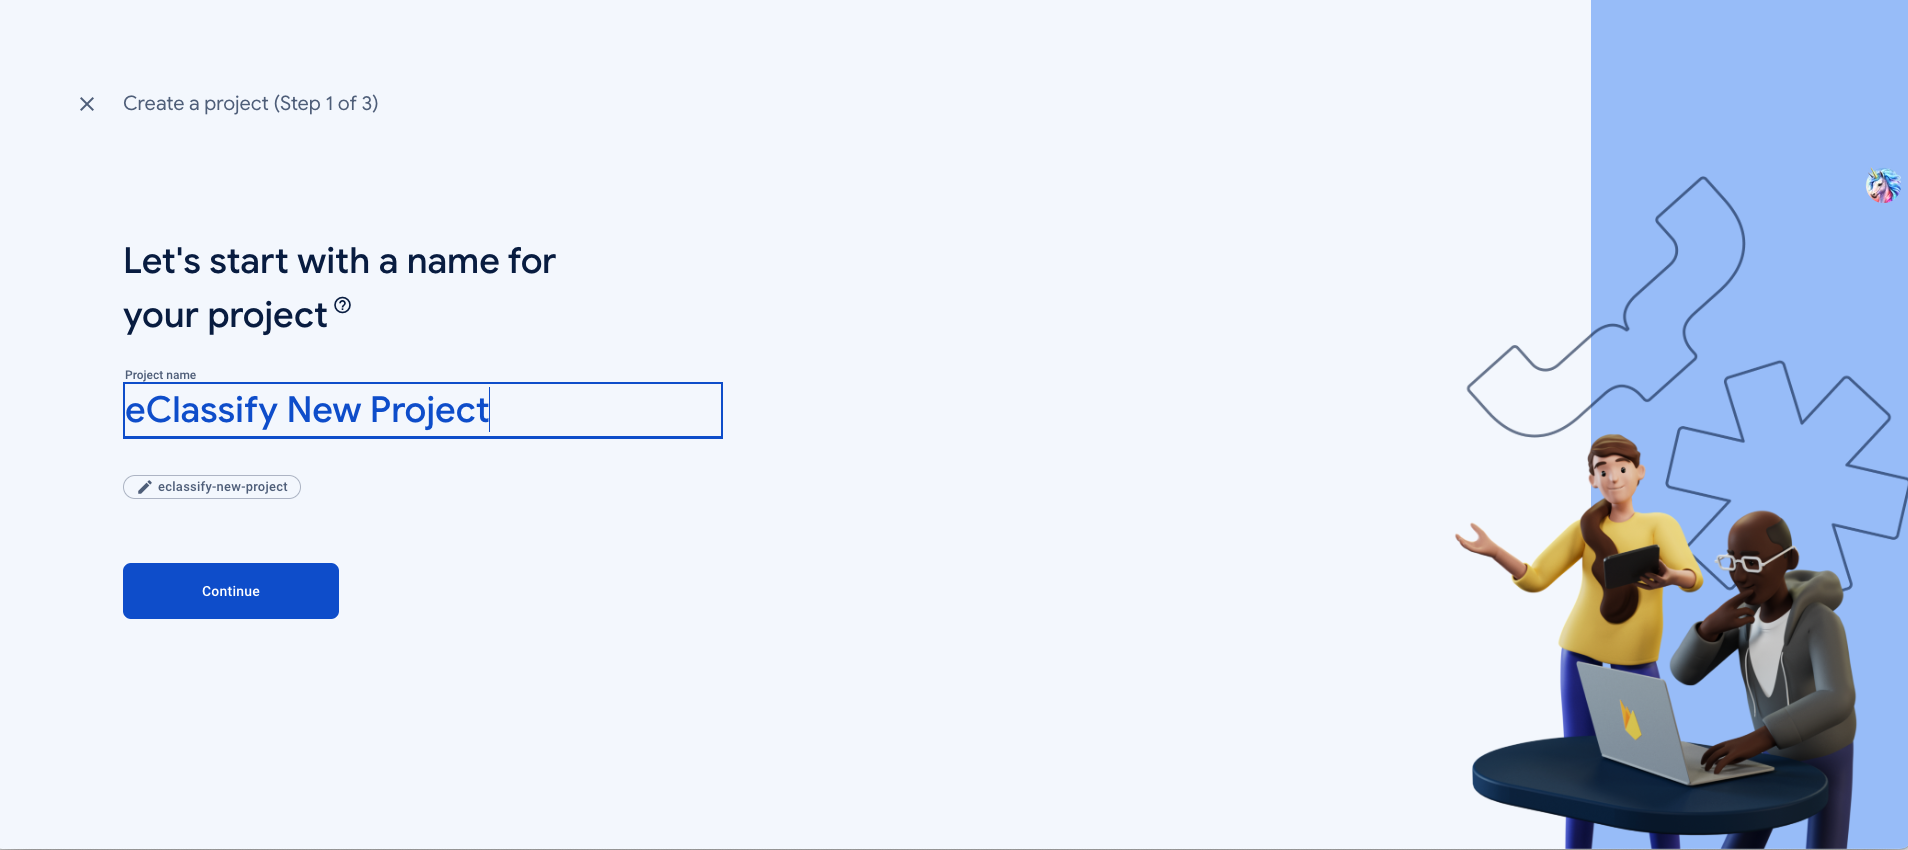
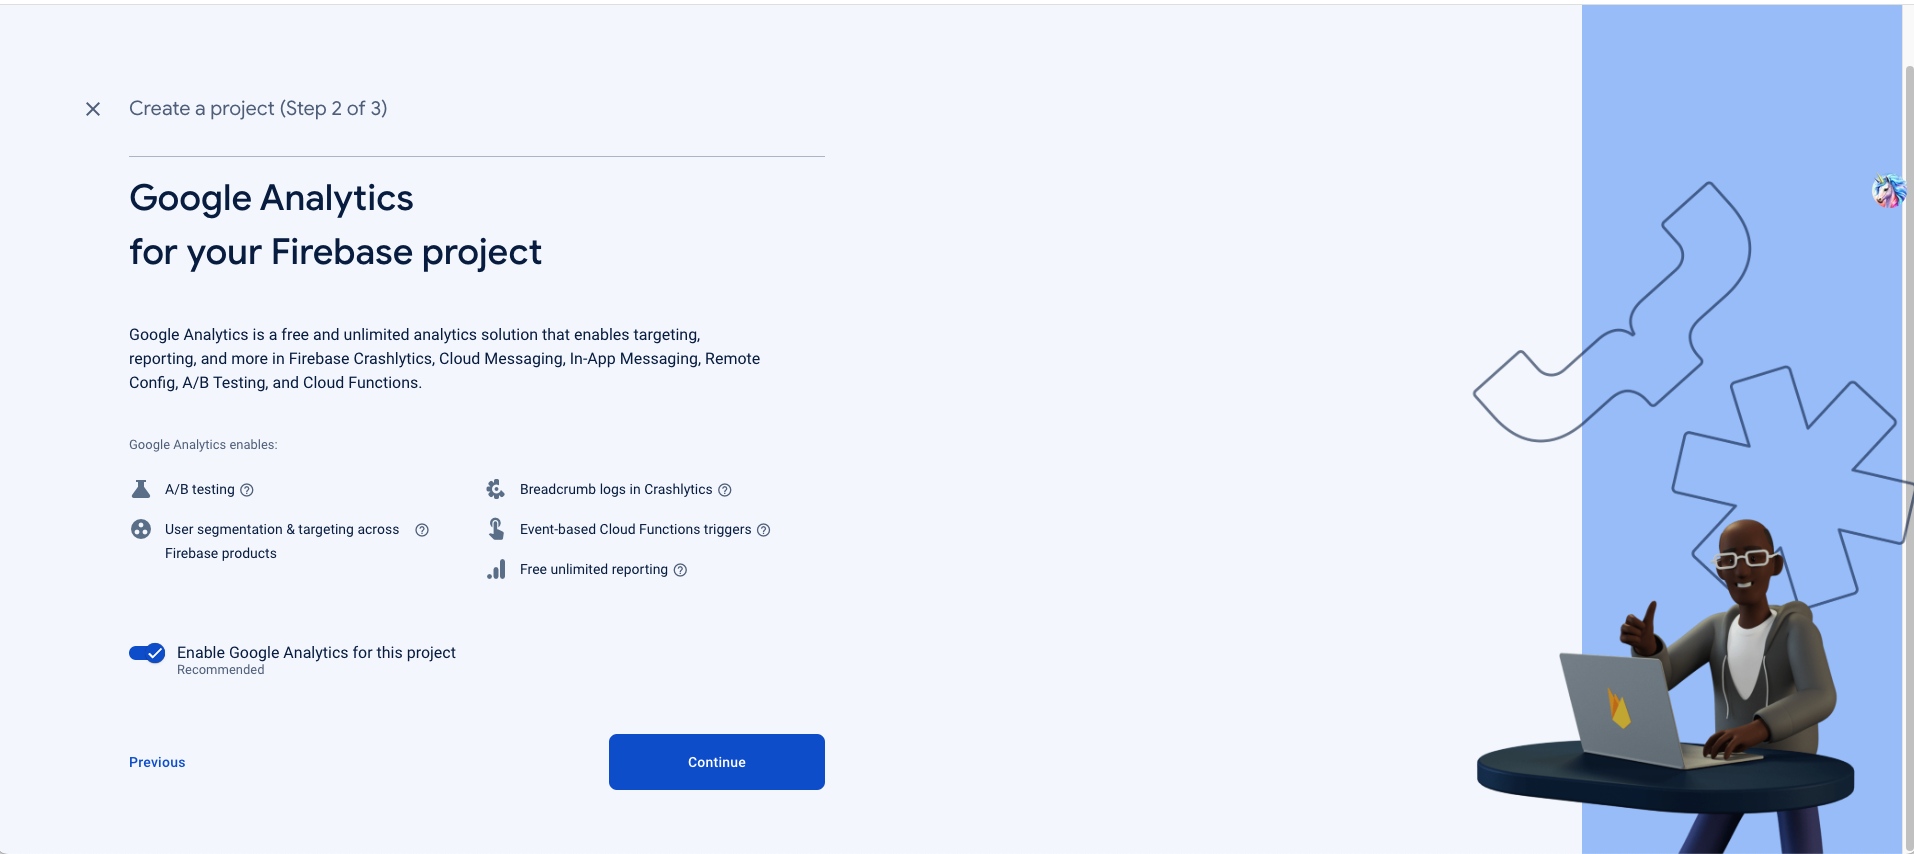
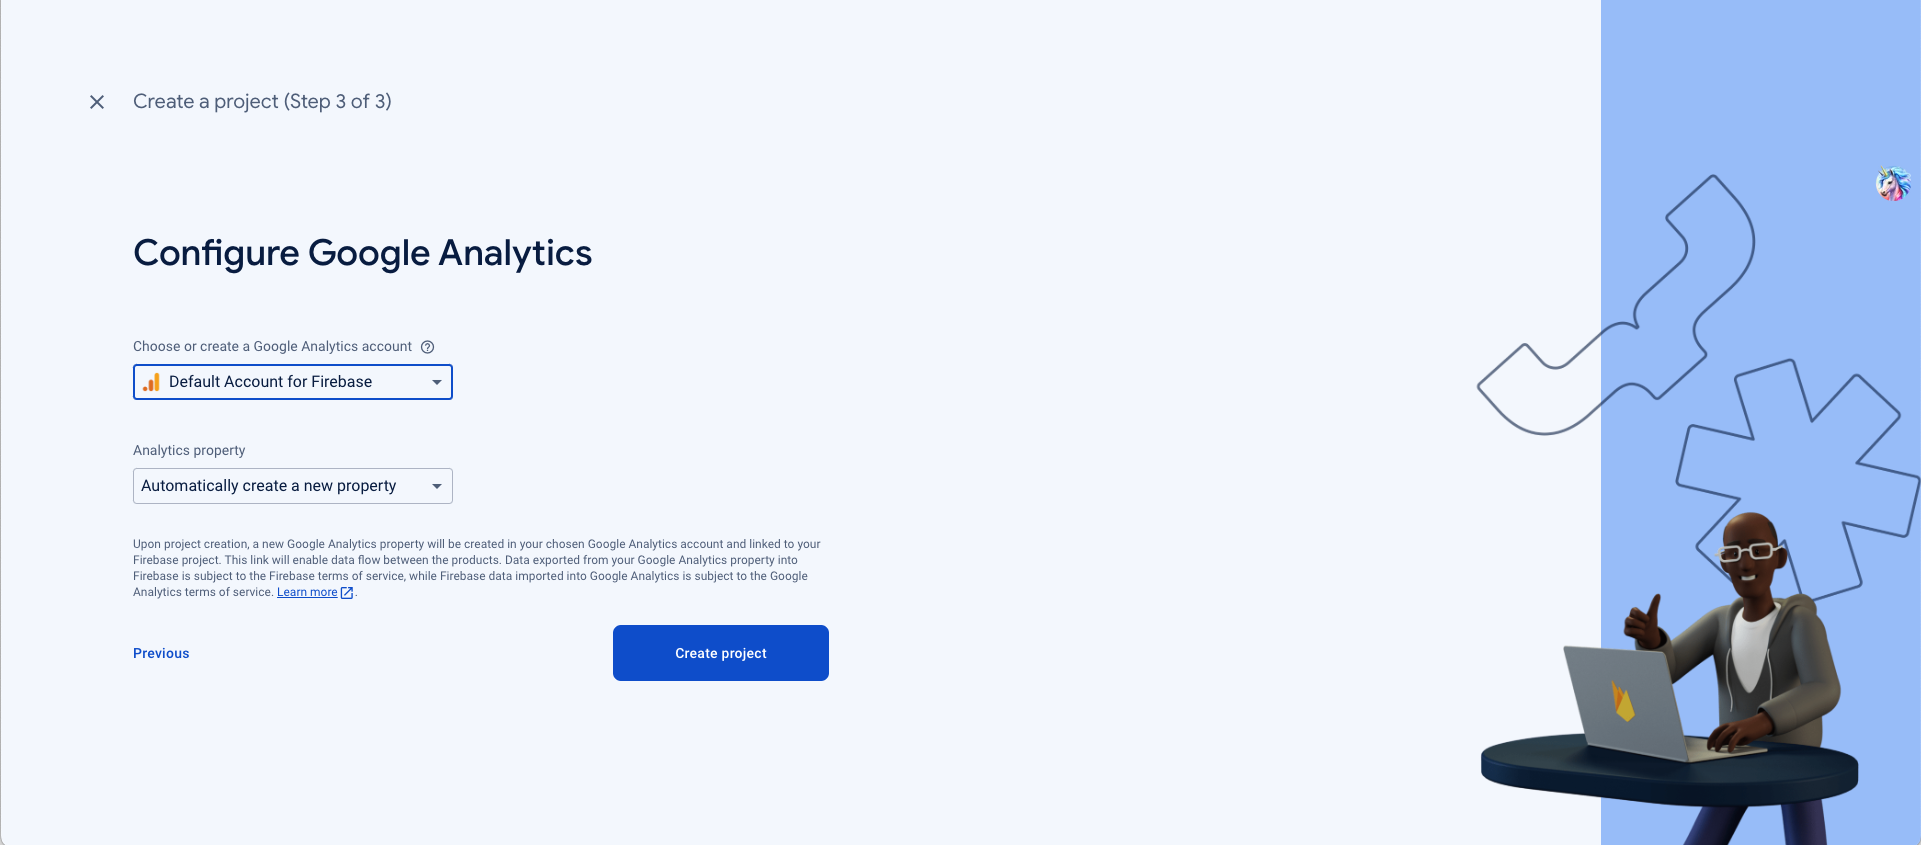
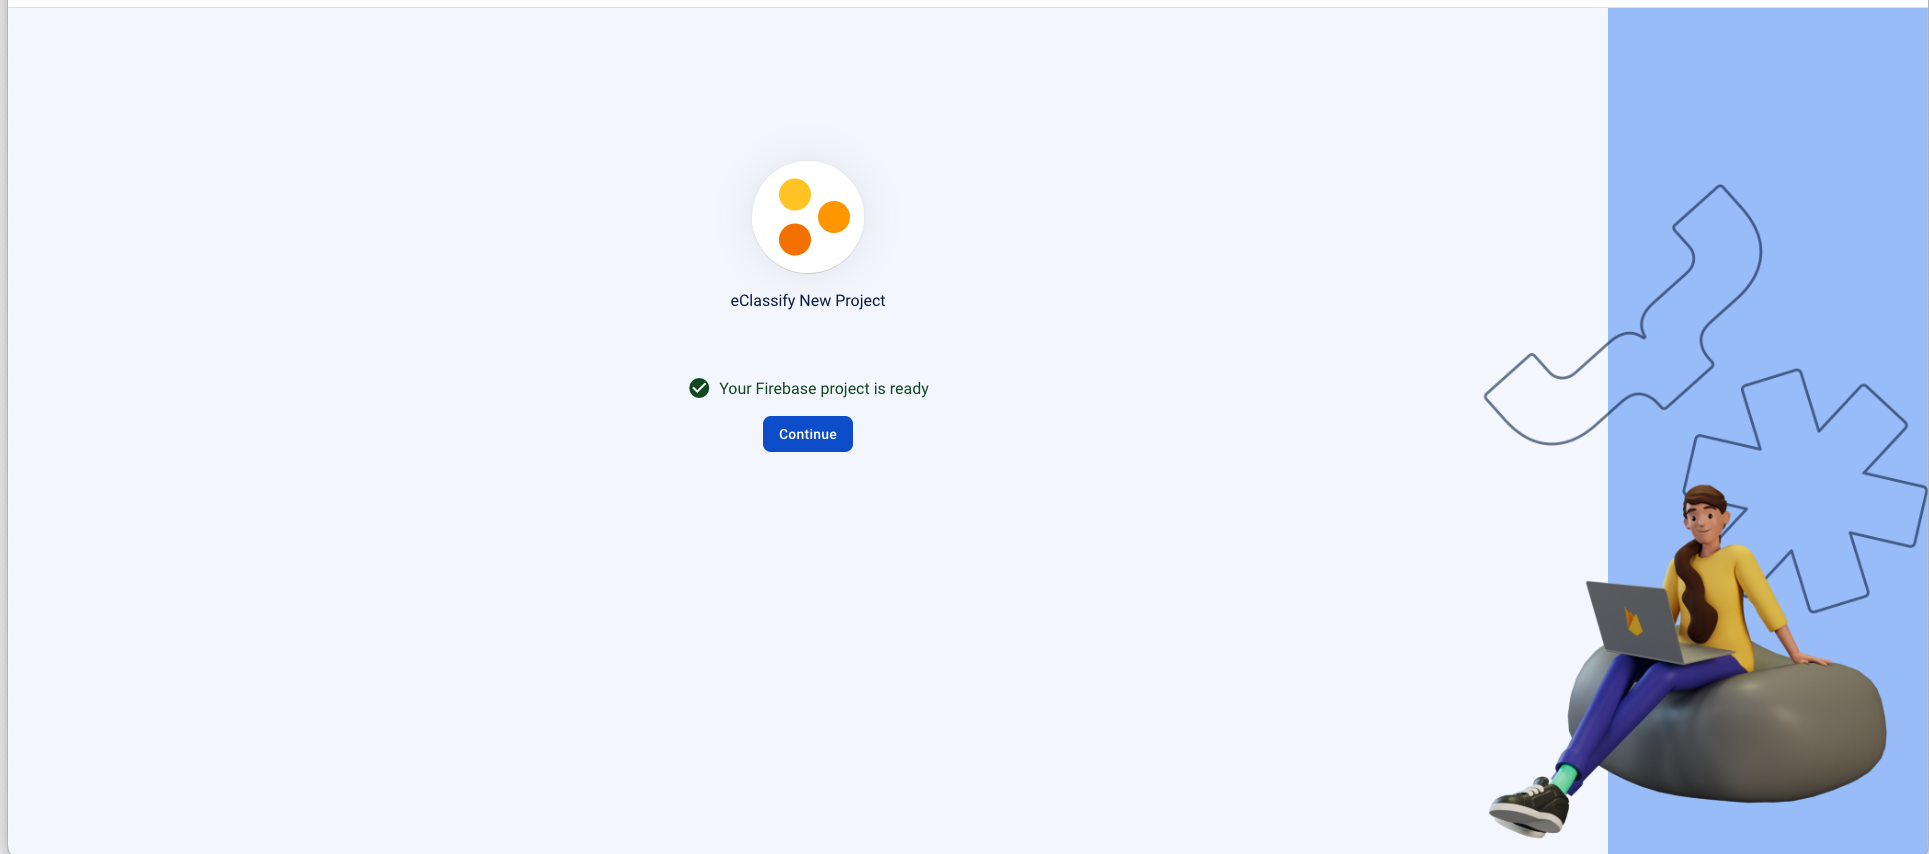
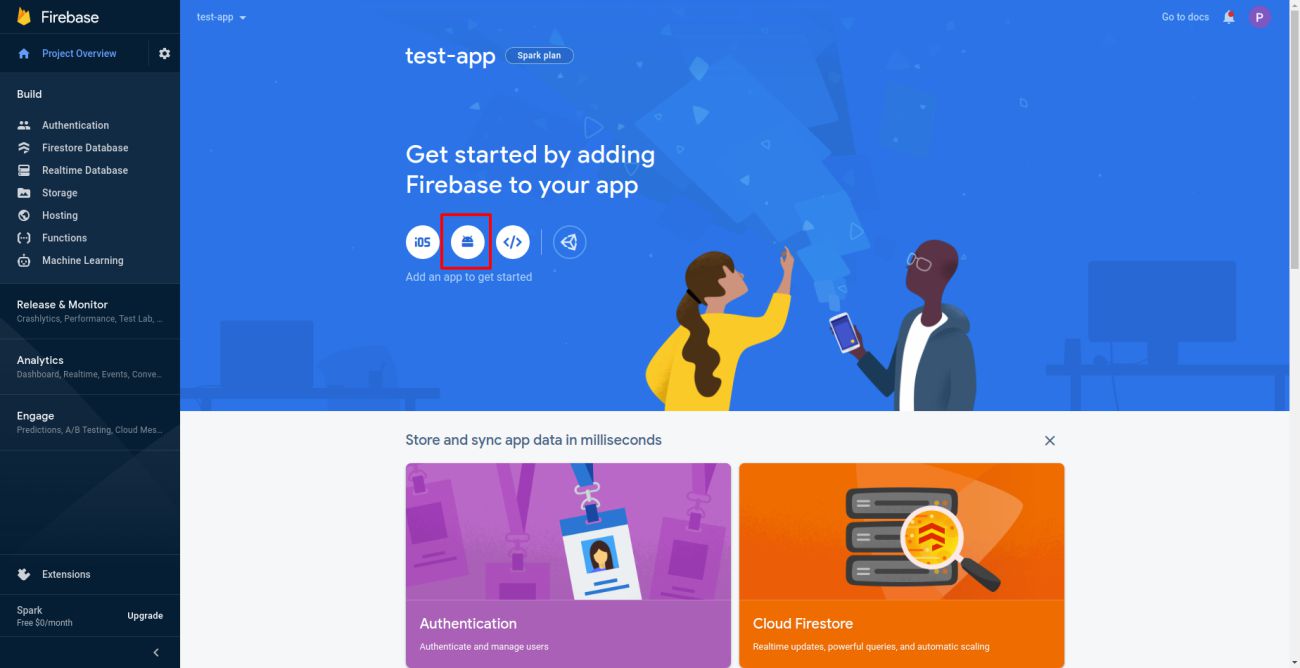
Create firebase project in your account:
-
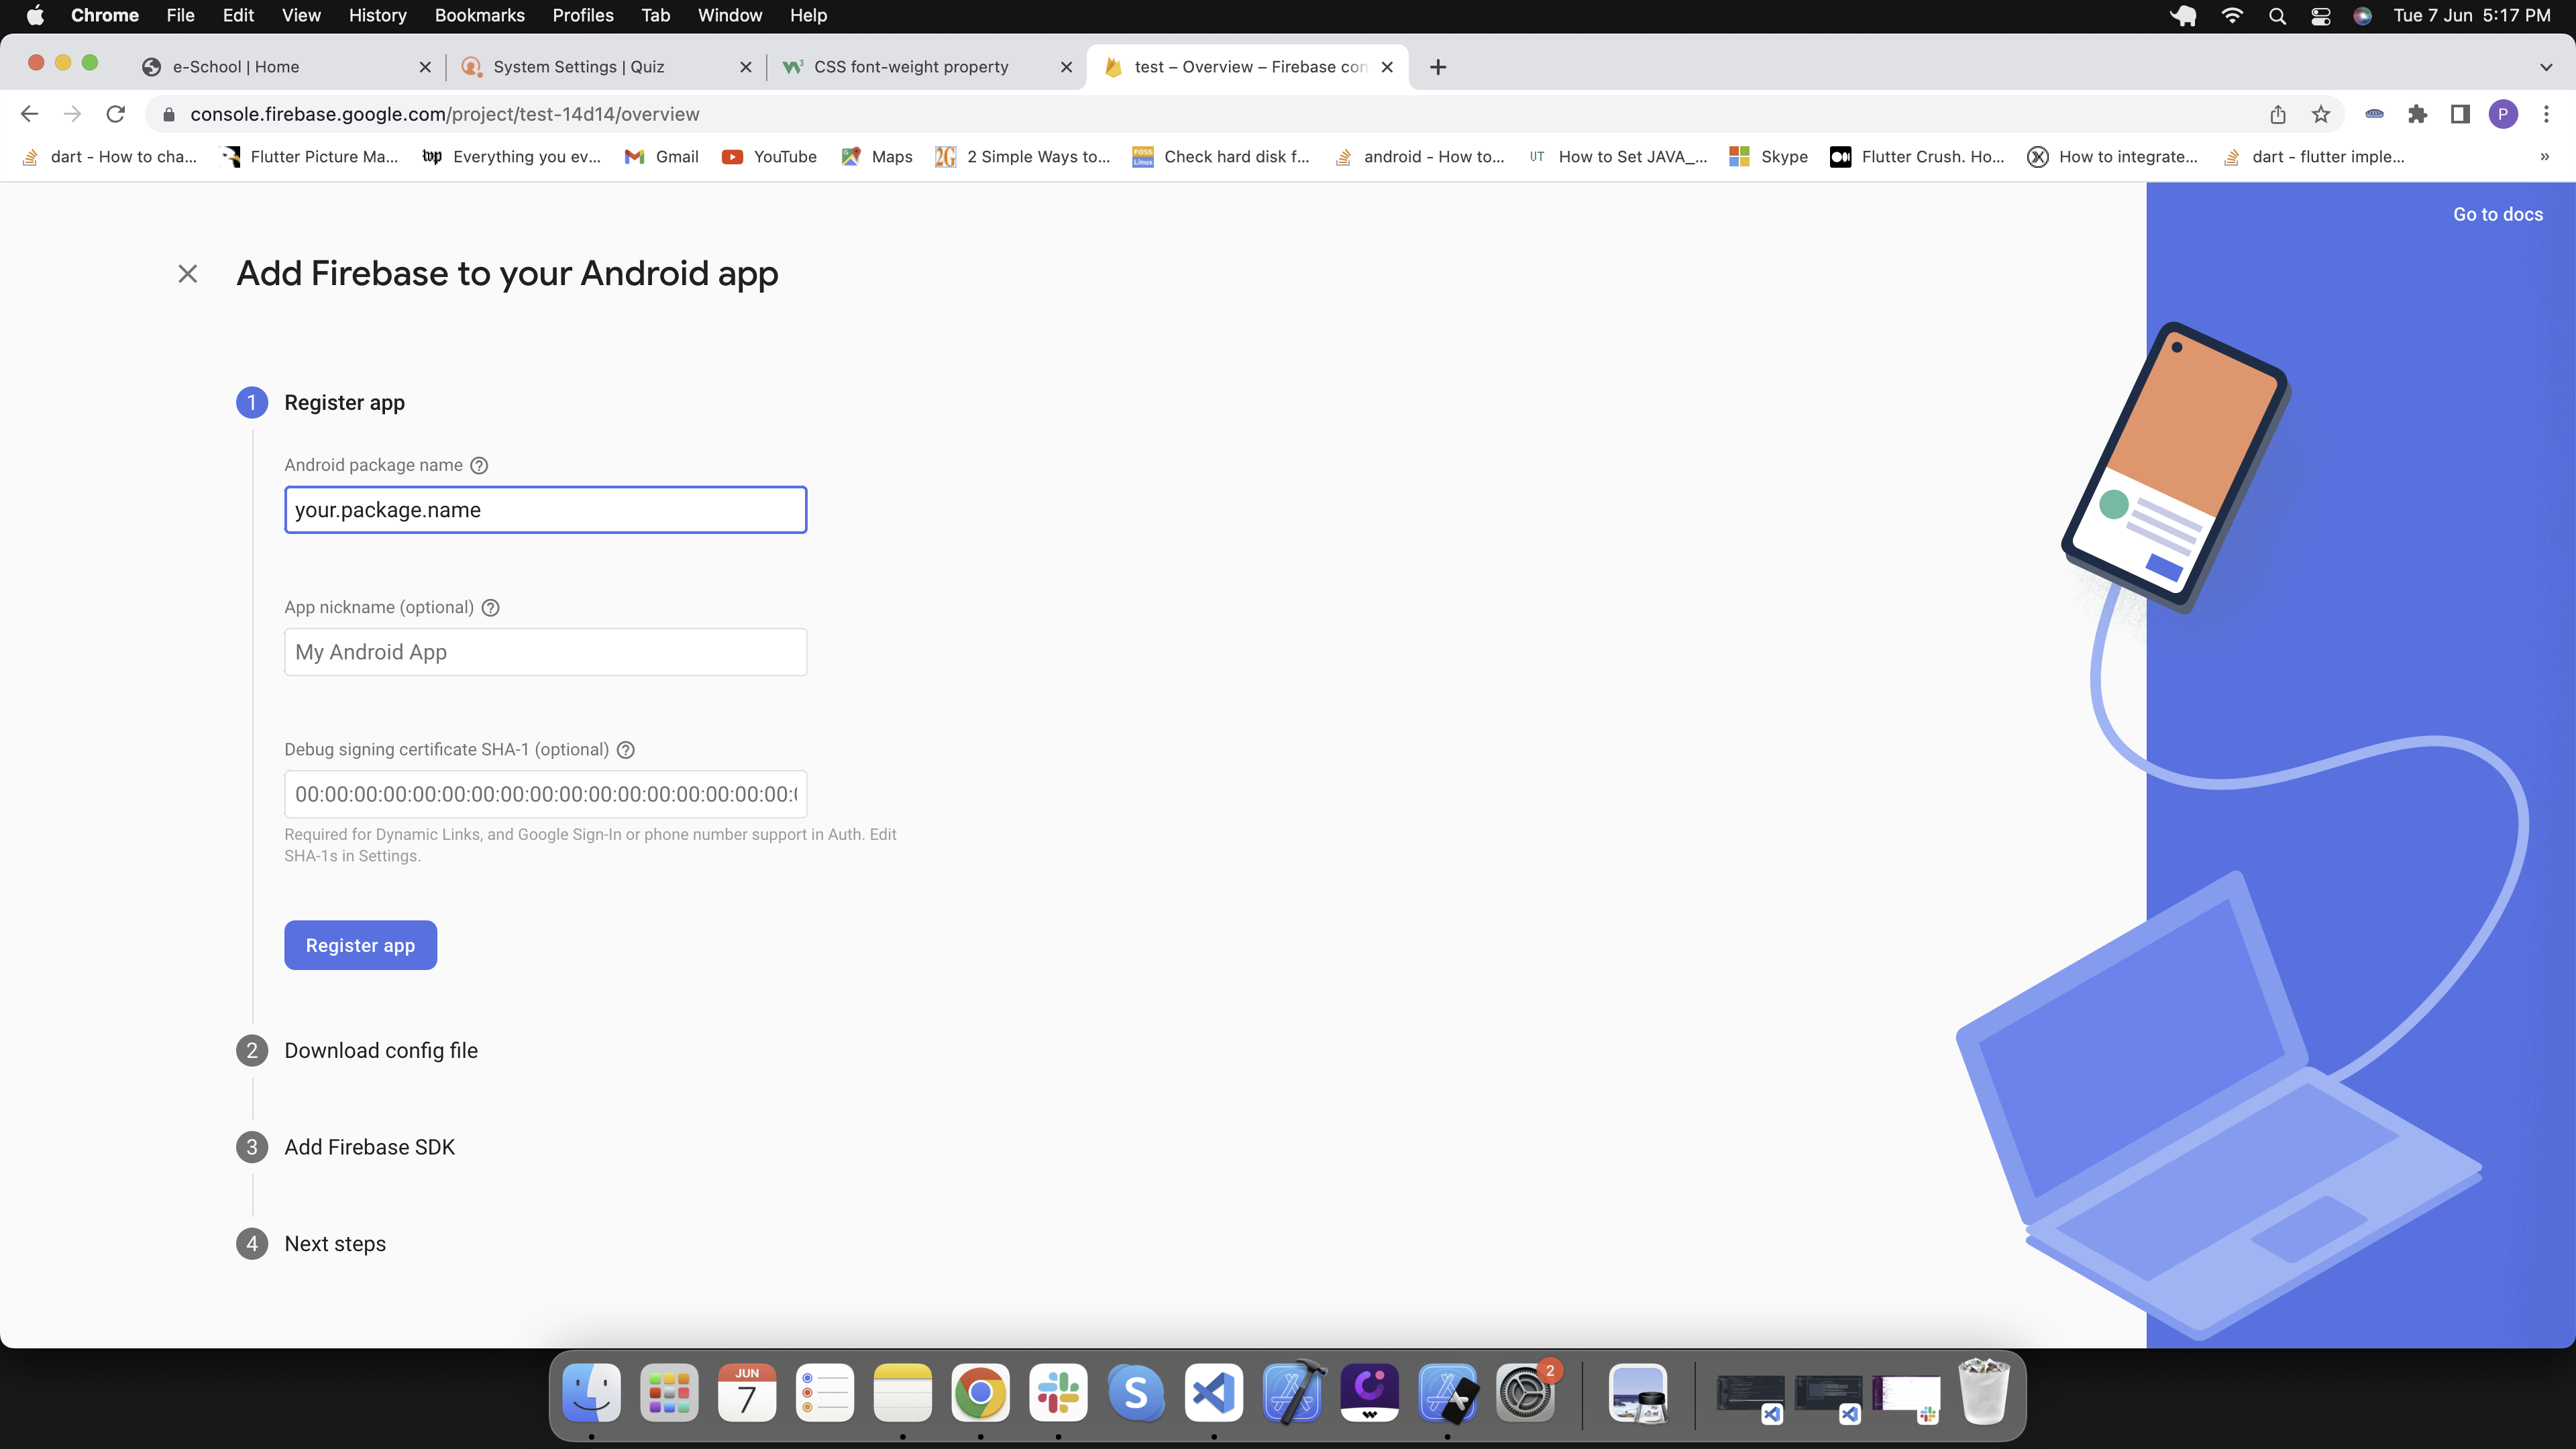
Add android application to your firebase project
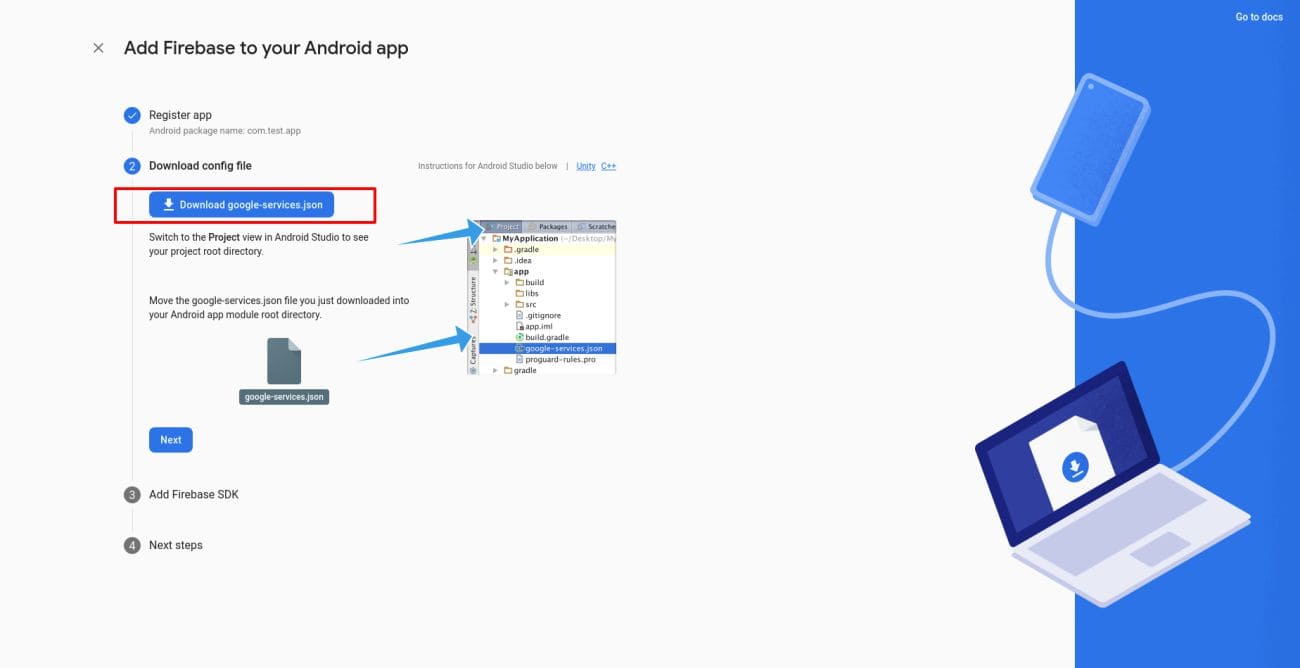
Download the google-service.json file and add in this folder android/app/
-
Add ios application to your firebase project
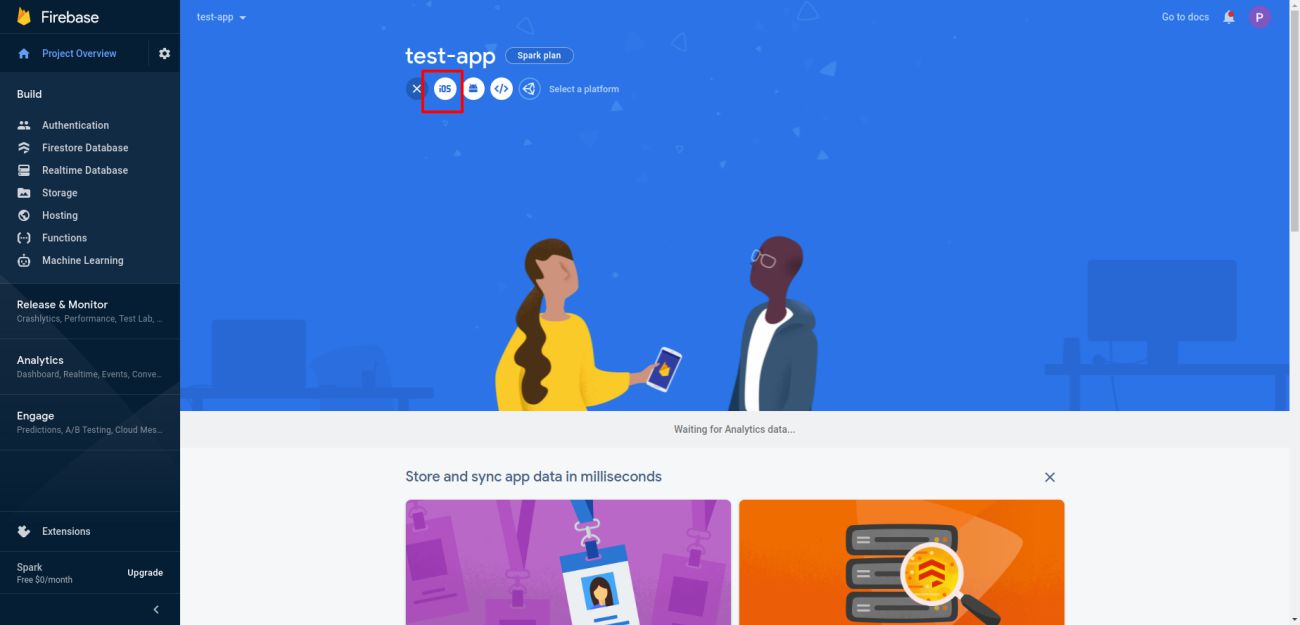
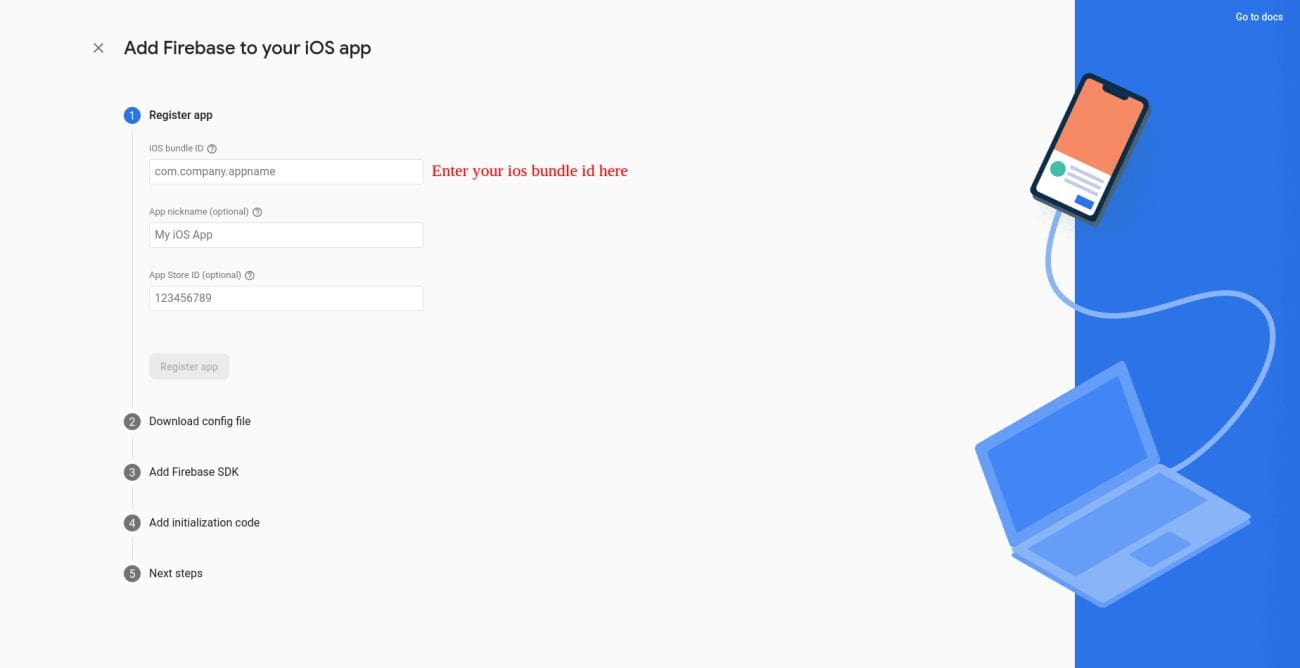
-
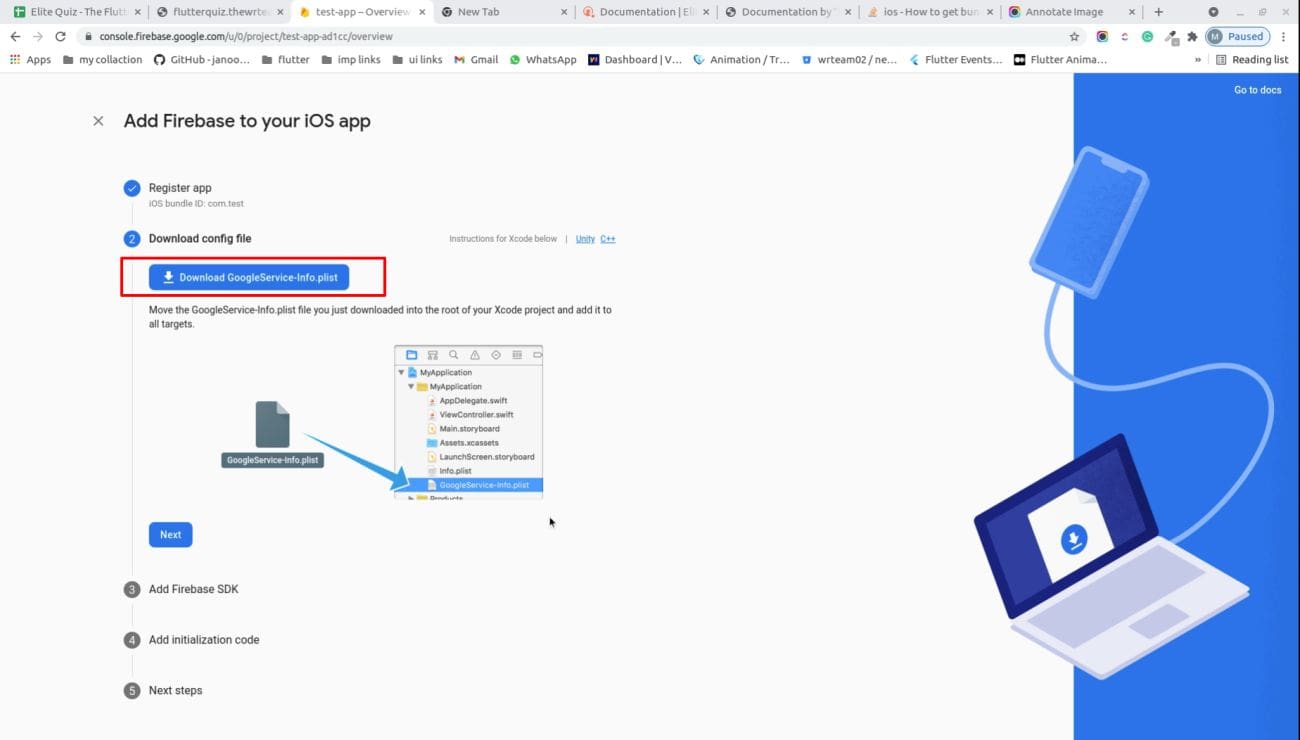
Download GoogleService-Info.plist and add in this folder ios/Runner/
-
Please configre this settings in-order to send ios notifications.
https://firebase.flutter.dev/docs/messaging/apple-integration
-
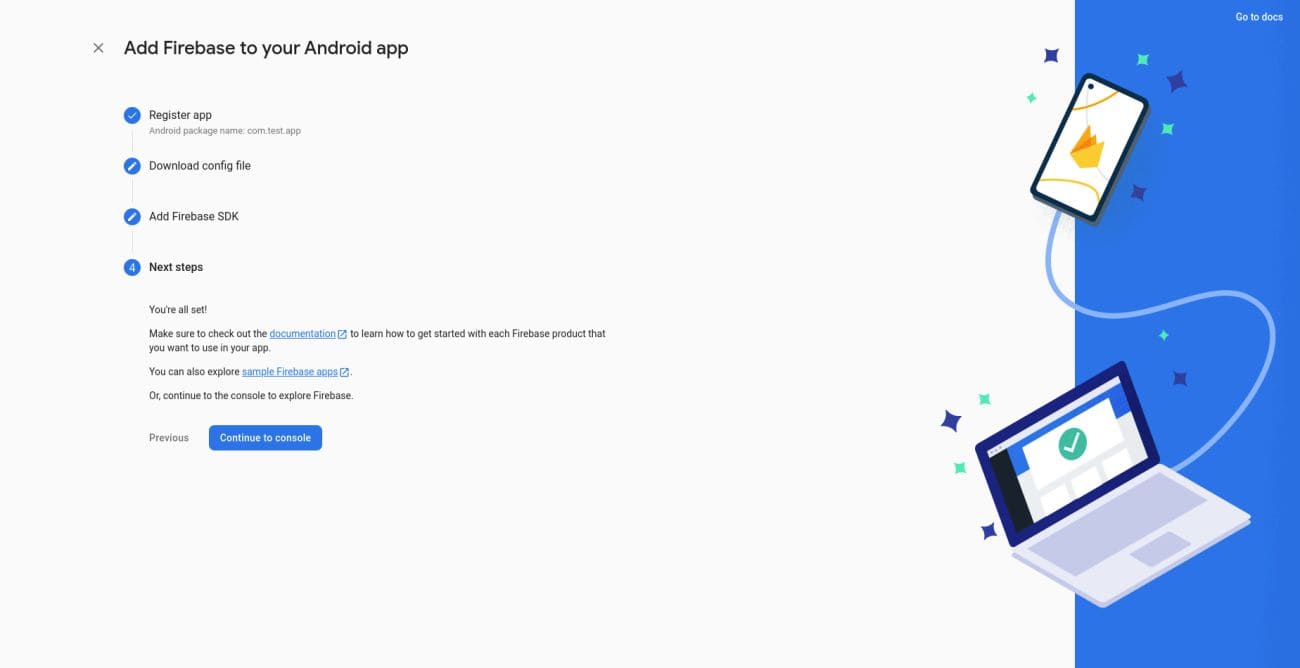
You have configured firebase in your project successfully.
Note:
You can configure firebase with flutter project through these steps: https://firebase.google.com/docs/flutter/setup
How to enable Firebase Phone Authentication(OTP).
-
- Open your firebase console.
- Go to Authentication and open Sign-in method.
- Enable Phone Sign-in method and save.

-
- Now, we have to add sha1 and sha256 key in firebase, for that perform below given step.
How to get Debug SHA Keys?
-
- Open terminal and copy these both commands run below command one by one for getting debug sha keys
- cd android
- ./gradlew signingReport
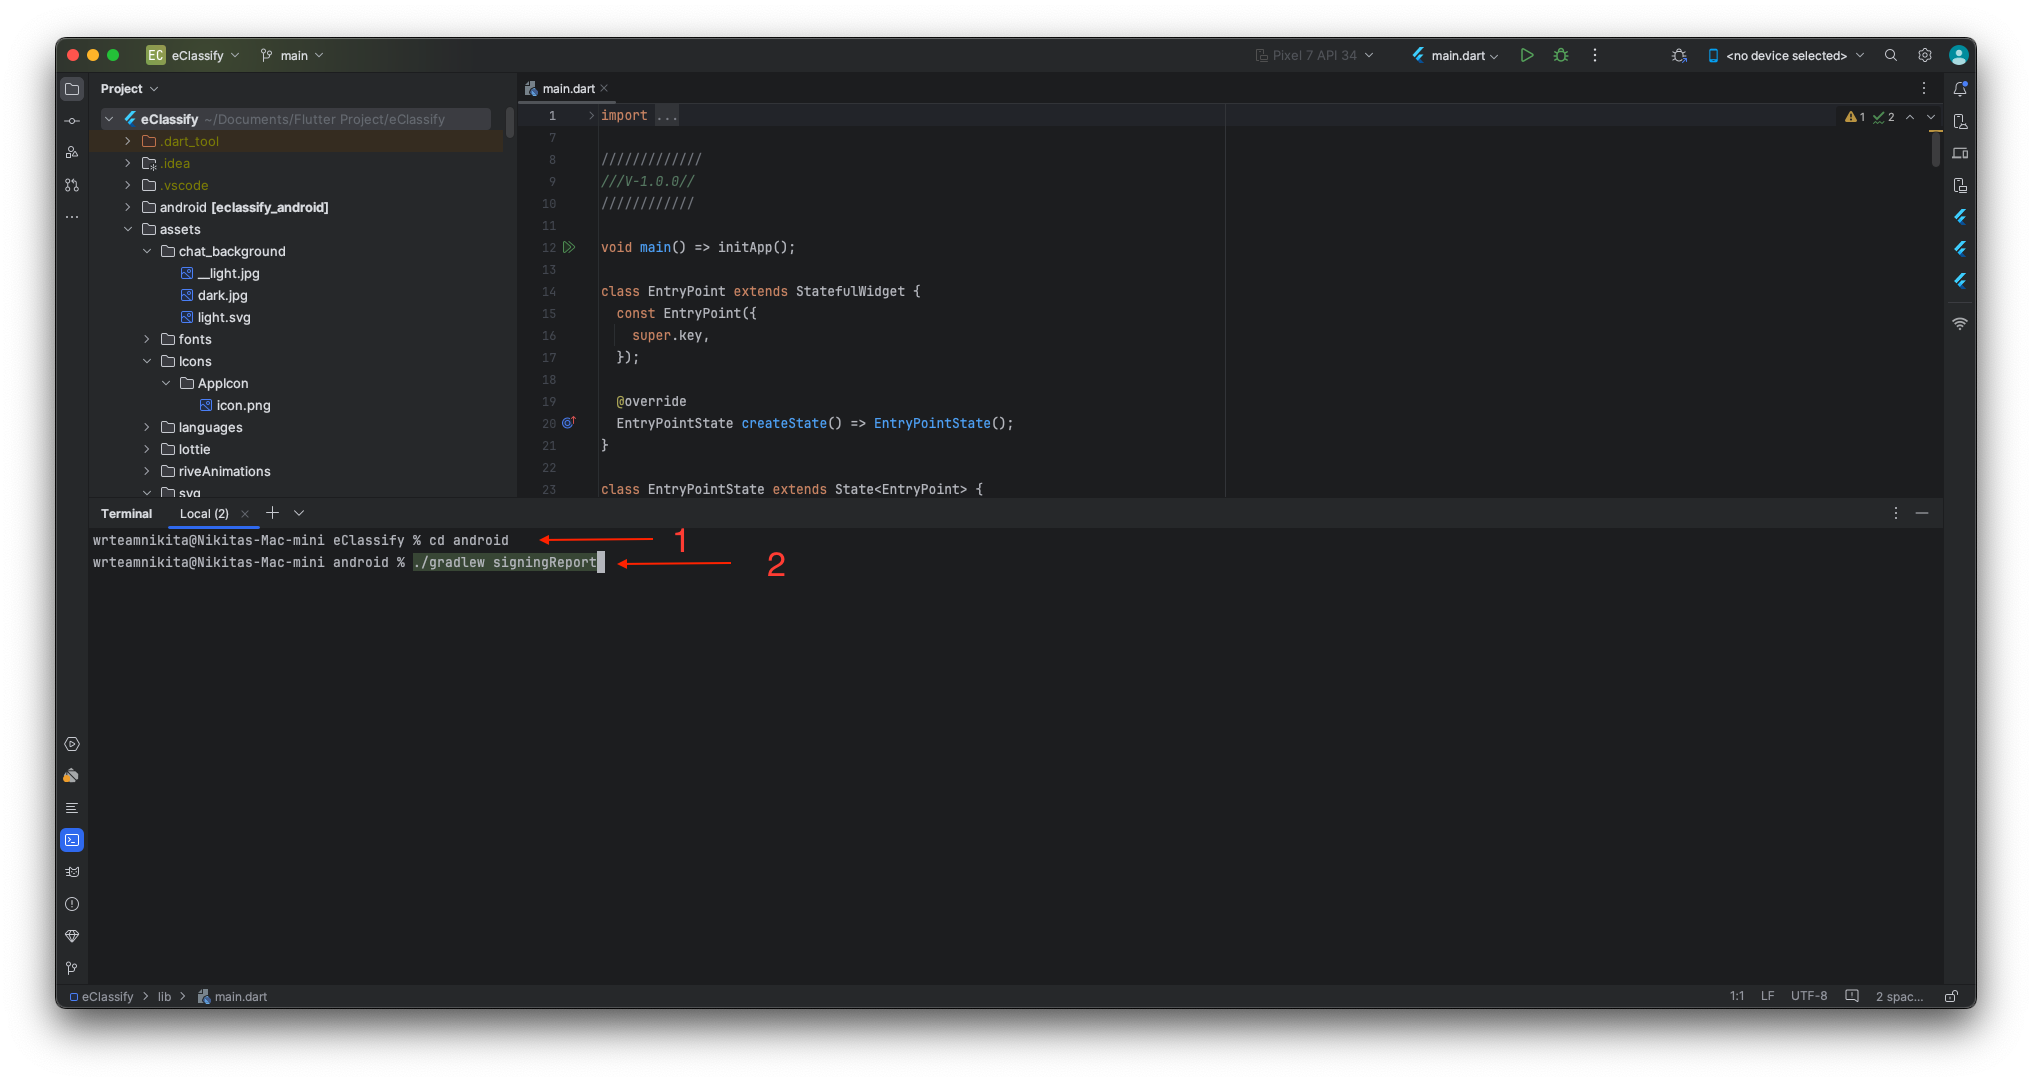
- After ran those command you can get debug sha keys in terminal as below image.
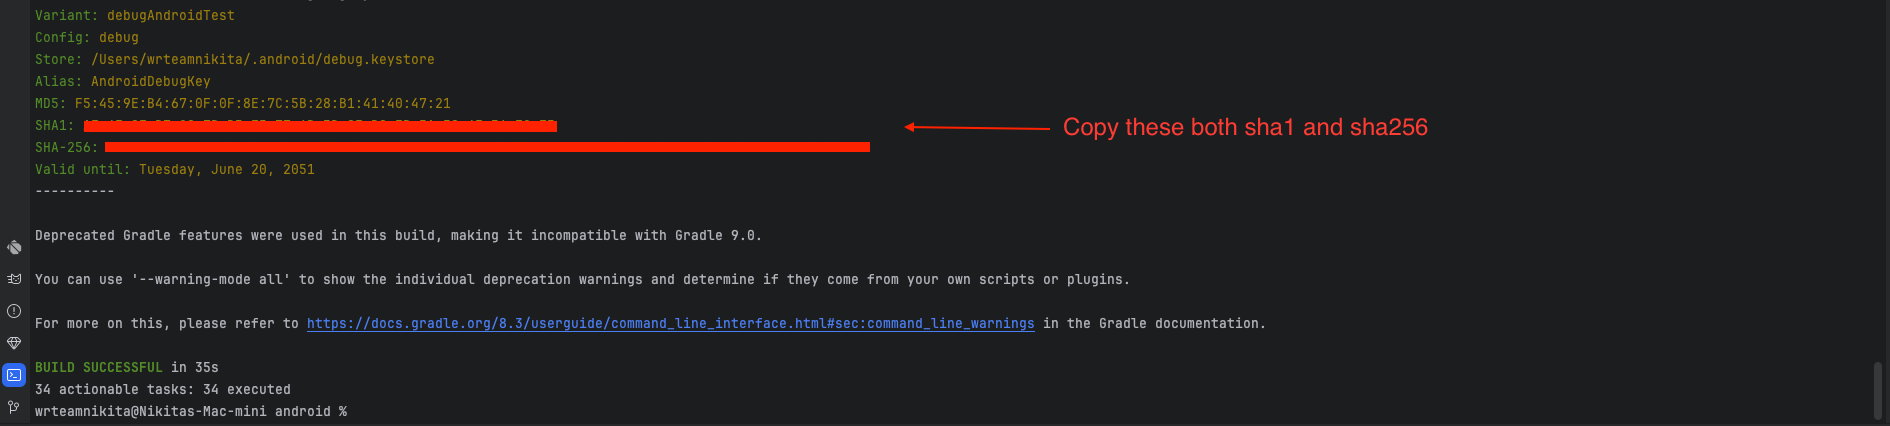
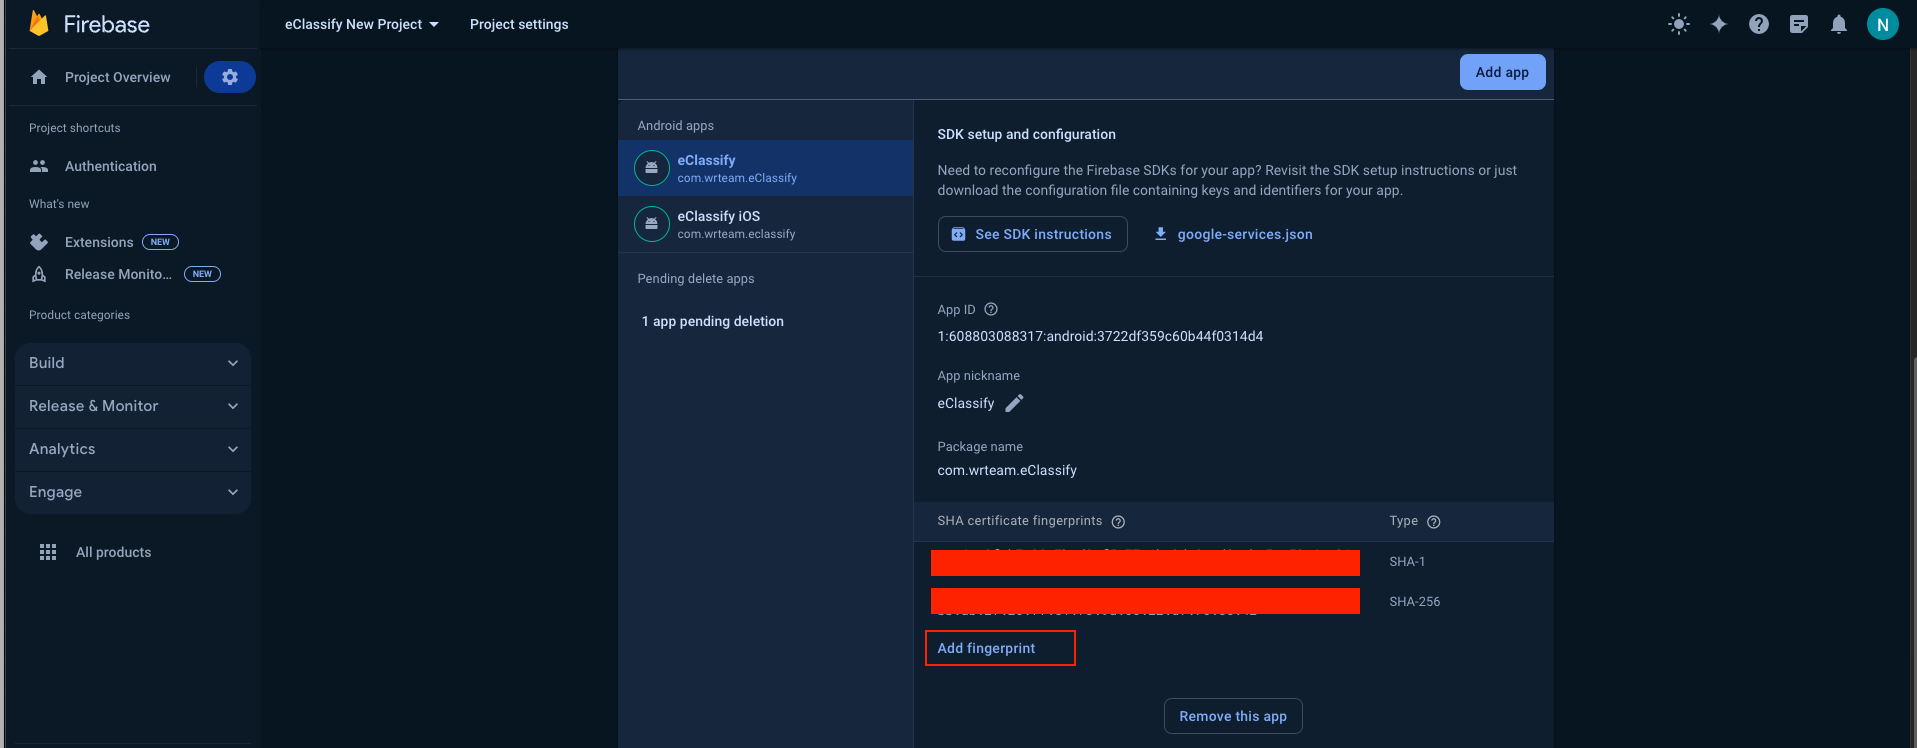
- Now copy debug SHA-1 and SHA-256 both and add it in firebase console as below image.
How to get Release SHA Keys?
Remember:
- When we are releasing apk then we need to add release sha in firebase panel otherwise otp will not work.
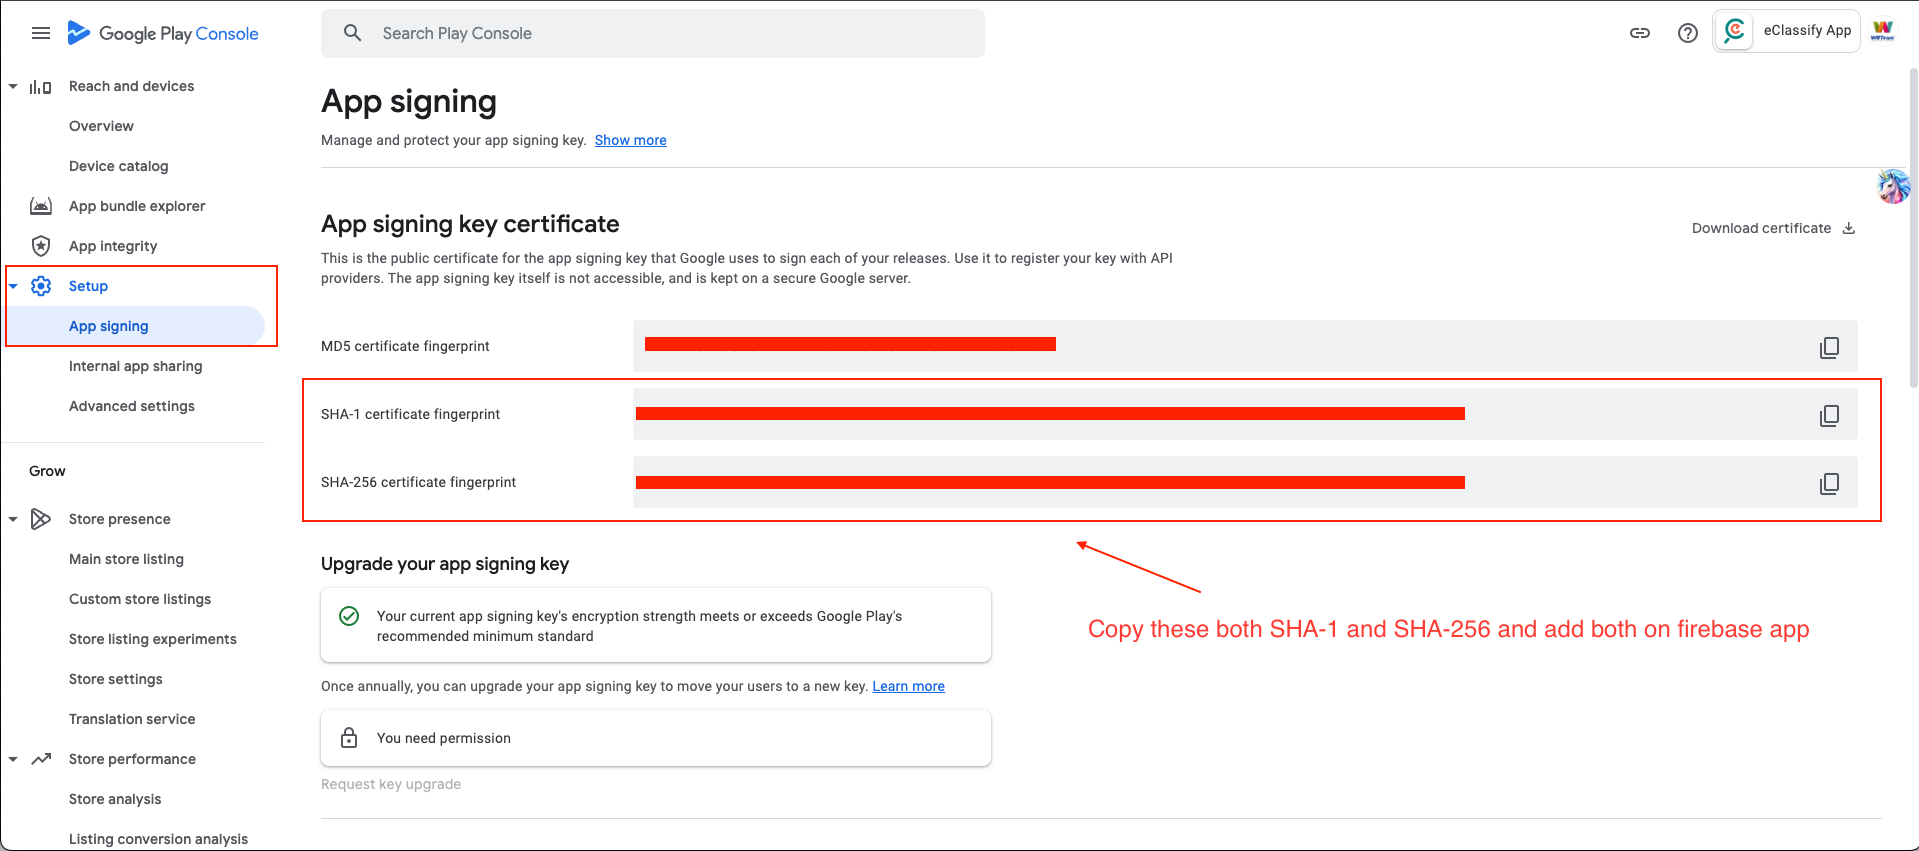
- after release you can get sha from play console here
- or another way you can also get release sha from below given command in terminal
- If you have already created keystore file then do below steps otherwise first create keystore file through these steps :: Create KeyStore File
- Then here edit this command and replace your keystore path and alias in this command keytool -list -v -keystore “D:\keystore\eclassify.jks” -alias eclassify
- Then it will ask for password. Enter password and then it will show your release SHA-1 and SHA-256 keys..
- Copy these both keys and add on firebase app.

For iOS:
Add custom URL schemes to your Xcode project:
-
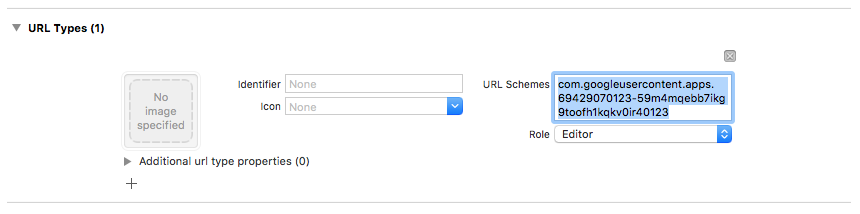
- Open your project configuration: double-click the project name in the left tree view. Select your app from the TARGETS section, then select the Info tab, and expand the URL Types section.
- Click the + button, and add a URL scheme for your reversed client ID. To find this value, open the GoogleService-Info.plist configuration file, and look for the REVERSED_CLIENT_ID key. Copy the value of that key, and paste it into the URL Schemes box on the configuration page. Leave the other fields blank.
- When completed, your config should look something similar to the following (but with your application-specific values):
-
- Same as open your project configuration: double-click the project name in the left tree view. Select your app from the TARGETS section, then select the Info tab, and expand the URL Types section.
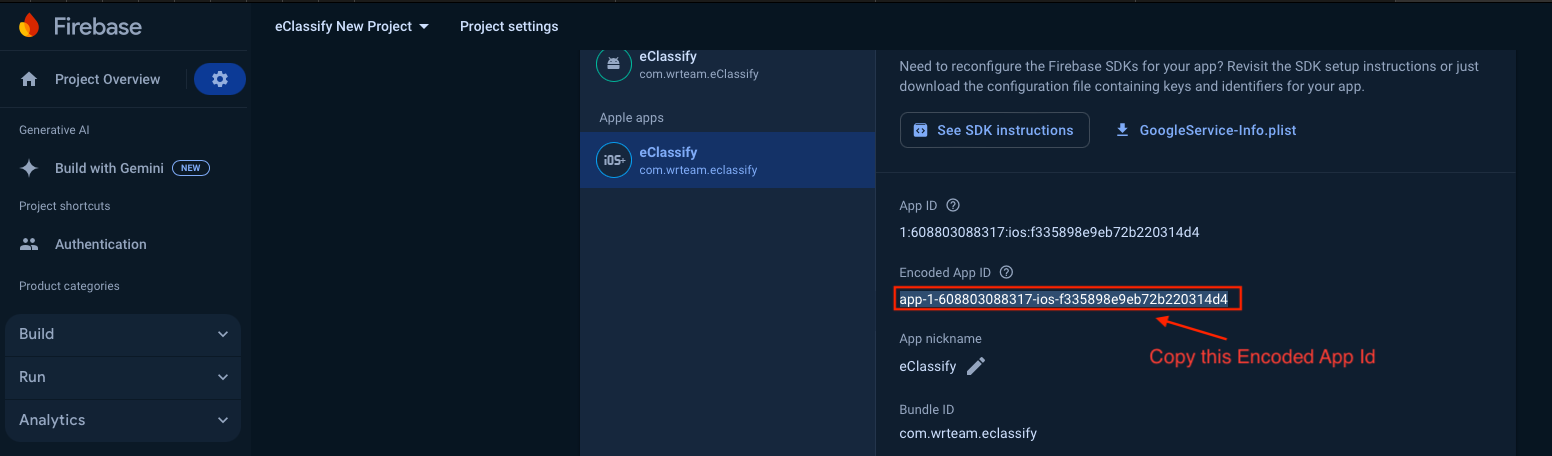
- Click the + button, and add a URL scheme for your Encoded App ID. To find this value, open the Firebase project settings ios Apps, and look for the Encoded App ID. Copy the value of that key, and paste it into the URL Schemes box on the configuration page. Leave the other fields blank.
-
- When completed, your config should look something similar to the following (but with your application-specific values):

Authenticate with Firebase Using Email/Password Sign-In
-
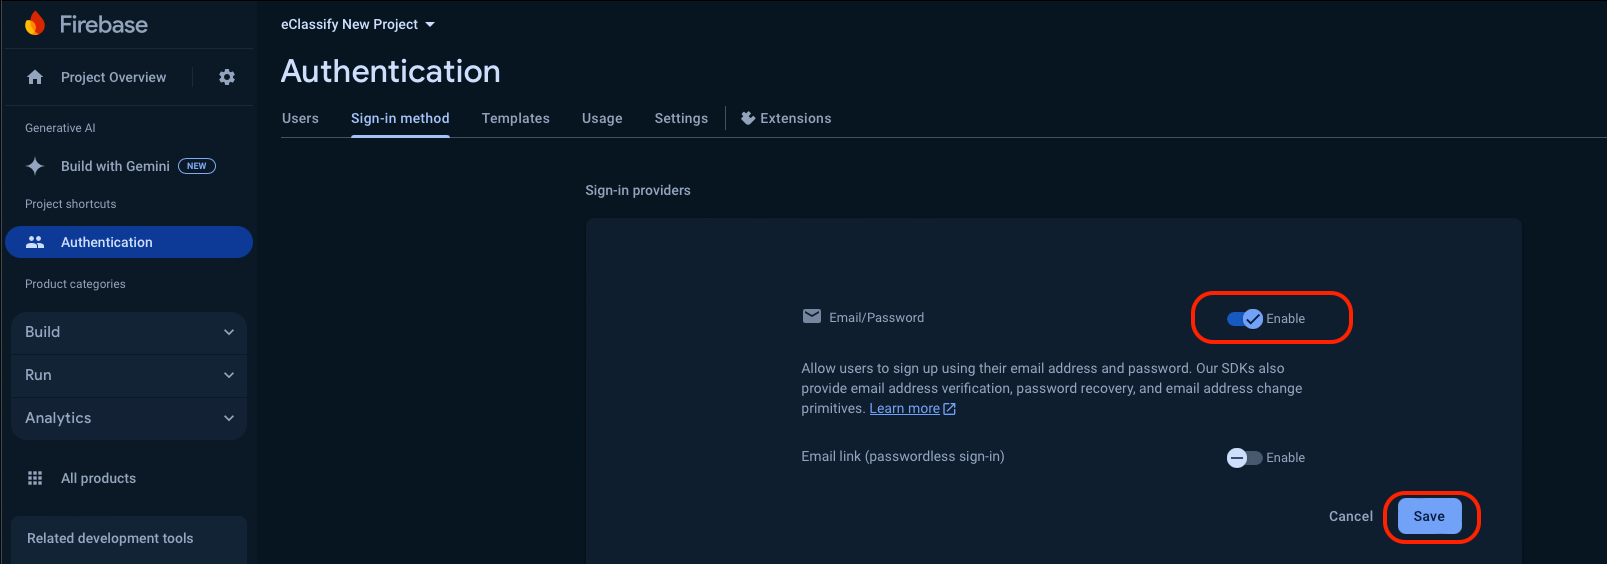
- Open your firebase console.
- Go to Sign-in method in Authentication.
- Go to Email/Password. Enable the Save it.
Authenticate with Firebase Using Google Sign-In
-
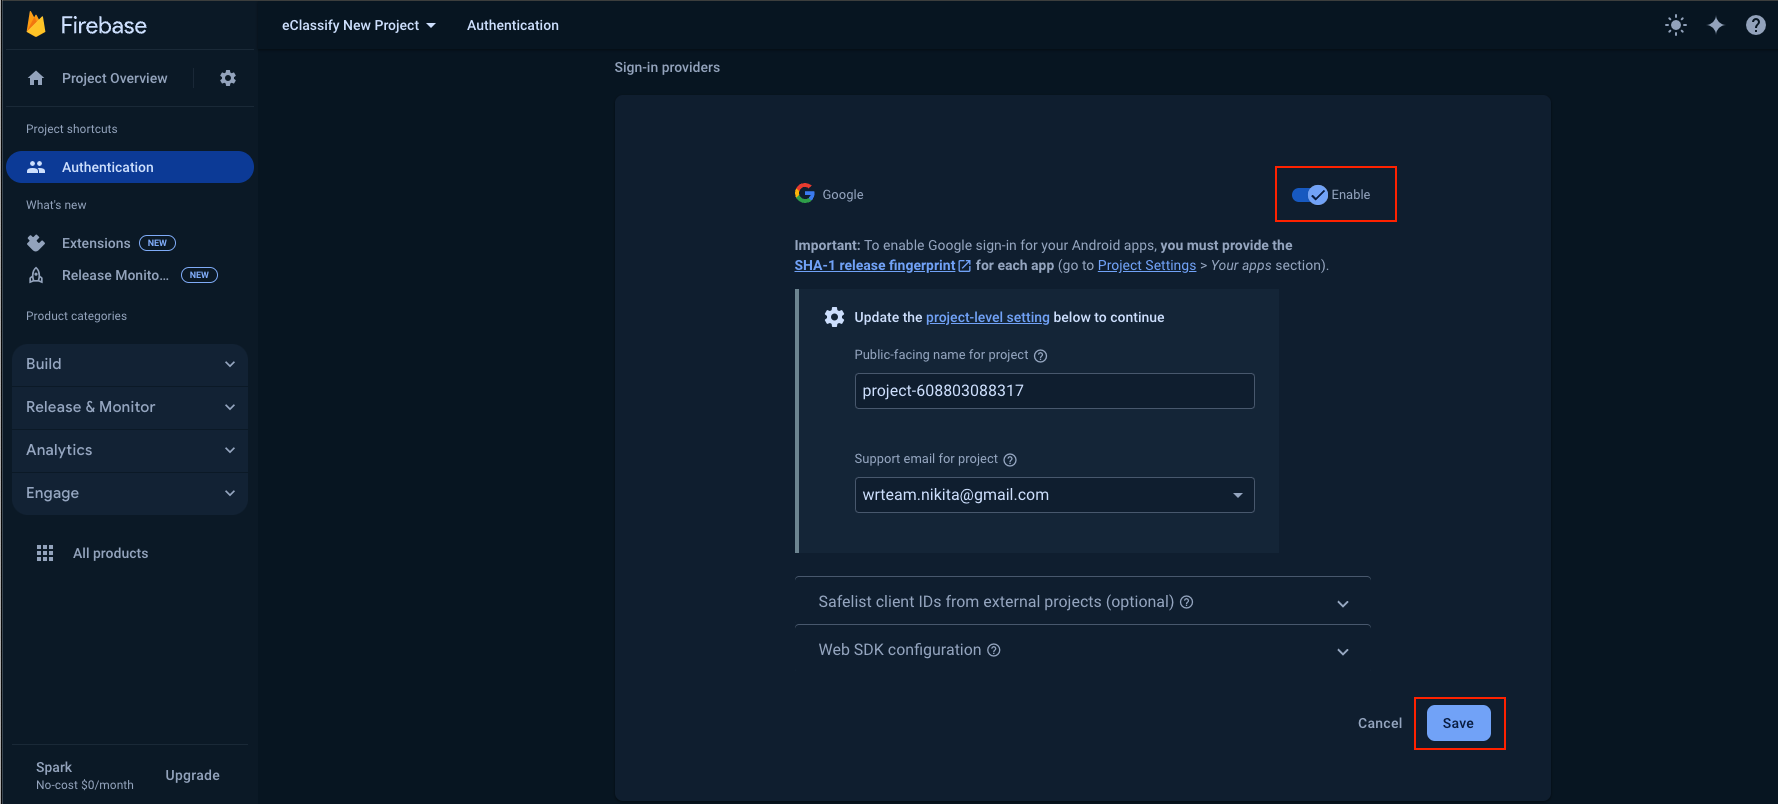
- Open your firebase console.
- Go to Sign-in method in Authentication.
- Go to the Google.. Enable the Save it.
Authenticate with Firebase Using Apple Sign-In
-
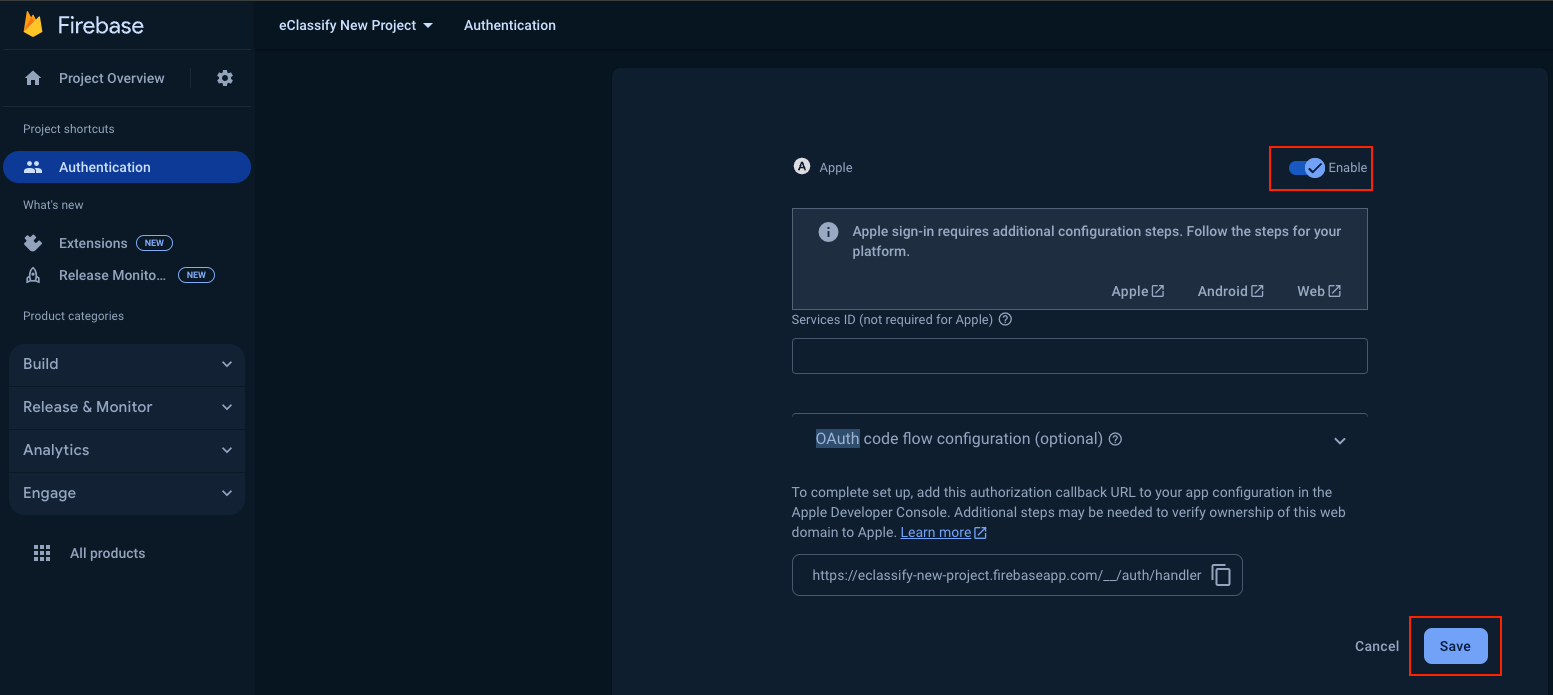
- Open your firebase console.
- Go to Sign-in method in Authentication.
- Go to the Apple and enable apple sign in.
-
- In Xcode, select the Signing & Capabilities tab, and add “Sign In With Apple” as a new Capability then select a team on the Code Signing section.
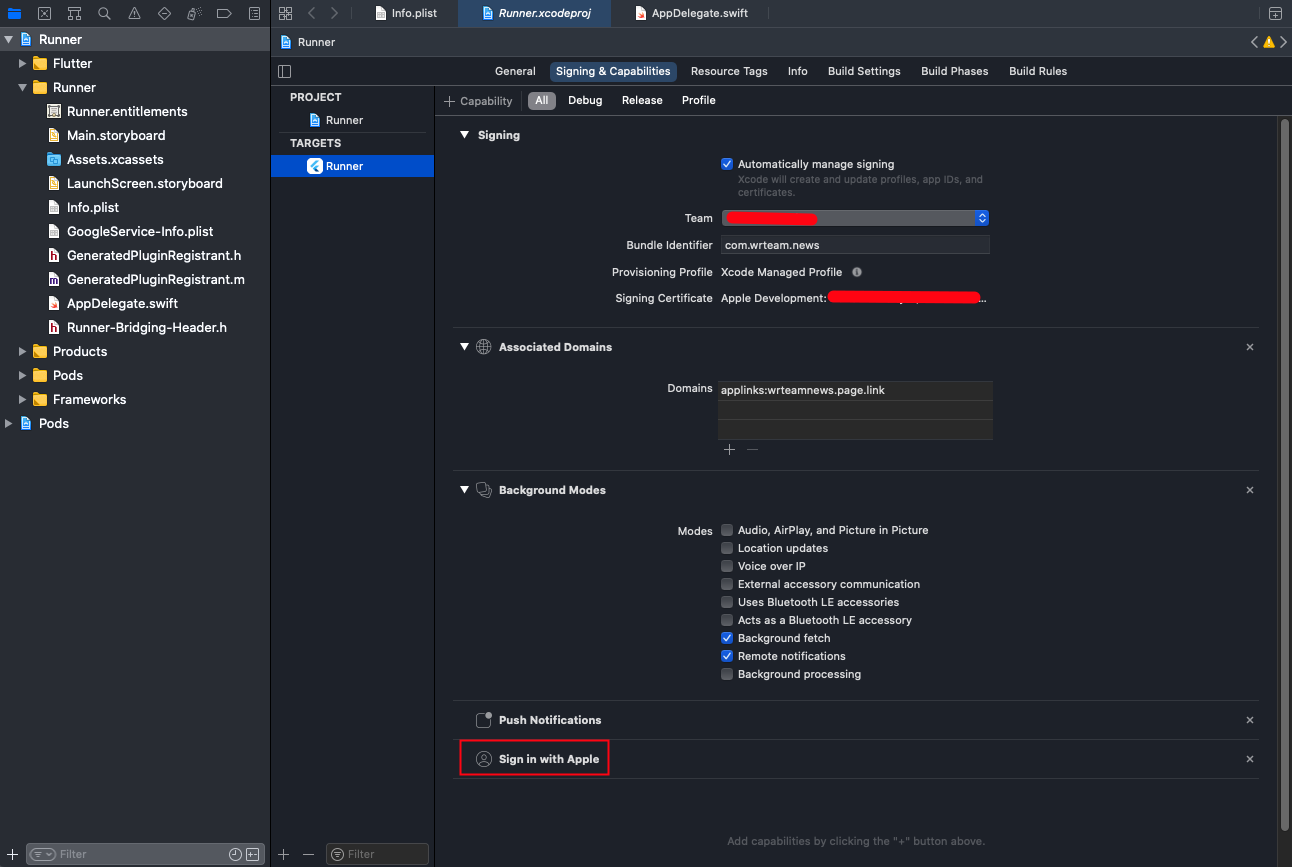
- This will generate and configure an App ID in the “Certificates, Identifiers & Profiles” section of the Apple Developer portal.
How to set Notification
-
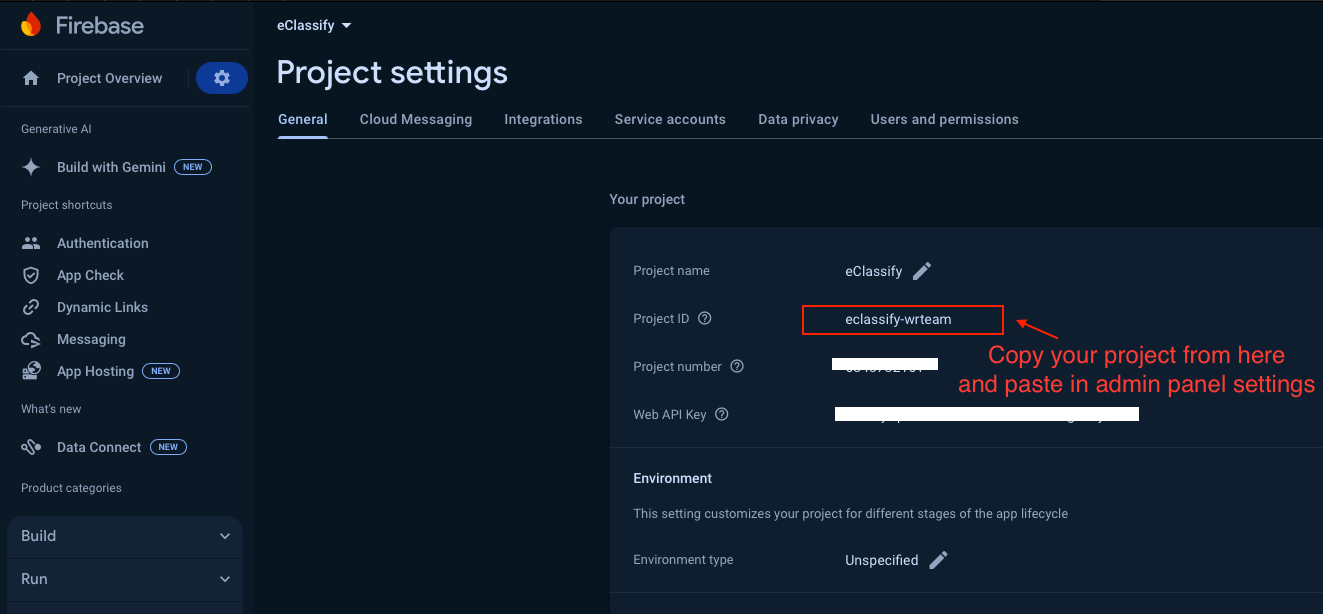
- Go to your firebase project in project settings -> general. Copy your project id from there as below image.
-
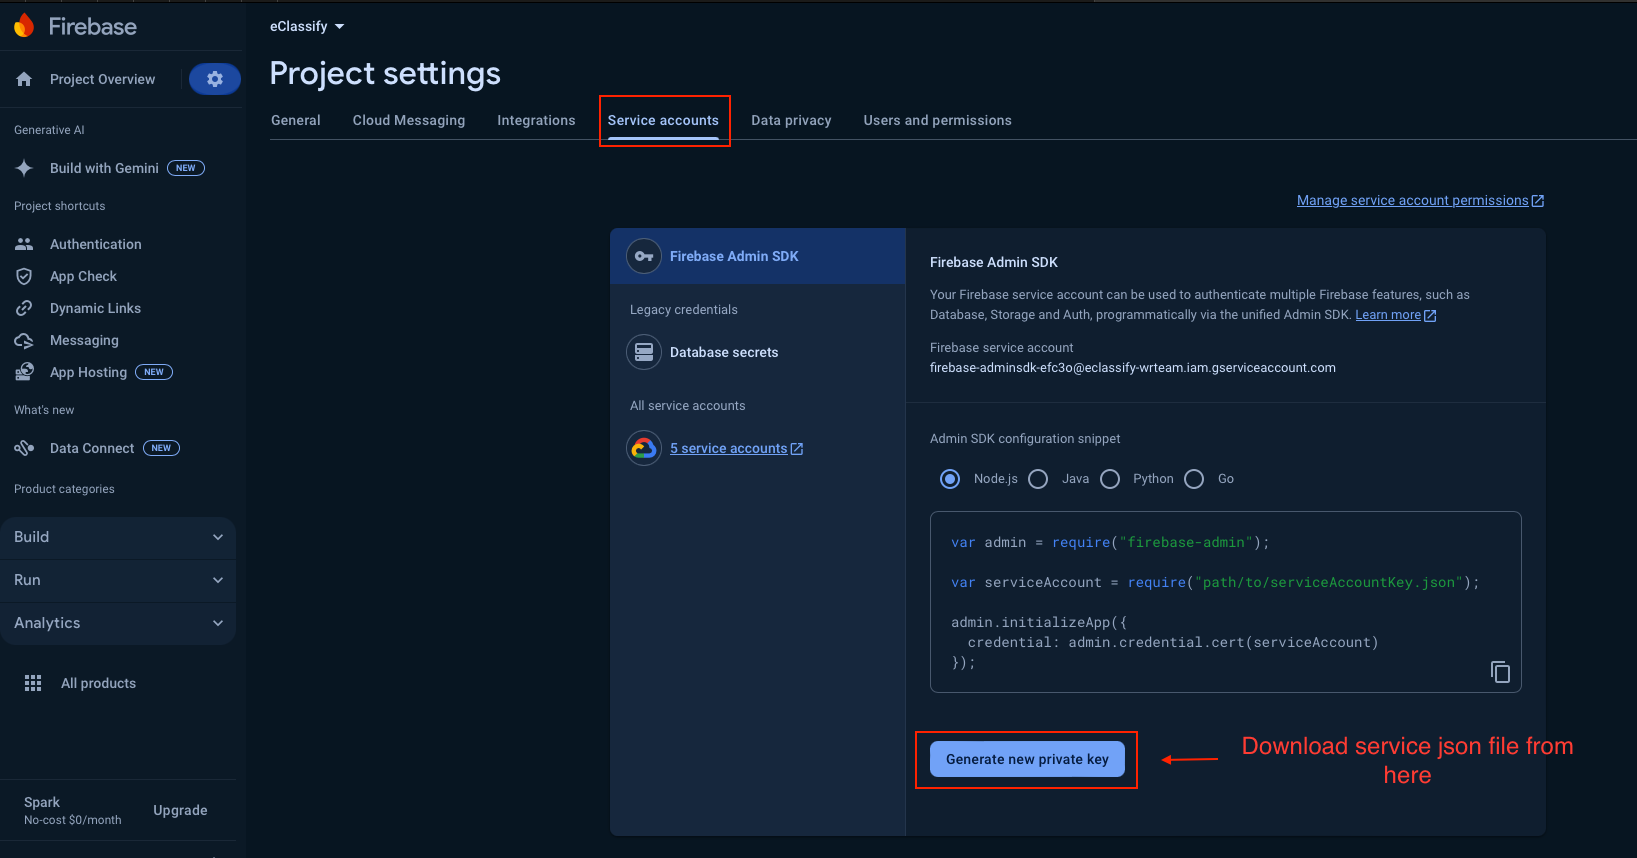
- Go to project settings -> service accounts. For download service json file click on Generate new private key button as below image.
-
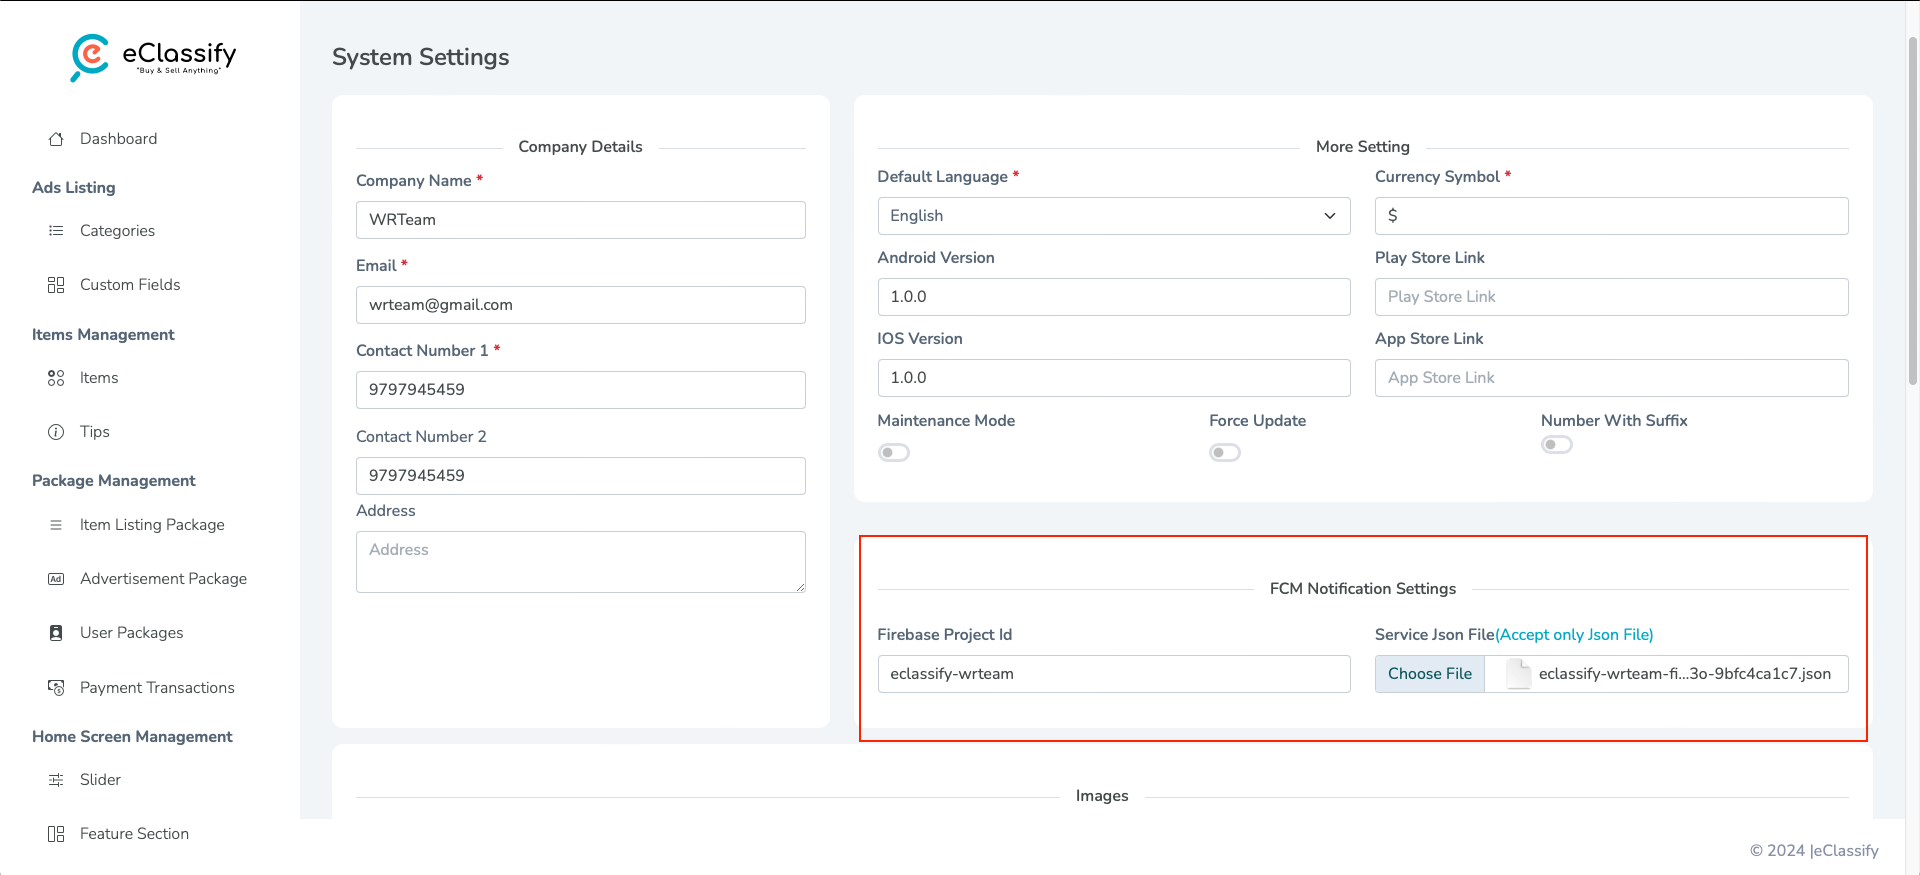
- Now add your project id and downloaded service json file in admin panel system settings and save it.
For ios your need to perform below given step.
-
- In Xcode, open the project.
- In the Project Navigator (the left-hand menu), select the project icon that represents your app.
- In the top-left corner of the right-hand pane in Xcode, select your app’s target.
- Navigate to the Capabilities tab.
- Enable Push Notifications.
- Check Remote Notifications and Background Fetch from Enabling Background Modes.

-
- APNs (Apple’s Push Notification service) currently supports two types of connections: token-based (.p8) and certificate-based (.p12).you can follow either one of them
For Token-based (.p8).
-
- Log in to the Apple Developer Portal.
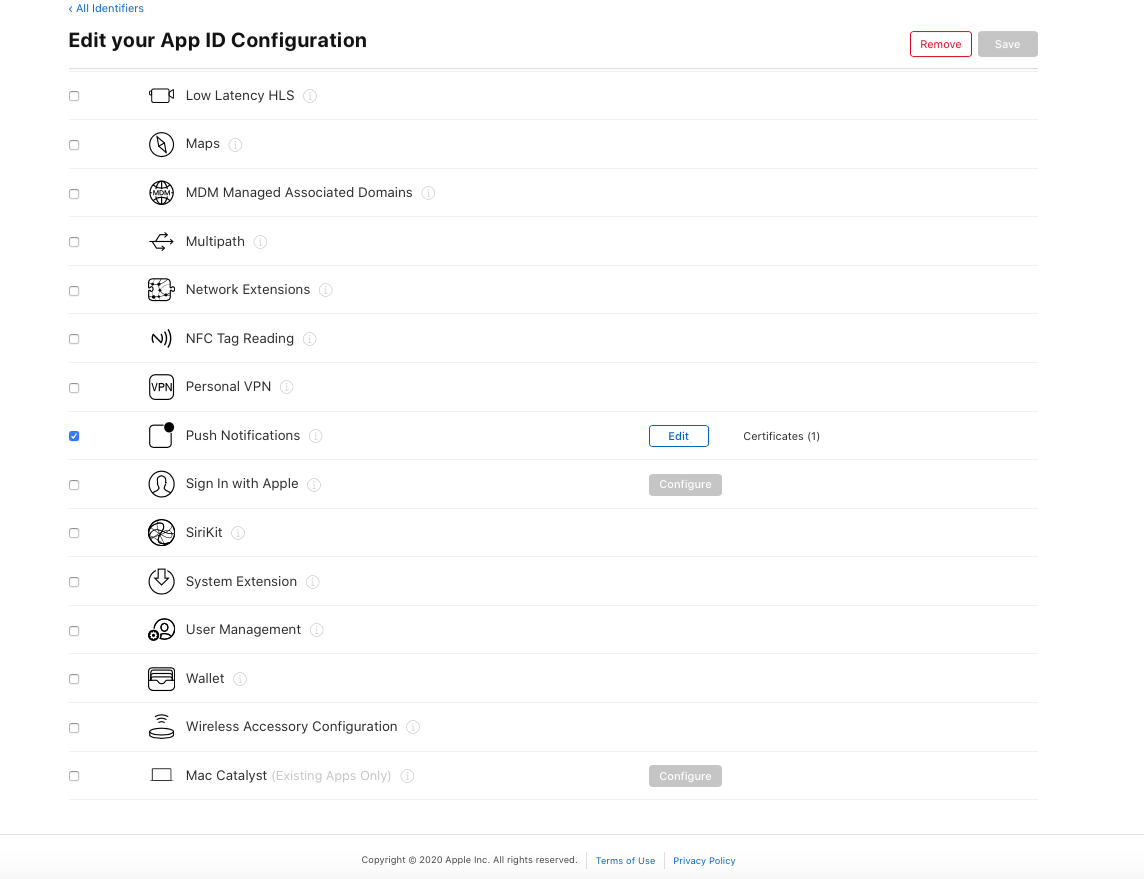
- Navigate to Certificates, IDs & Profiles > Identifiers > App IDs and click the App ID associated with your app.
- On the screen for your App ID, check Capabilities > Push Notifications.

-
- Select App ID in next page & click continue.
- And then create Development SSL Certificate & Production SSL Certificate by adding CSR certificate. follow Apple’s Create a certificate signing request instructions.
- Navigate to Certificates, IDs & Profiles > Keys Section and add a Universal key for Notifications,which you can use for more than one apps as well.
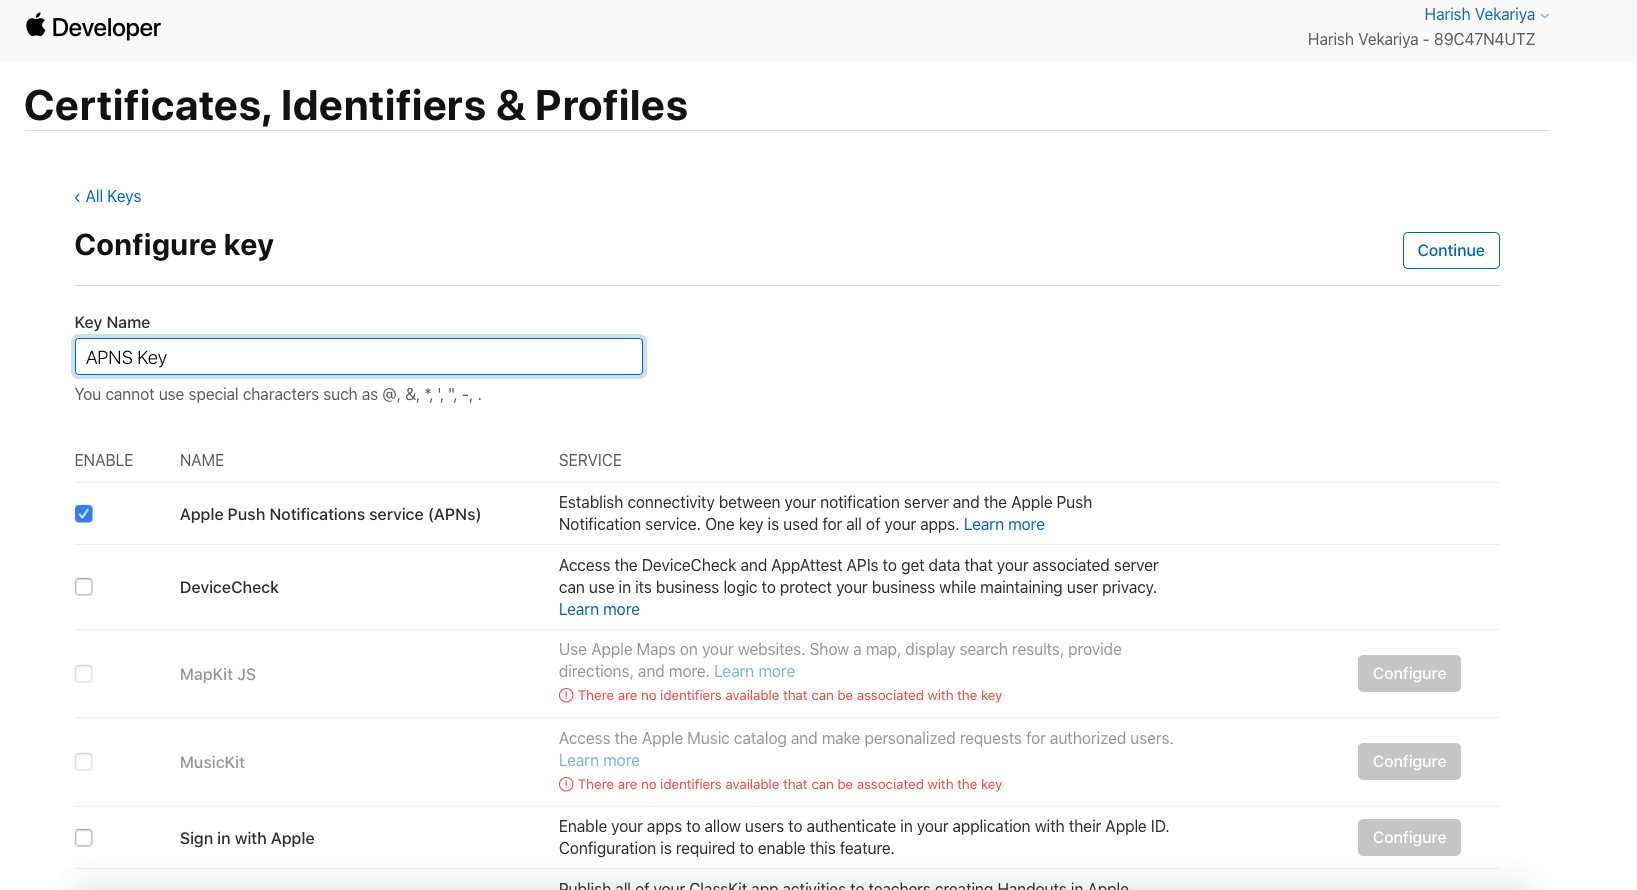
-
- Just save and Download & keep it safe, as it will be downloaded only once.
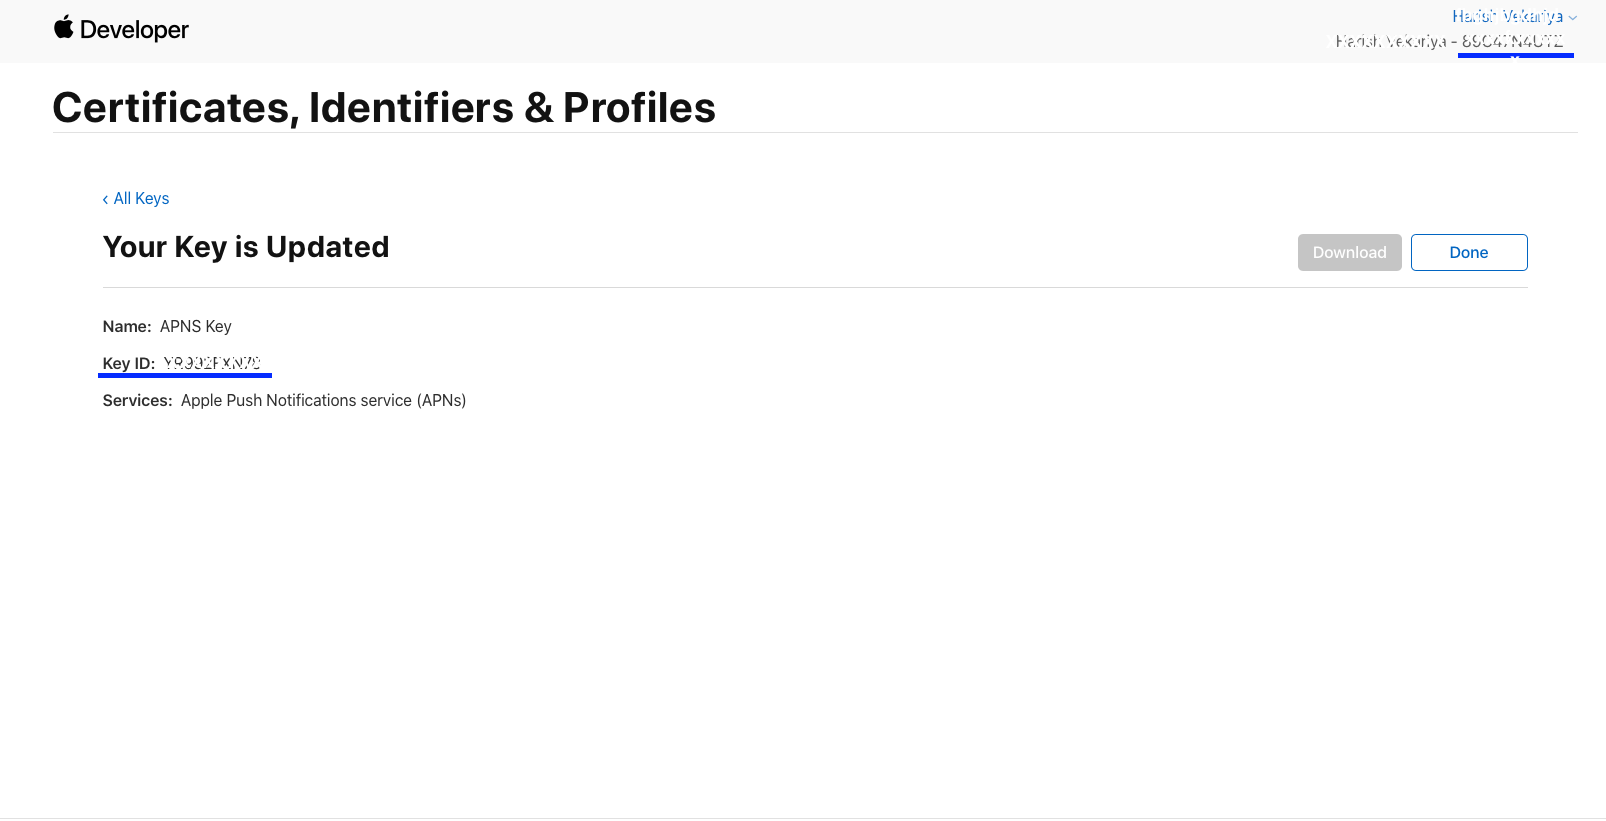
-
- Then go to Firebase and add this .p8 file along with Your Key ID and Team ID.

FOR certificate-based (.p12) :
-
- Log in to the Apple Developer Portal.
- Navigate to Certificates, IDs & Profiles > Identifiers > App IDs and click the App ID associated with your app.
- On the screen for your App ID, check Capabilities > Push Notifications.
- Click Save and respond to the Modify App Capabilities dialog box that appears.
- To create the certificate, we will use to communicate with Apple when sending push notifications:
- In a new browser tab, follow Apple’s Create a certificate signing request instructions.
- In the Apple Developer Portal, navigate back to your App ID.
- Click Capabilities > Push Notifications > Configure.
- Click one of the following buttons:
- Development SSL Certificate > Create Certificate (for testing push notifications while developing an iOS app)
- Production SSL Certificate > Create Certificate (for sending push notifications in production)
- Click Choose File and select the certificate signing request you created above.
- Click Continue.
- Click Download to download the certificate.
- Use this file to export a .p12 file in the next step.
- Navigate in the Apple Developer Portal to Certificates, IDs & Profiles > Provisioning Profiles.
- Click the provisioning profile you’d like to edit.
- Edit the provisioning profile as necessary, and click Save.
- Click Download, and double-click the downloaded provisioning profile to install it.
- Make sure your Xcode project is configured to use the provisioning profile as necessary.Next, export the downloaded certificate (.cer file) as a .p12 file that can be uploaded to firebase:
- On your Mac, double-click the .cer file to open it in Keychain Access.
- In Keychain Access, in the lower-left corner, select Category > Certificates.
- Select the certificate to export.
- Choose File > Export Items.
- Enter a name in the Save As field.
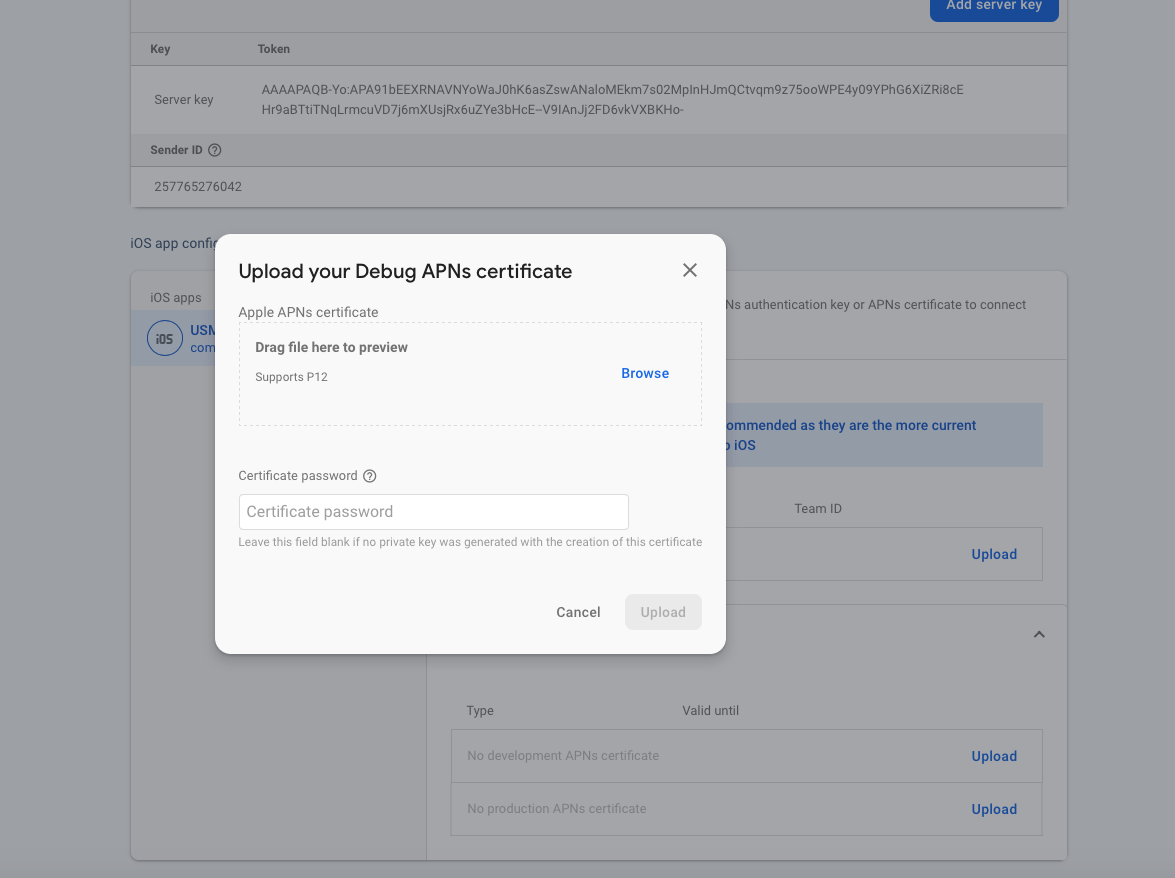
- Accept the default .p12 file format and click Save. Respond to the prompts, and enter a password for the file if necessary.
- Keep track of this file, since you’ll upload it to firebase in a later step.

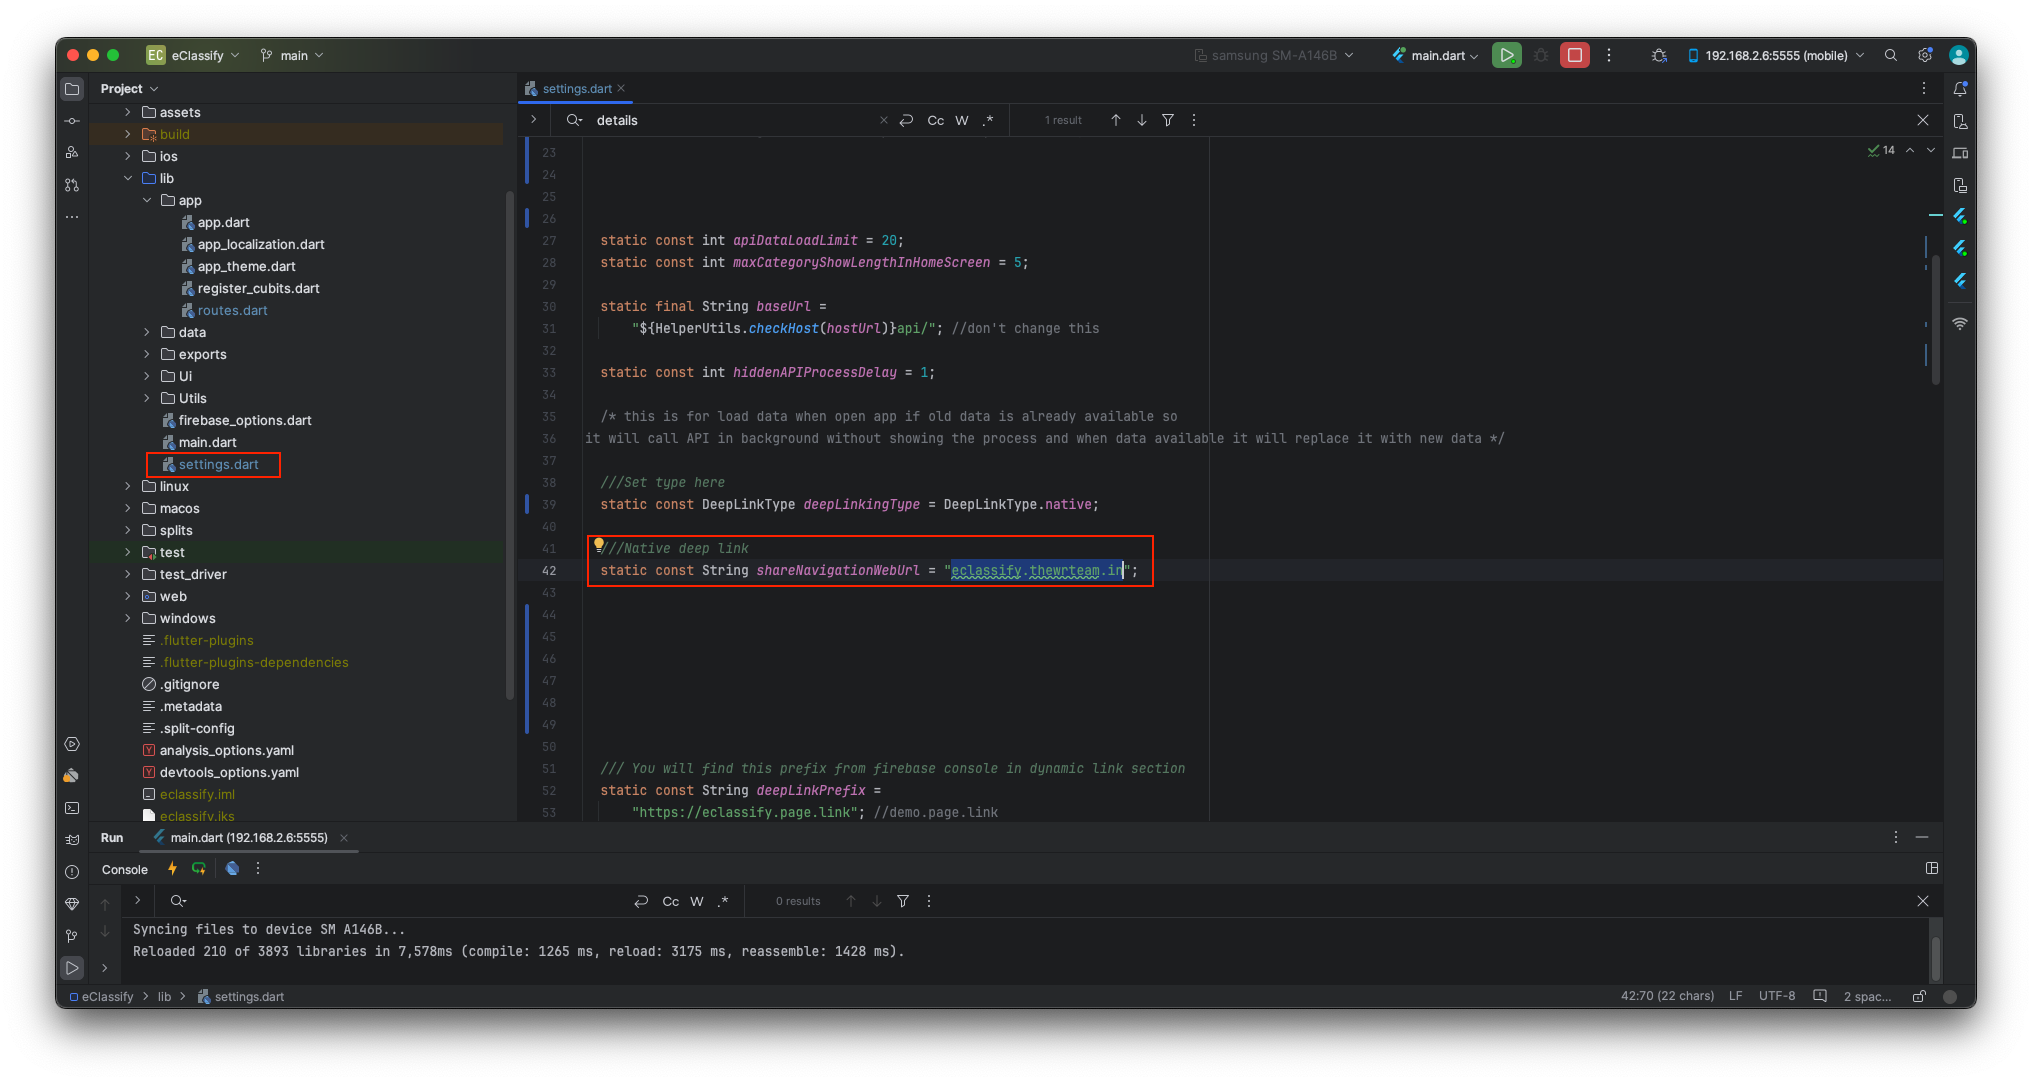
How to create Deep Link for Share Item
-
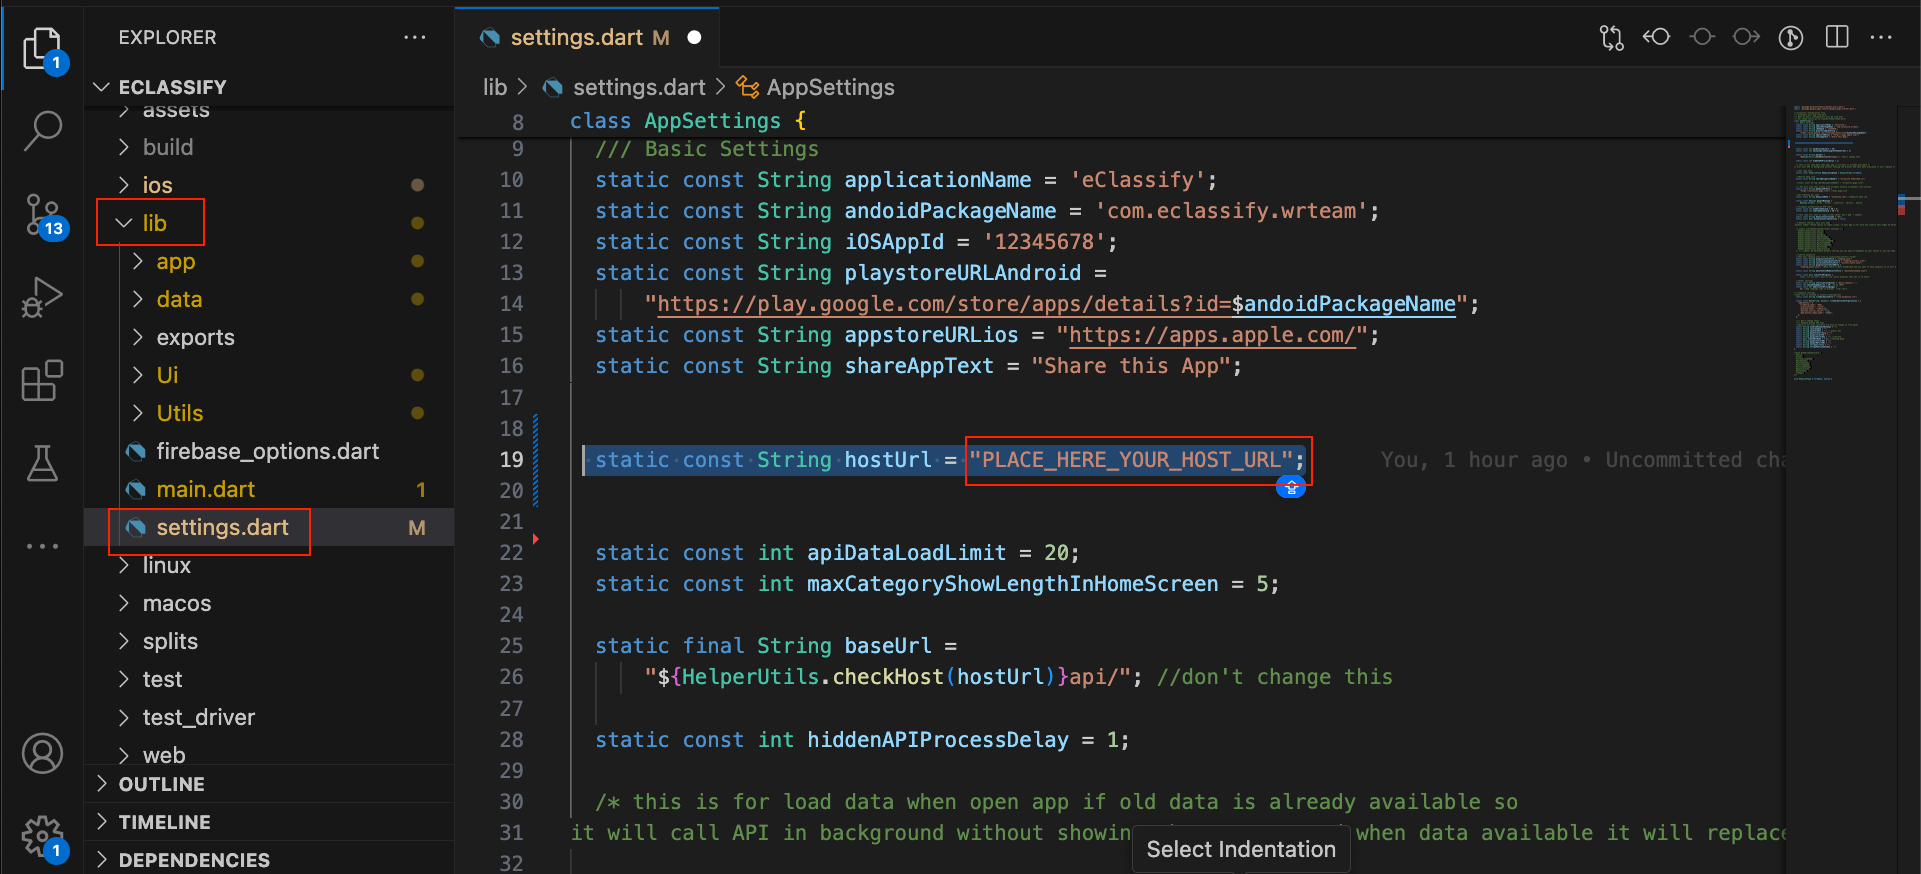
- Open lib -> settings.dart file.
- Add your host url here [Without http ot https]
-
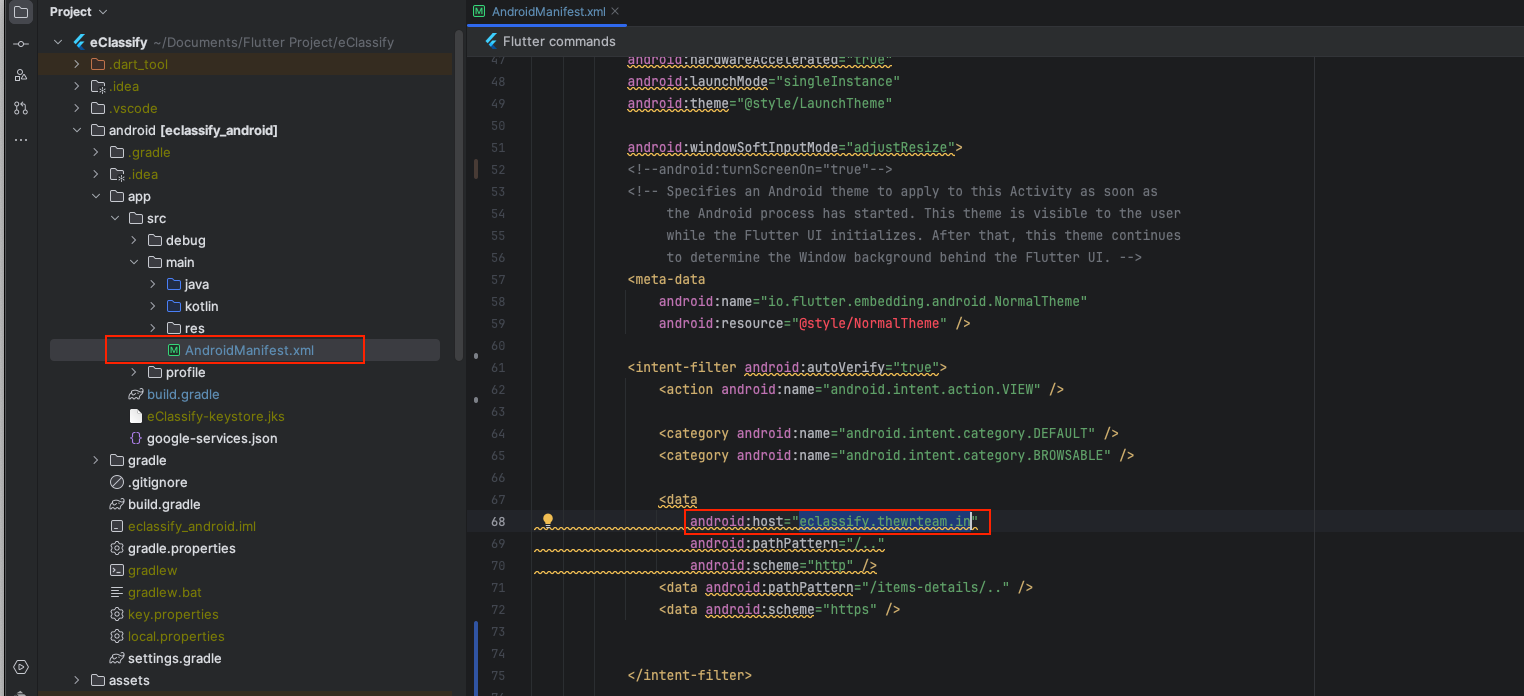
- Go to android -> app -> main -> AndroidManifest.xml file. Also add your host url here [Without http ot https]
-
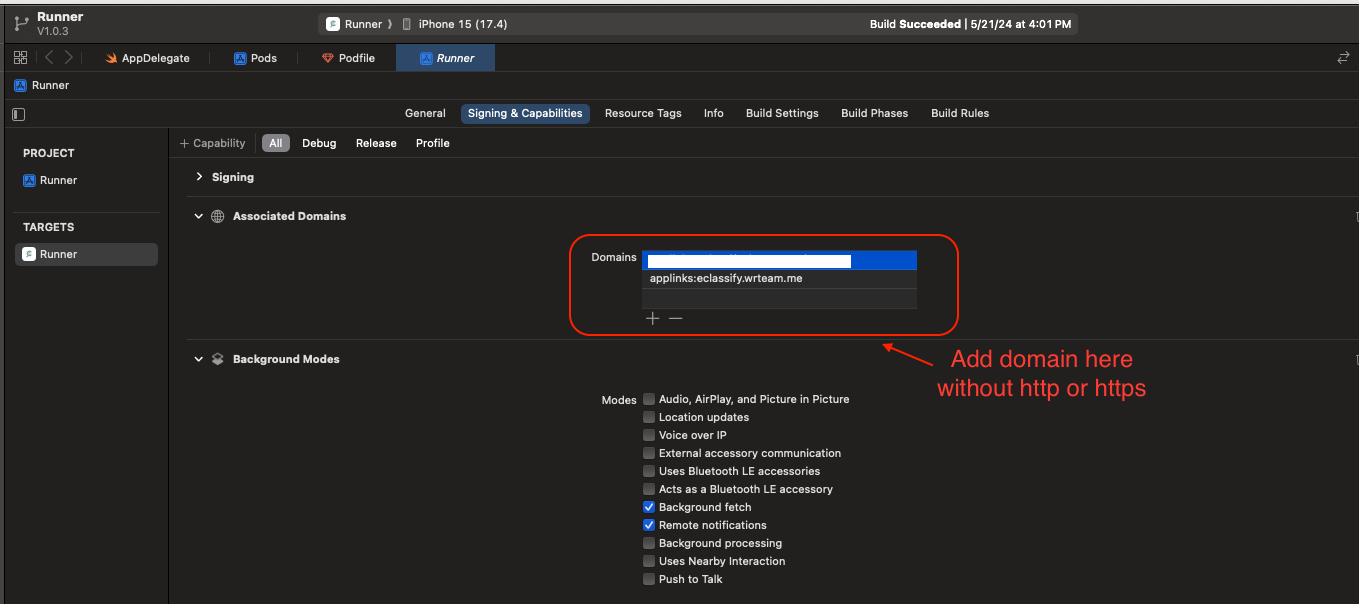
- Open your code in xcode -> Runner -> Signing & Capabilities -> Associated Domains in add your domain here. [Without http ot https]
-
- First of all download this google files from the link :Server Side Deeplink Files
- Open both files in the any text editor and follow below steps.

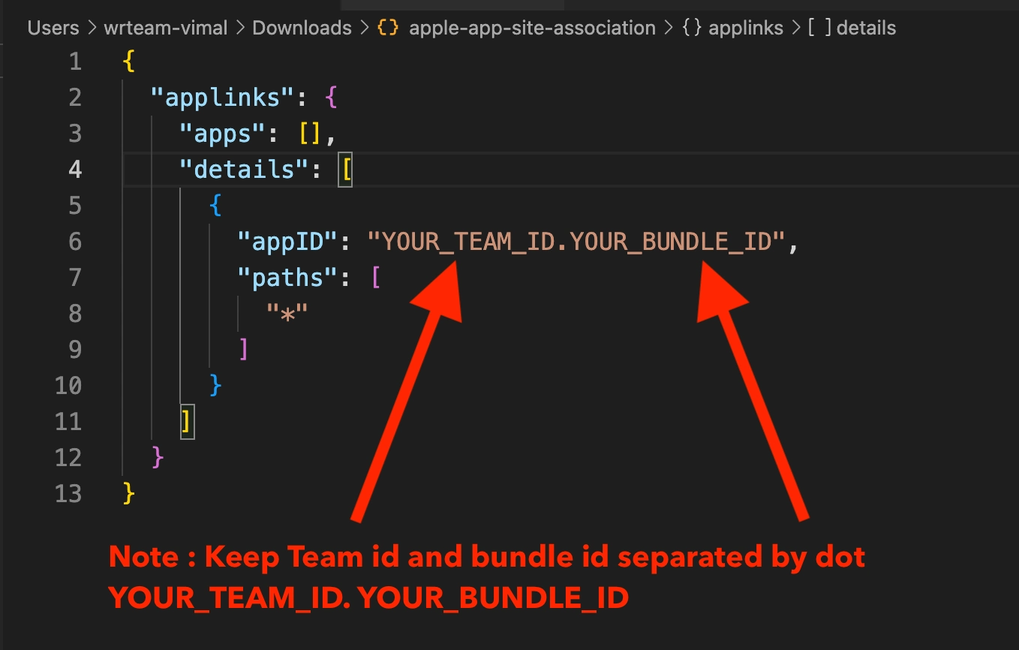
- After above changes save both files (Note- Keep name proper same of both files)
- Open server > Go to admin panel root folder
- You will get .well-known folder on root directory
- If you don’t get that folder from setting enable setting visible hidden files then check
- After the change setting still you don’t find the files, Create new directory named .well-known (Make sure name starts with dot[.])
- Add both above saved files inside the .well-known folder.
How to Add Map API key for Address
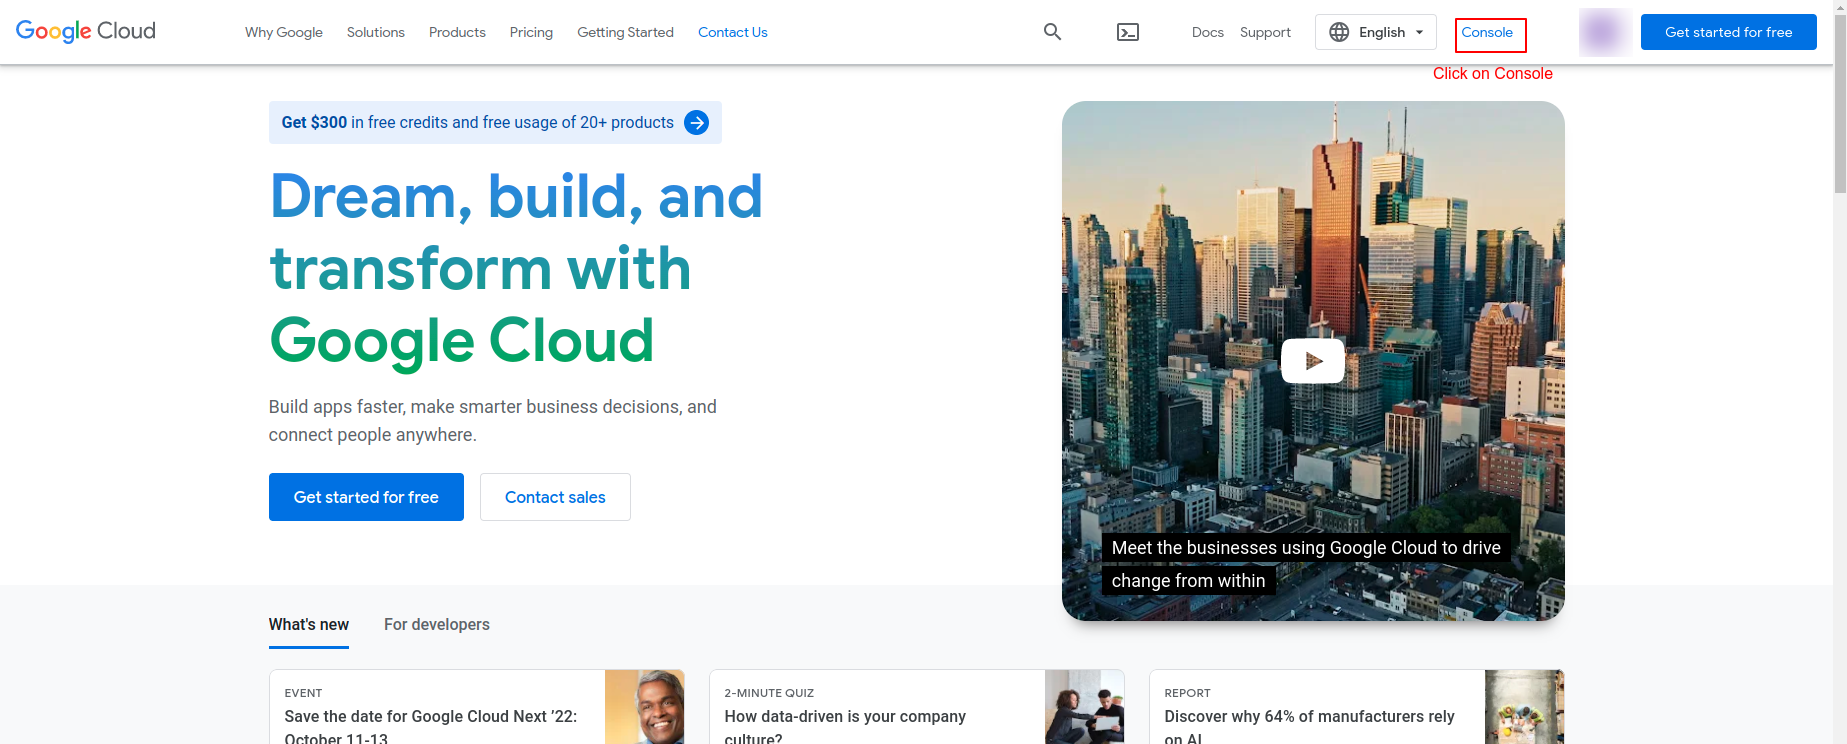
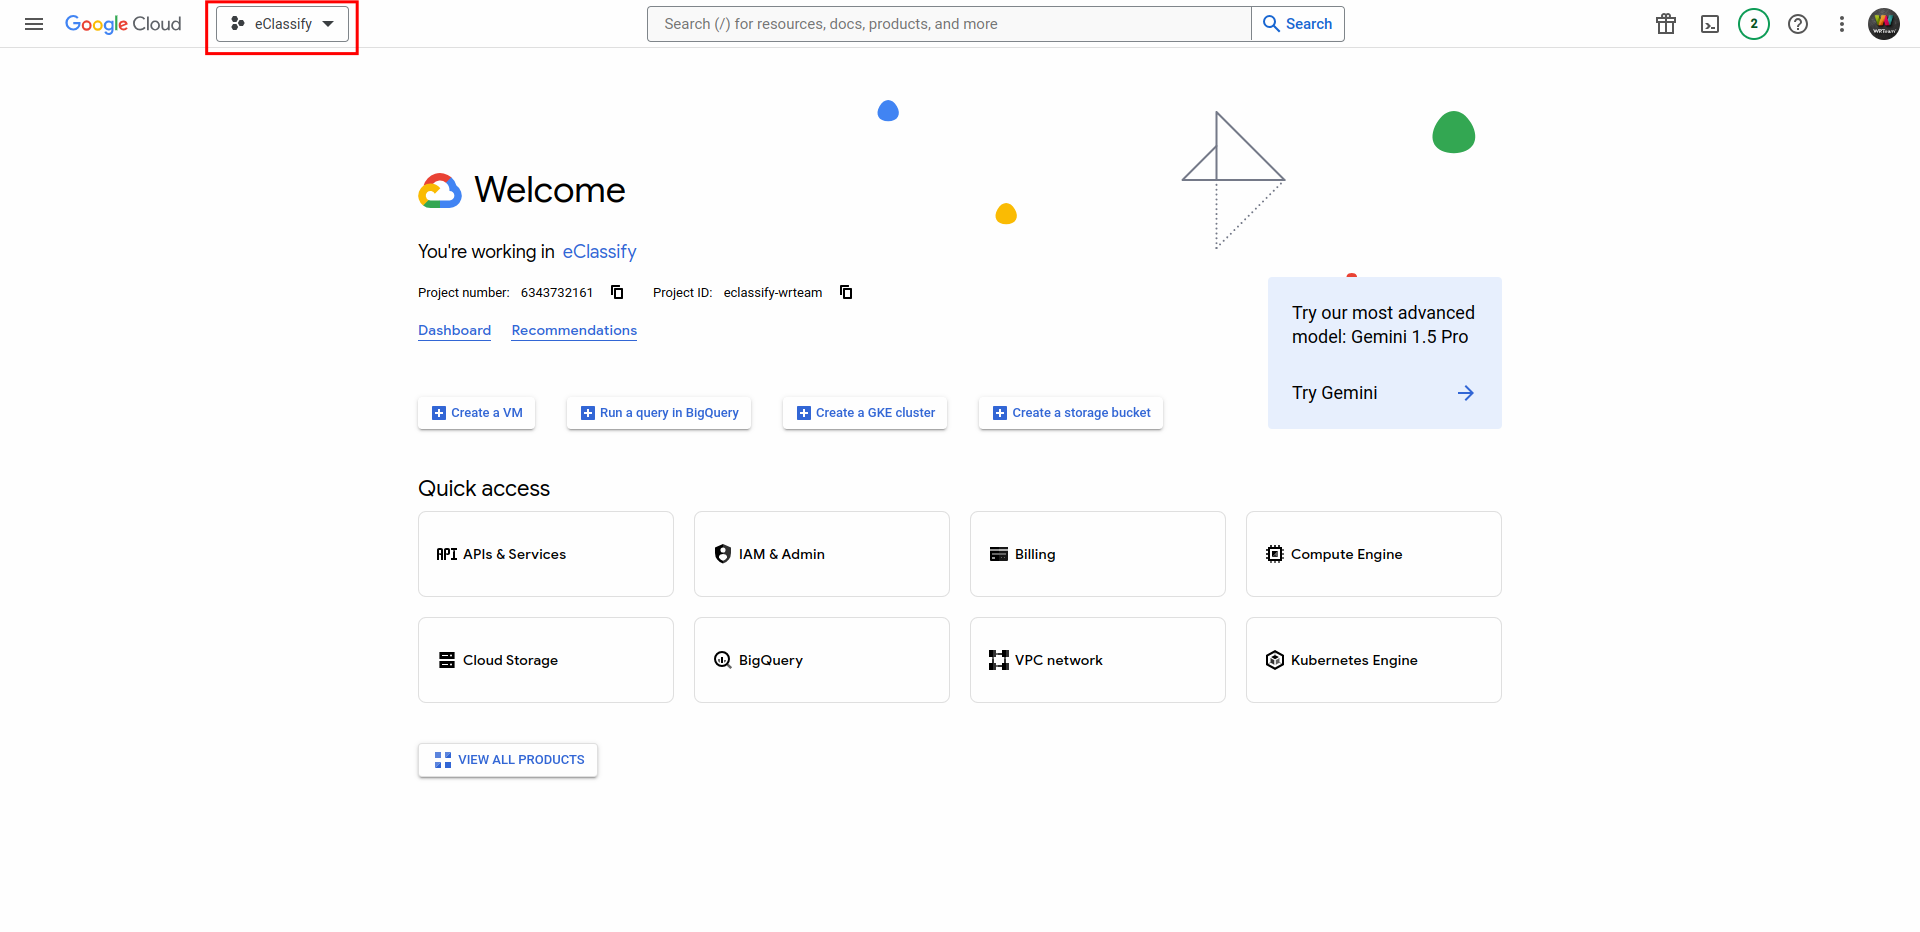
- Go to Google Cloud Platform. Click here
- Click on console.
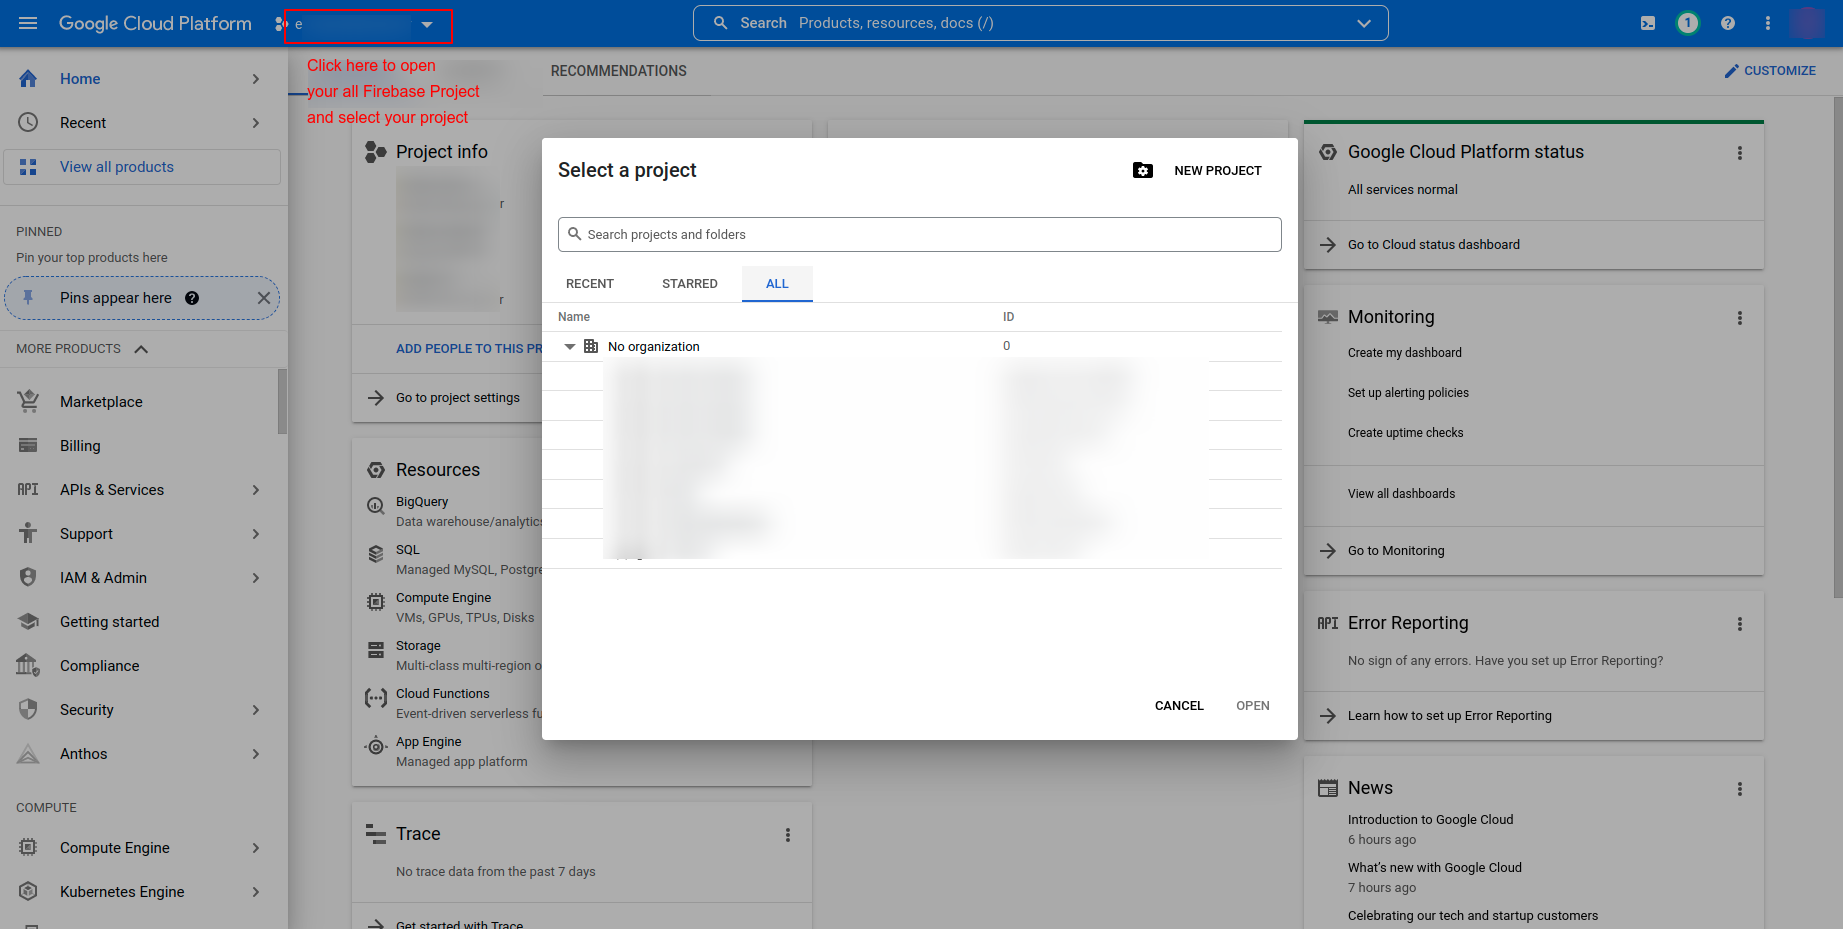
- Select your Firebase Project
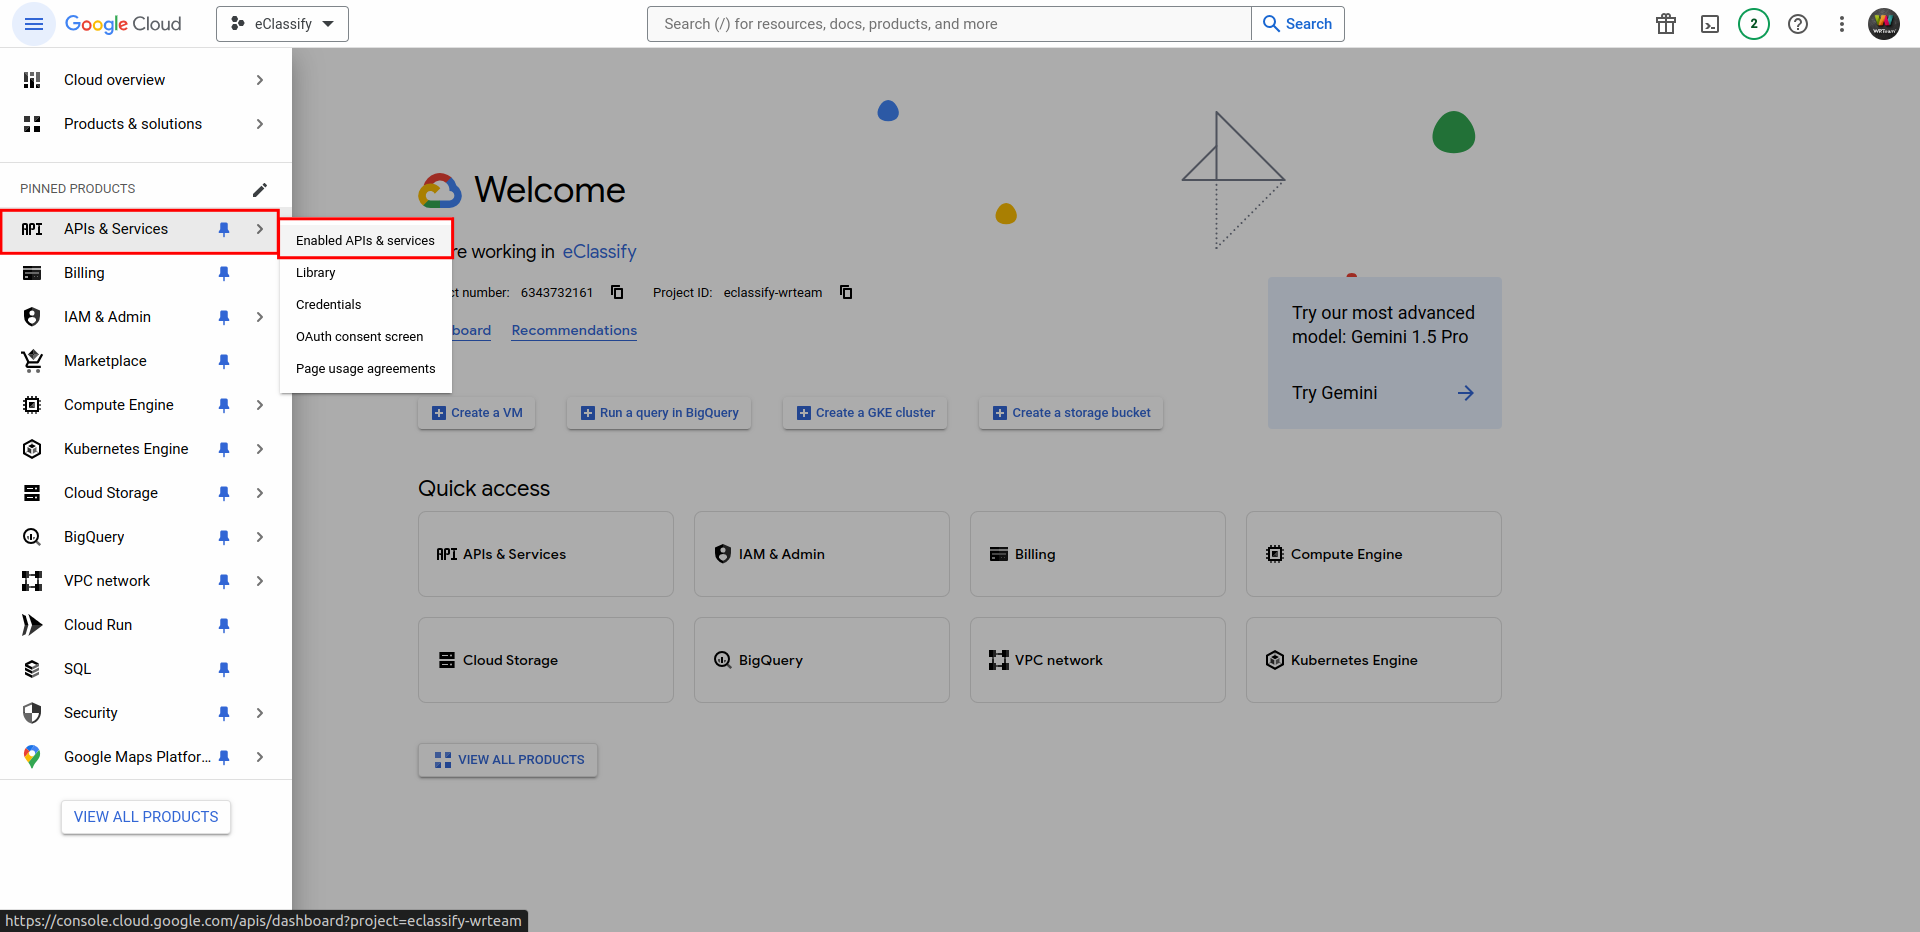
- Search for APIs, which are shown in below image.
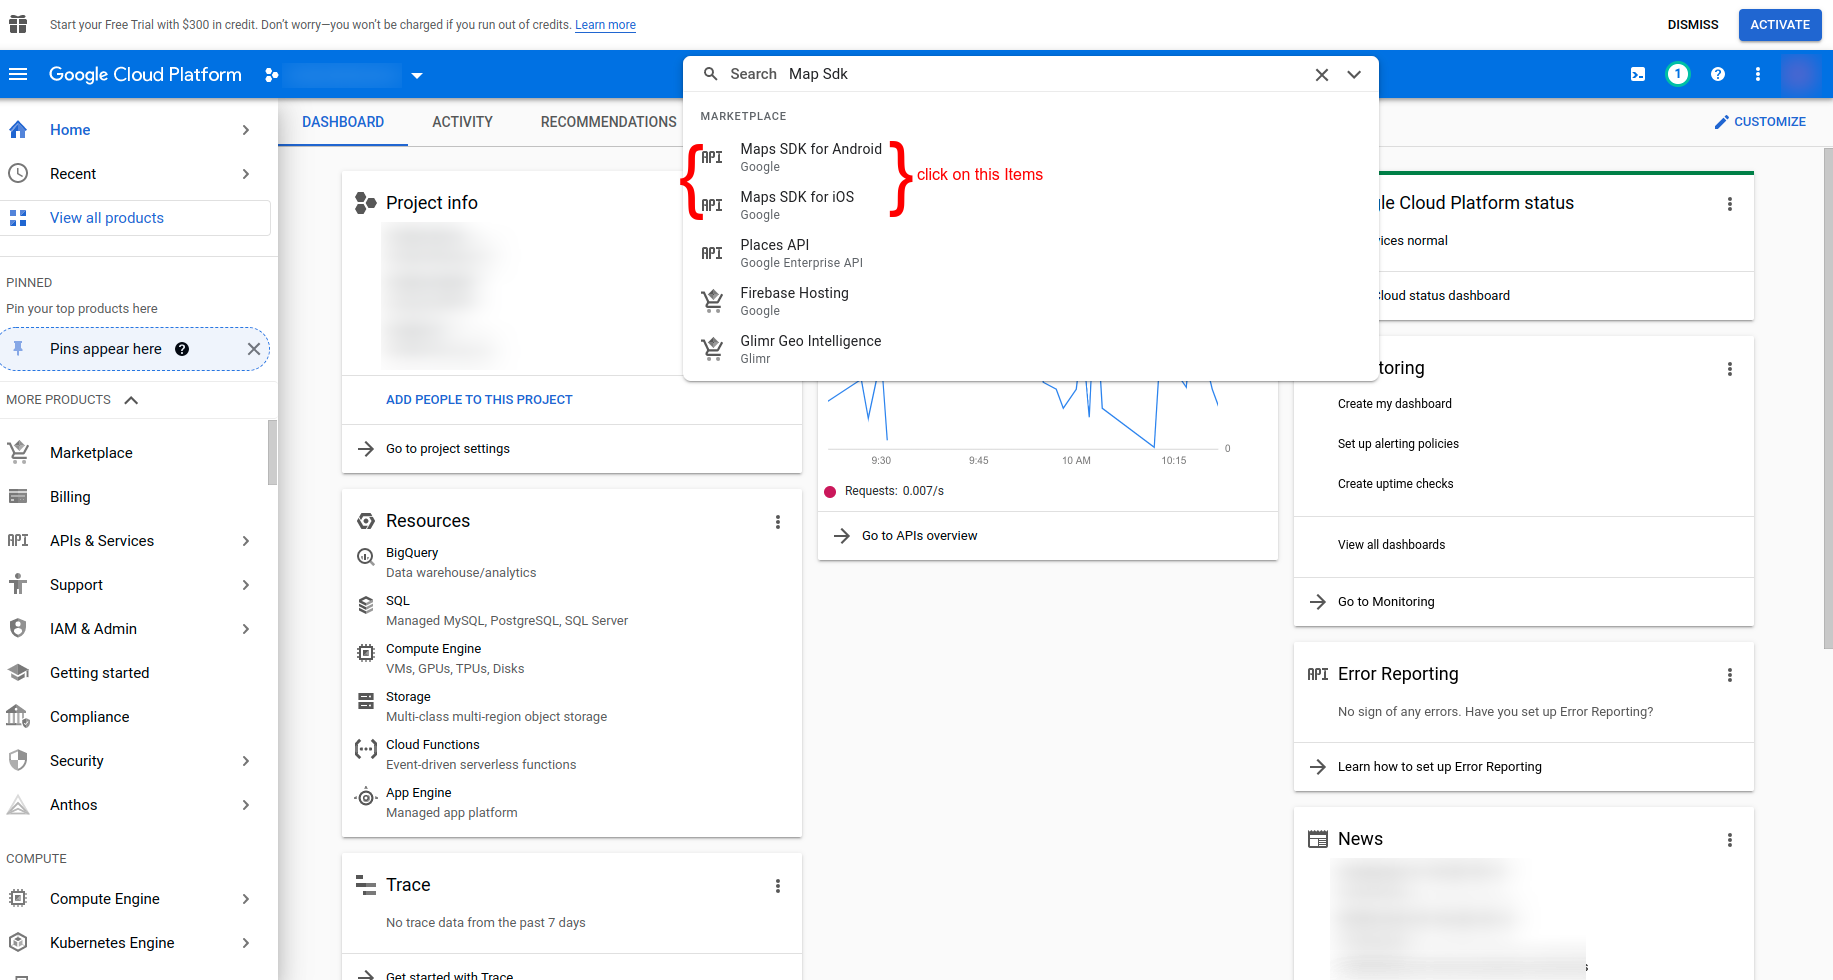
- Click on Enable to, enable that APIs

- Do above steps for below listed API. (enable all below APIs one by one by searching)
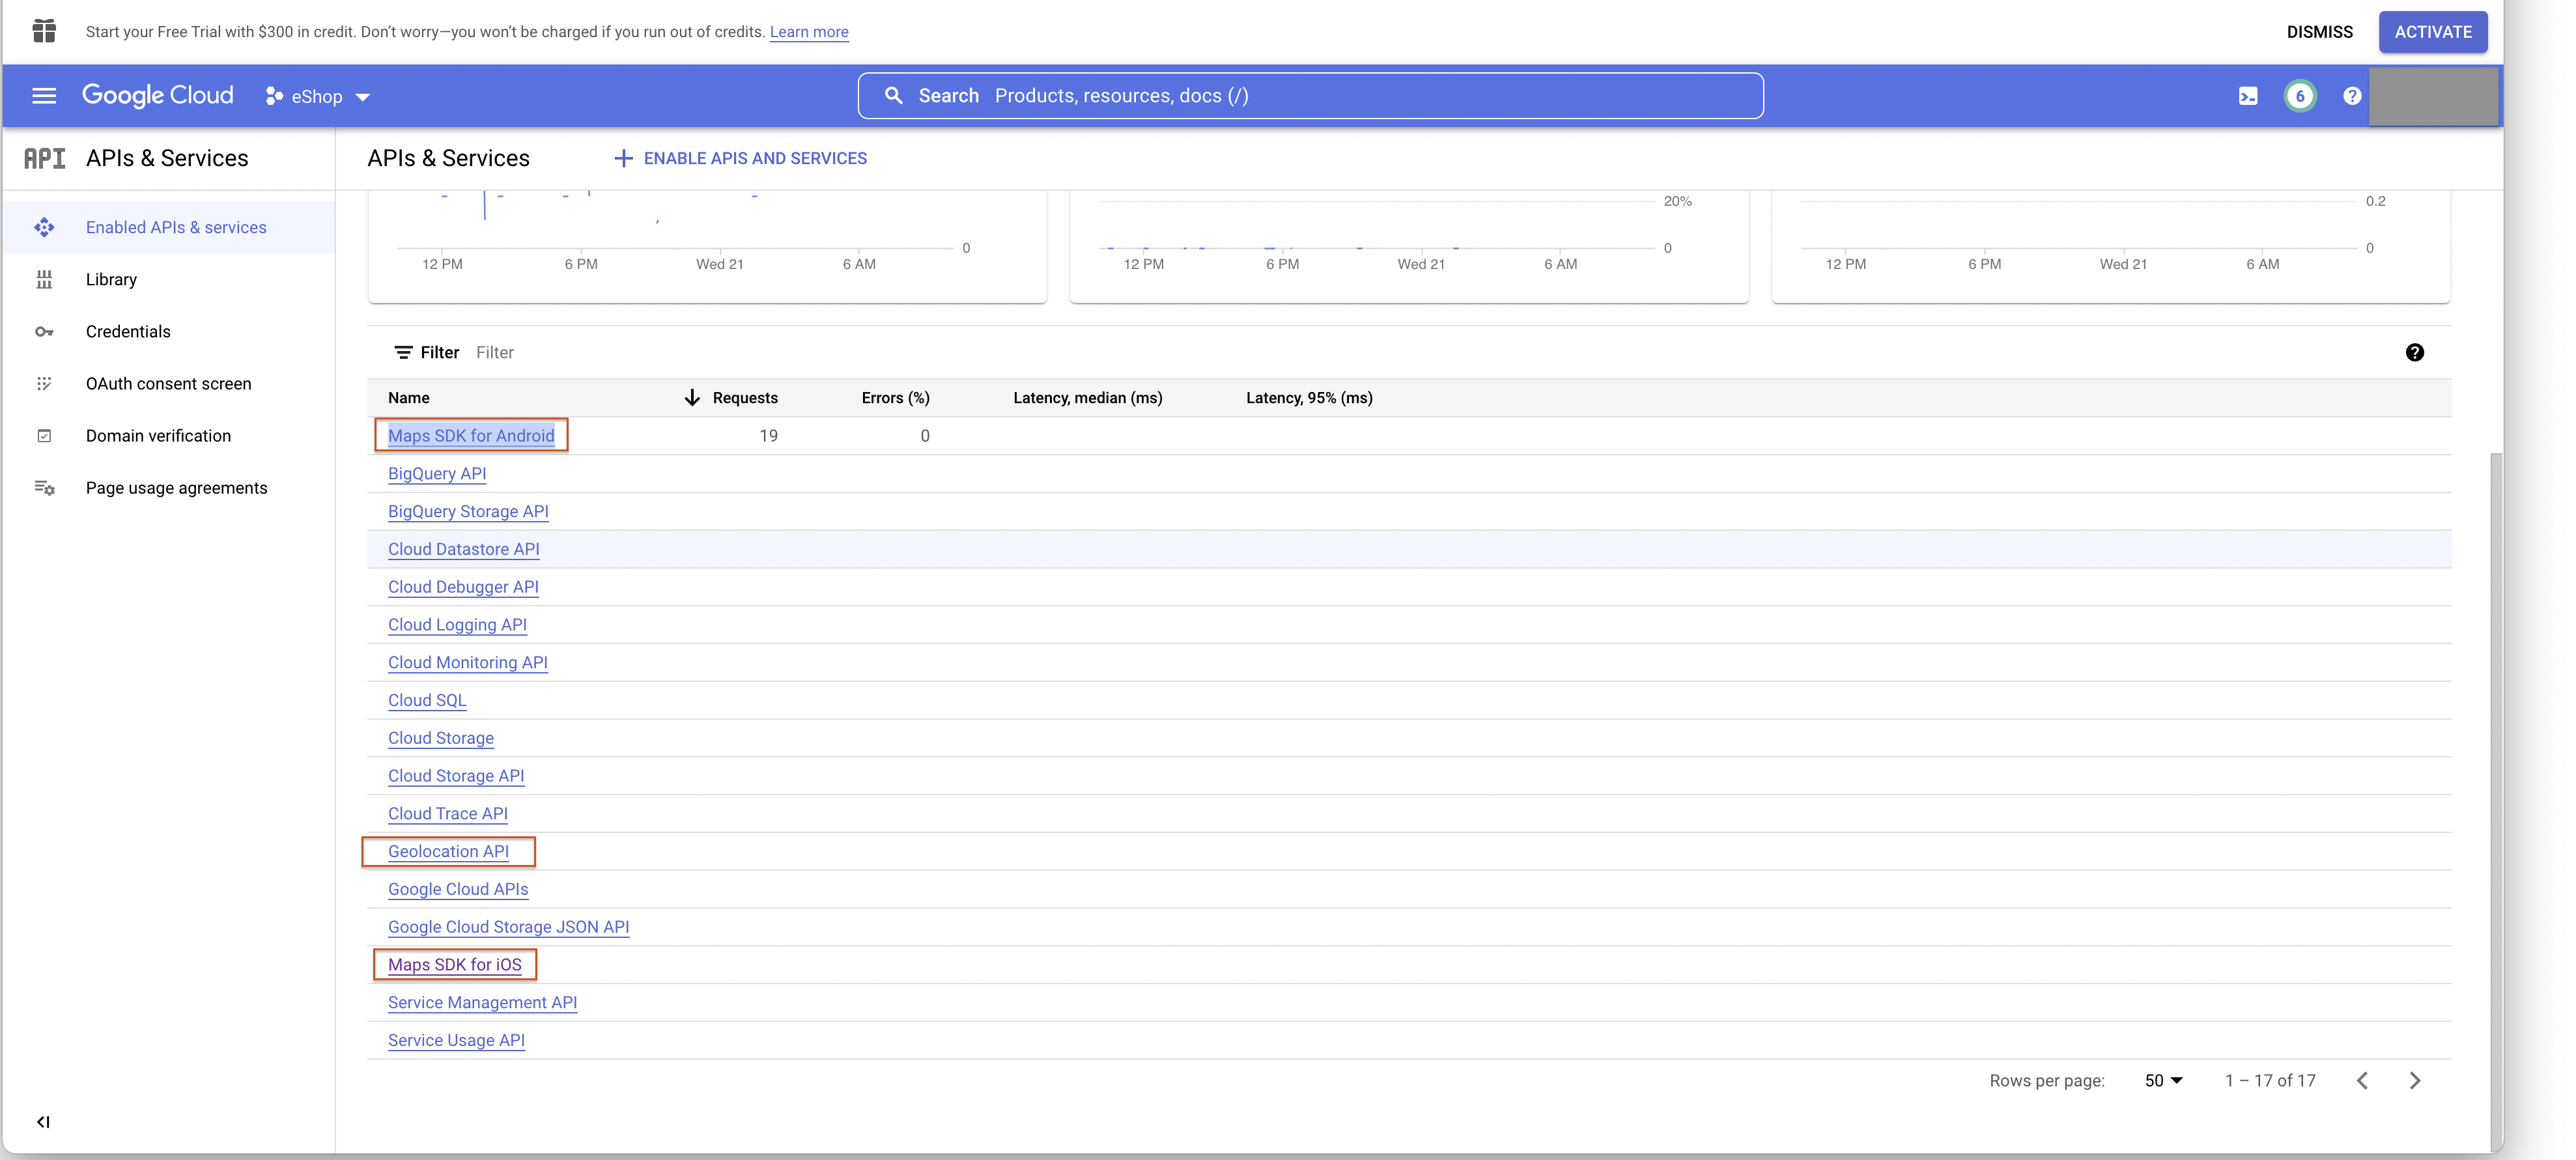
- Go to Credential Tab. you will find your Androiod and iOS API keys.
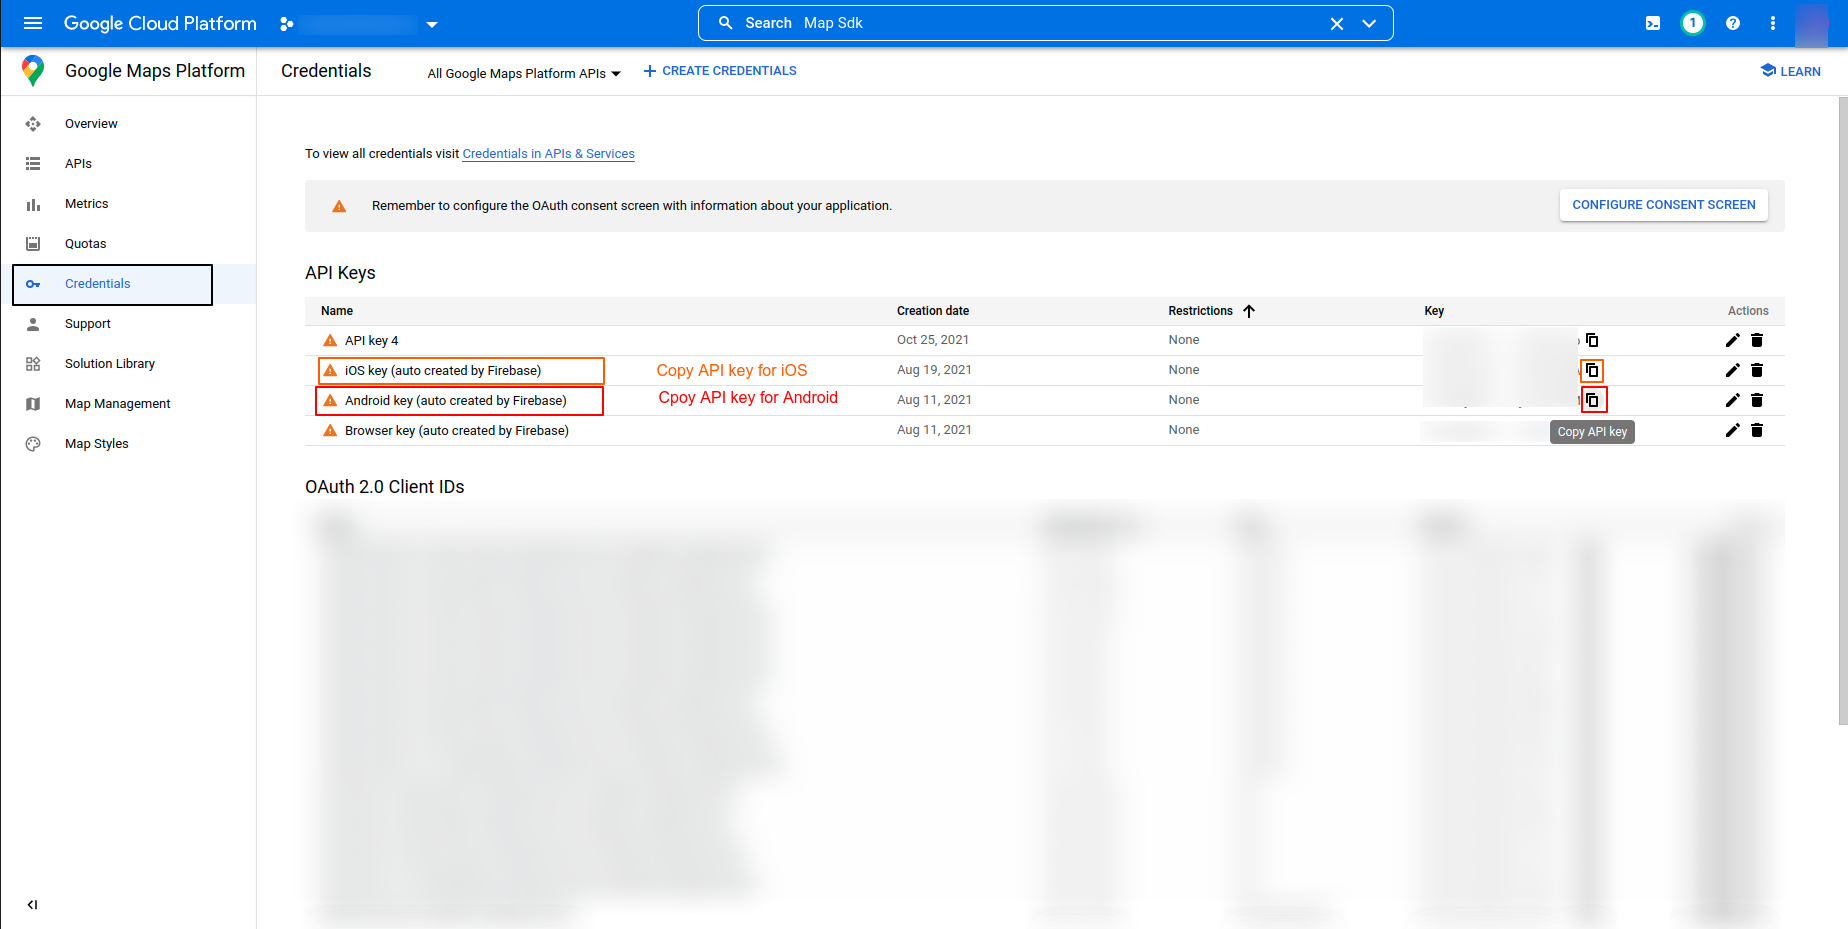
- You have to setup those above API keys for both Platform.
-
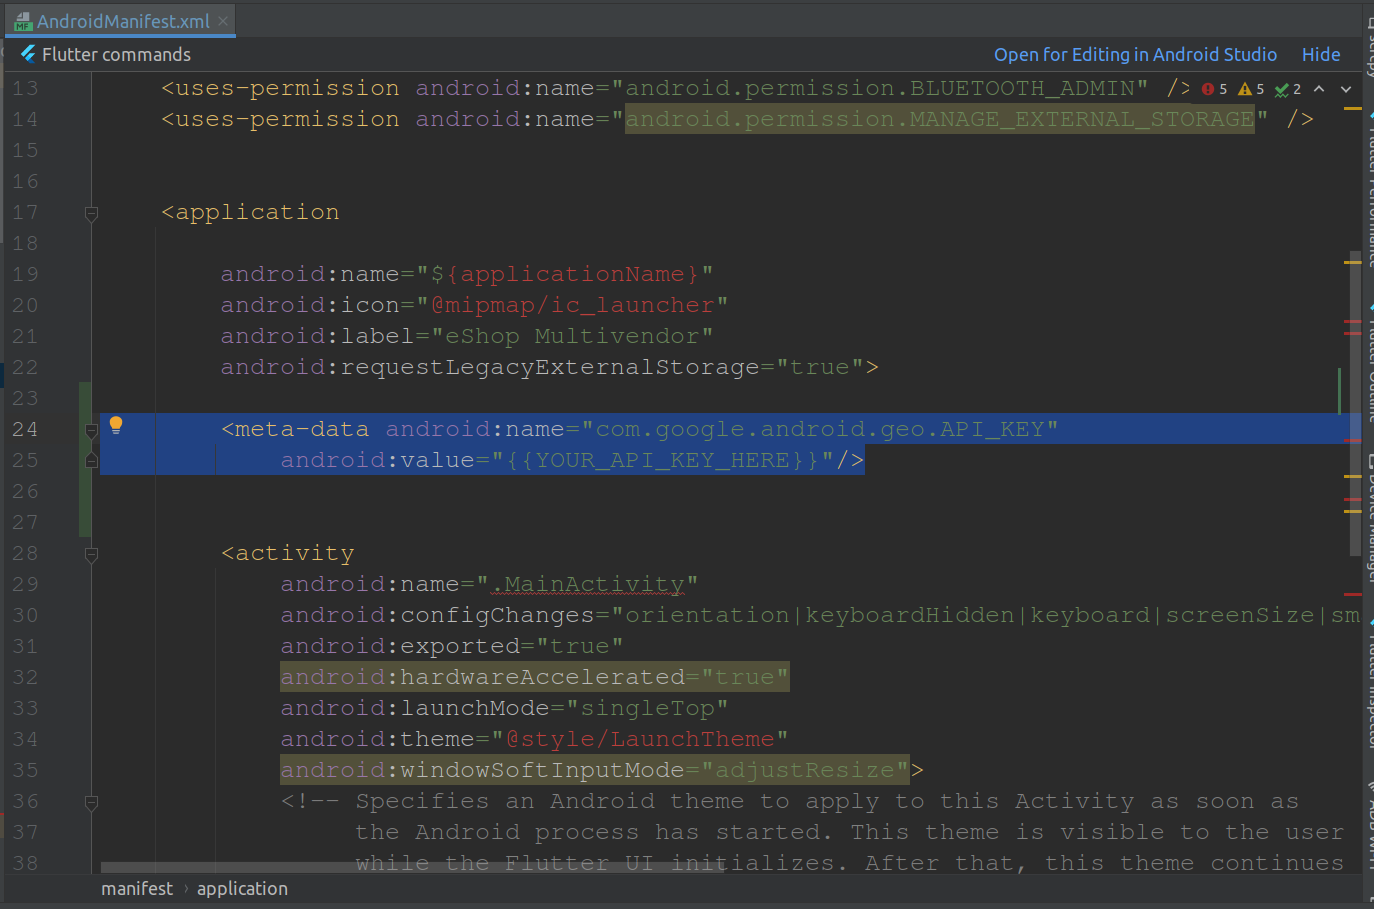
- Android Setup
- Next, open android ‣ app ‣ src ‣ main ‣ AndroidManifest.xml and paste the Google Maps meta data tag into your application tag before the activity tag, placing the API key you copied before to replace {{YOUR_API_KEY_HERE}}.
- Android Setup
Note
-
- : For the value field, please paste in your API Key from the Google Maps API registration process.
-
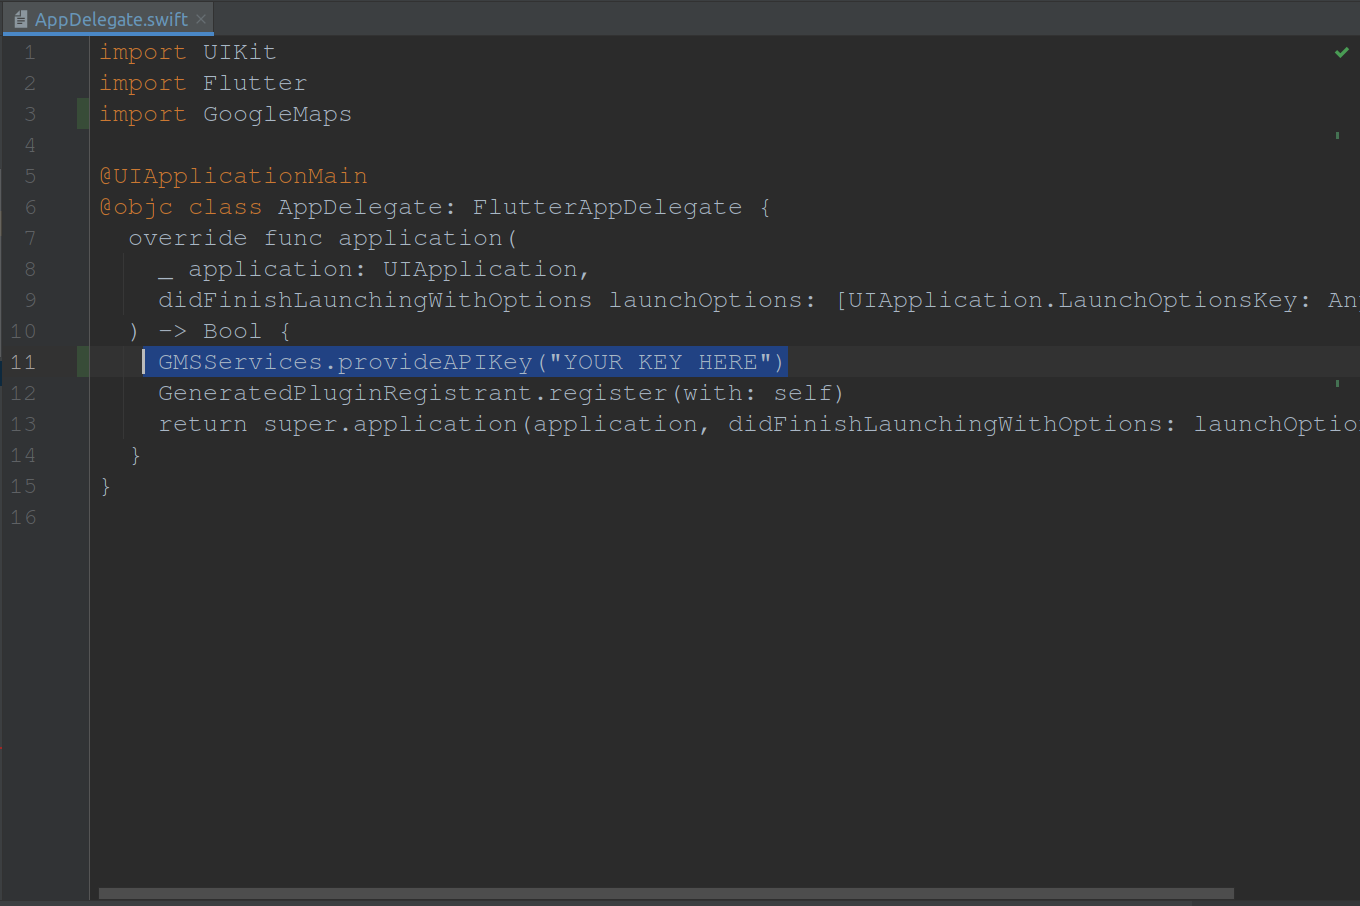
- iOS Setup
- Next, open the ios ‣ Runner ‣ AppDelegate.swift file and paste the following code at shown in image.
GMSServices.provideAPIKey(“YOUR KEY HERE”)
- Next, open the ios ‣ Runner ‣ AppDelegate.swift file and paste the following code at shown in image.
- iOS Setup
Note
-
- : Again, for the value field please paste in your API Key from the registration process.
-
Integrate with admin panel
Go to lib/settings.dart and replace the hostUrl with your admin panel url.
Change app logo
Add Logo Manually
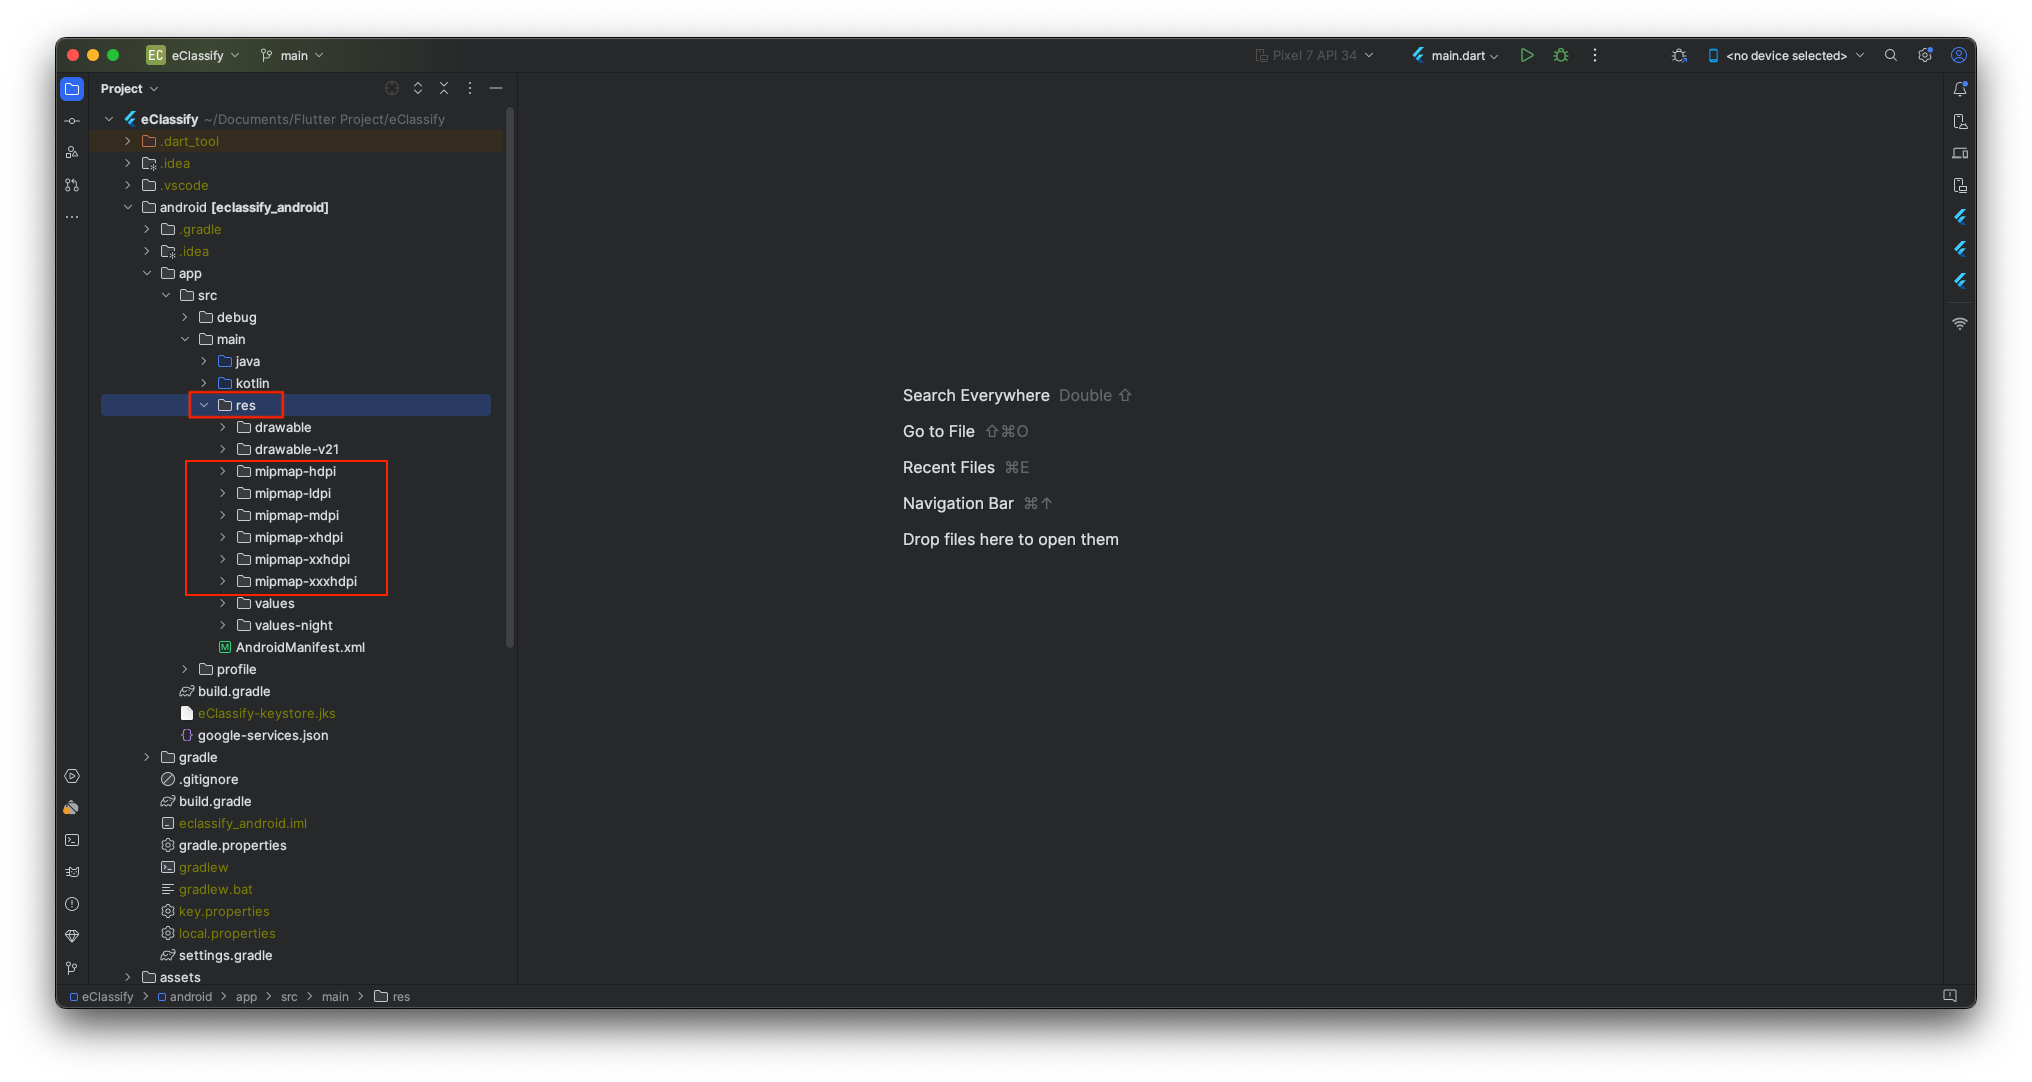
For Android, open android > app > src > main > res and add here your logo according to device screen size
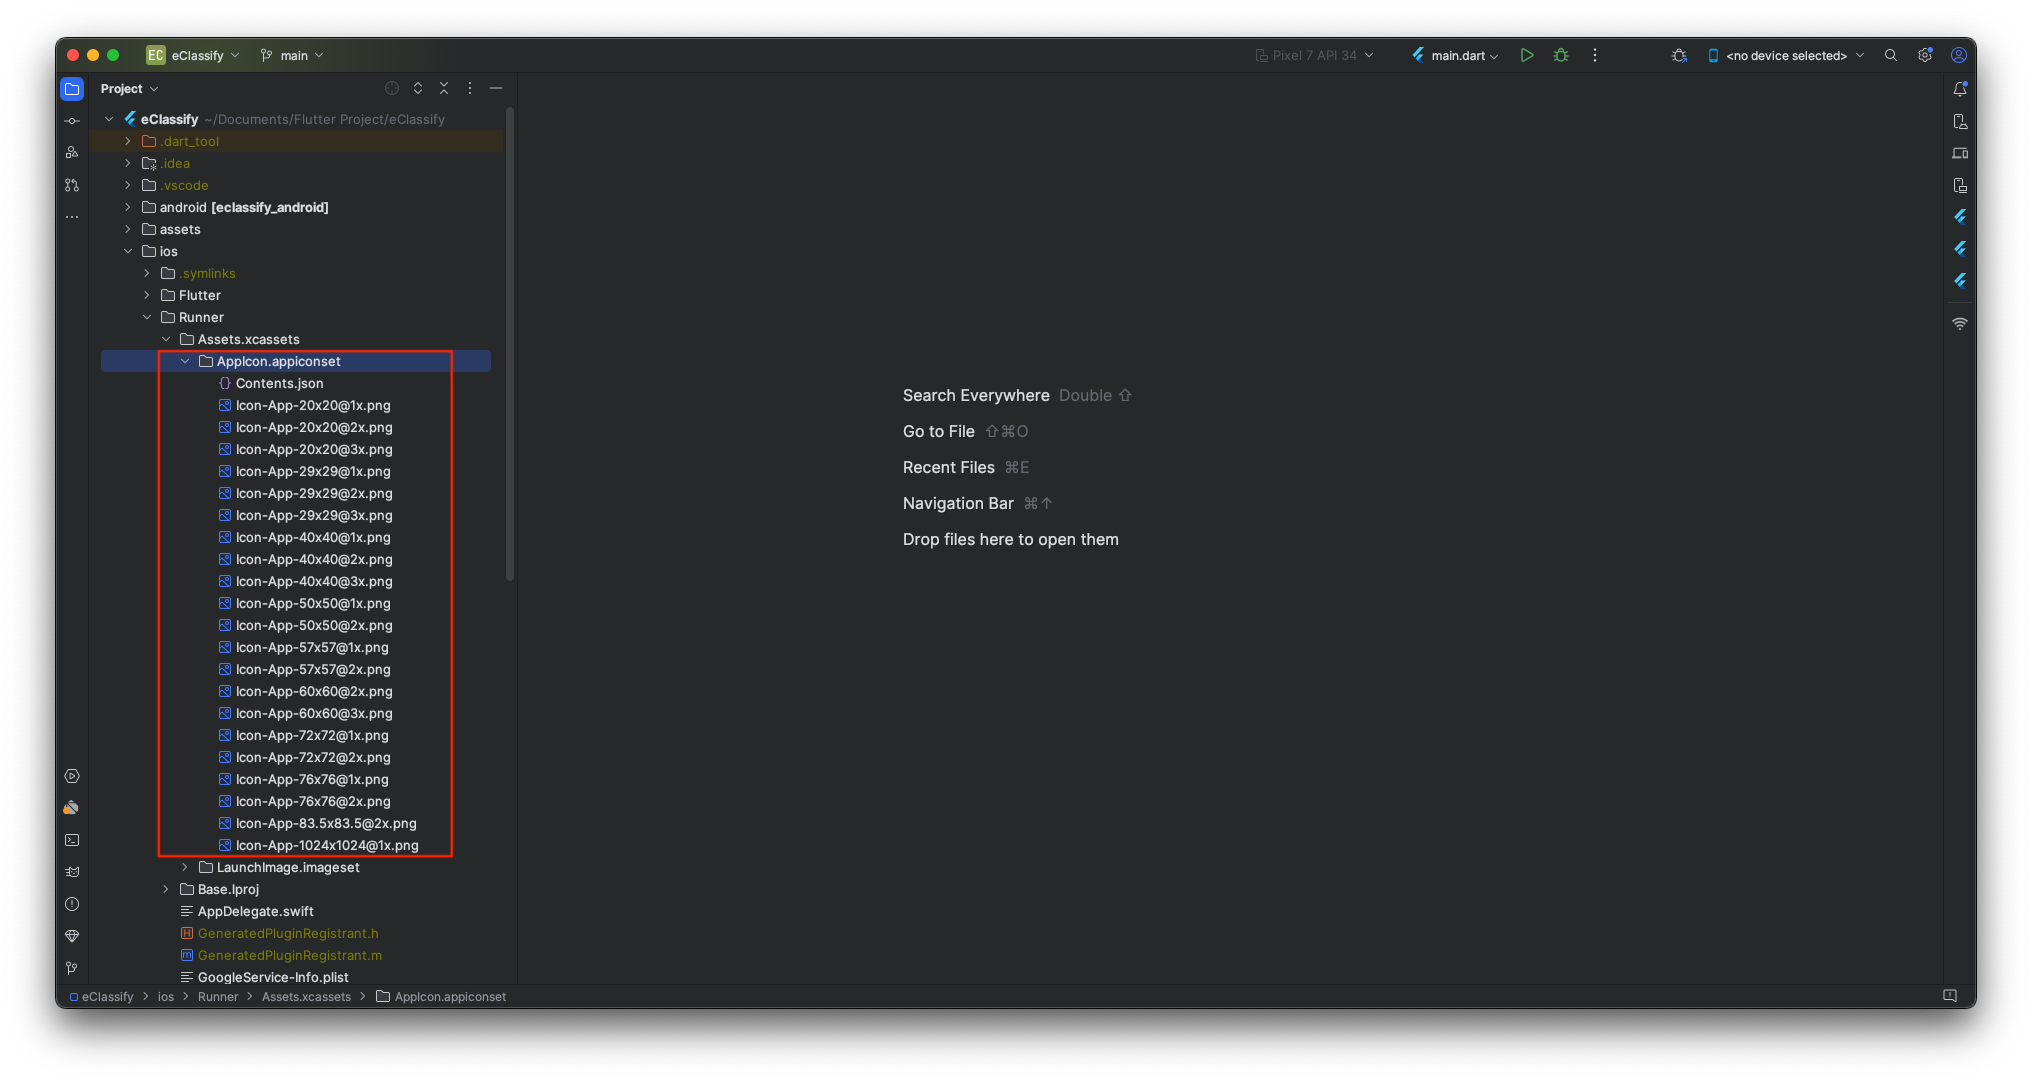
For IOS open ios > Runner > Assets.xcassets > AppIcon.appiconset here and add your logo according to diffrent size.
Change app name
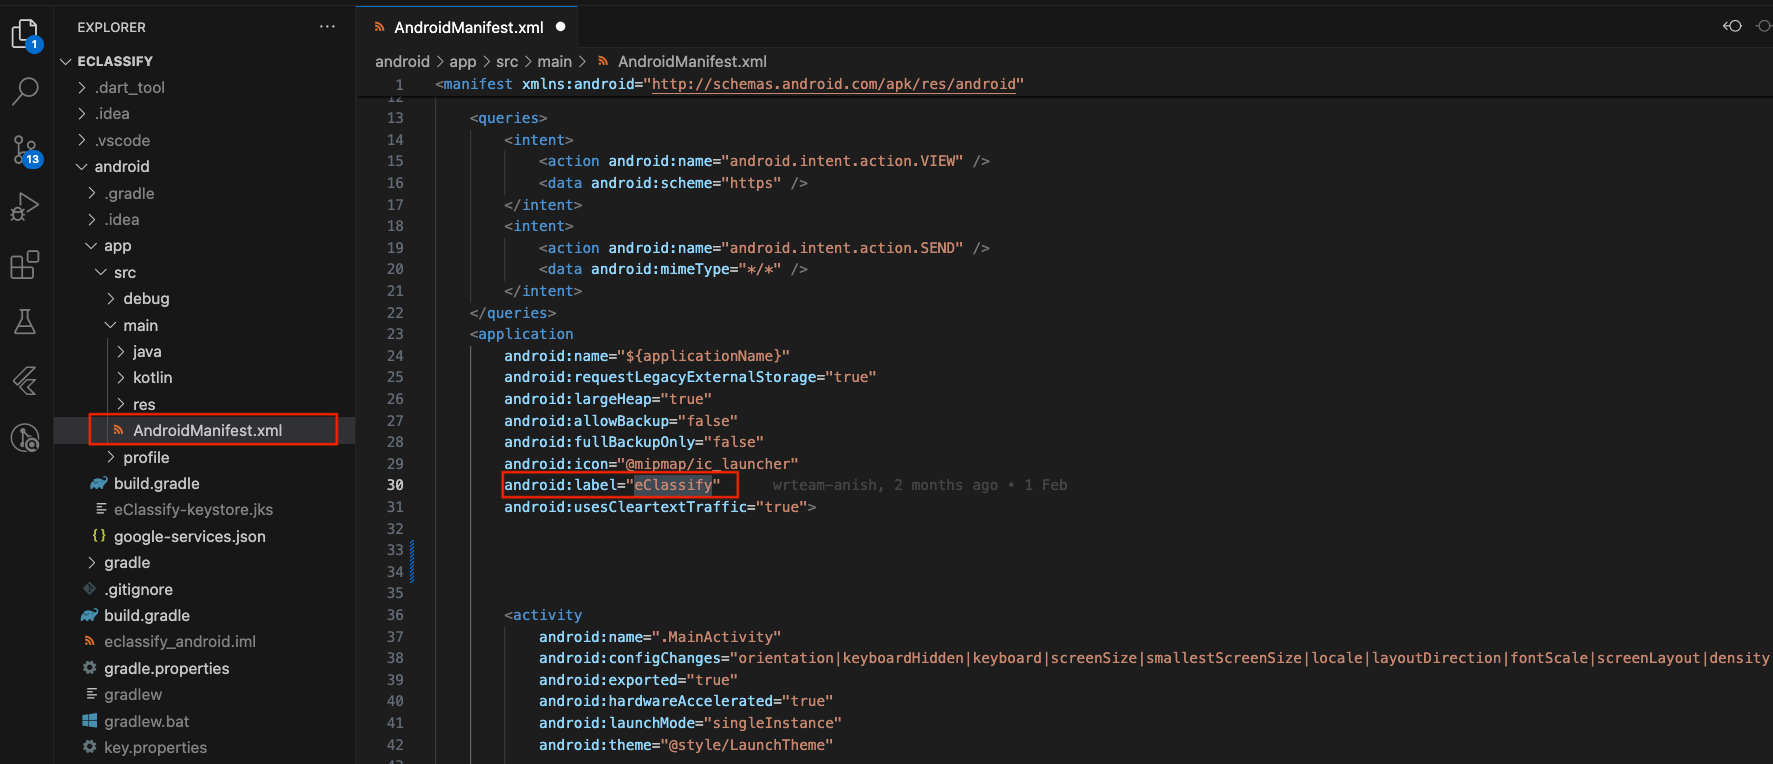
For Android, go to android/app/src/main/AndroidManifest.xml and change the app name as shown in image. Replace the selected Eclassify text with your school name
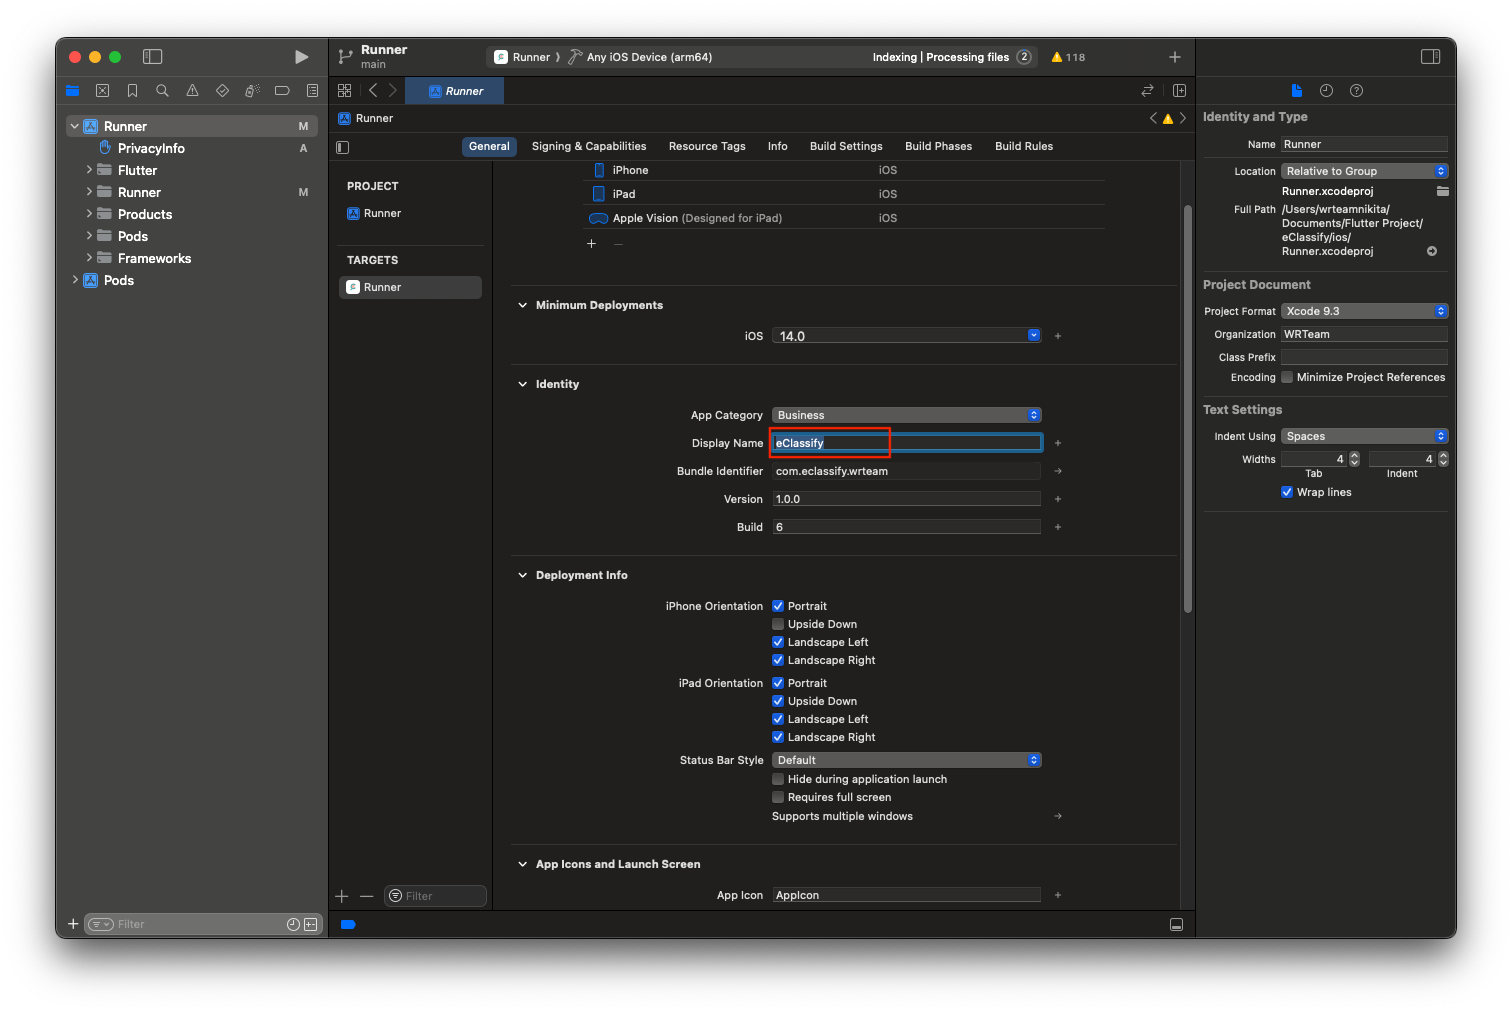
For IOS open this project in xcode and enter your app name in display name field as shown in image.
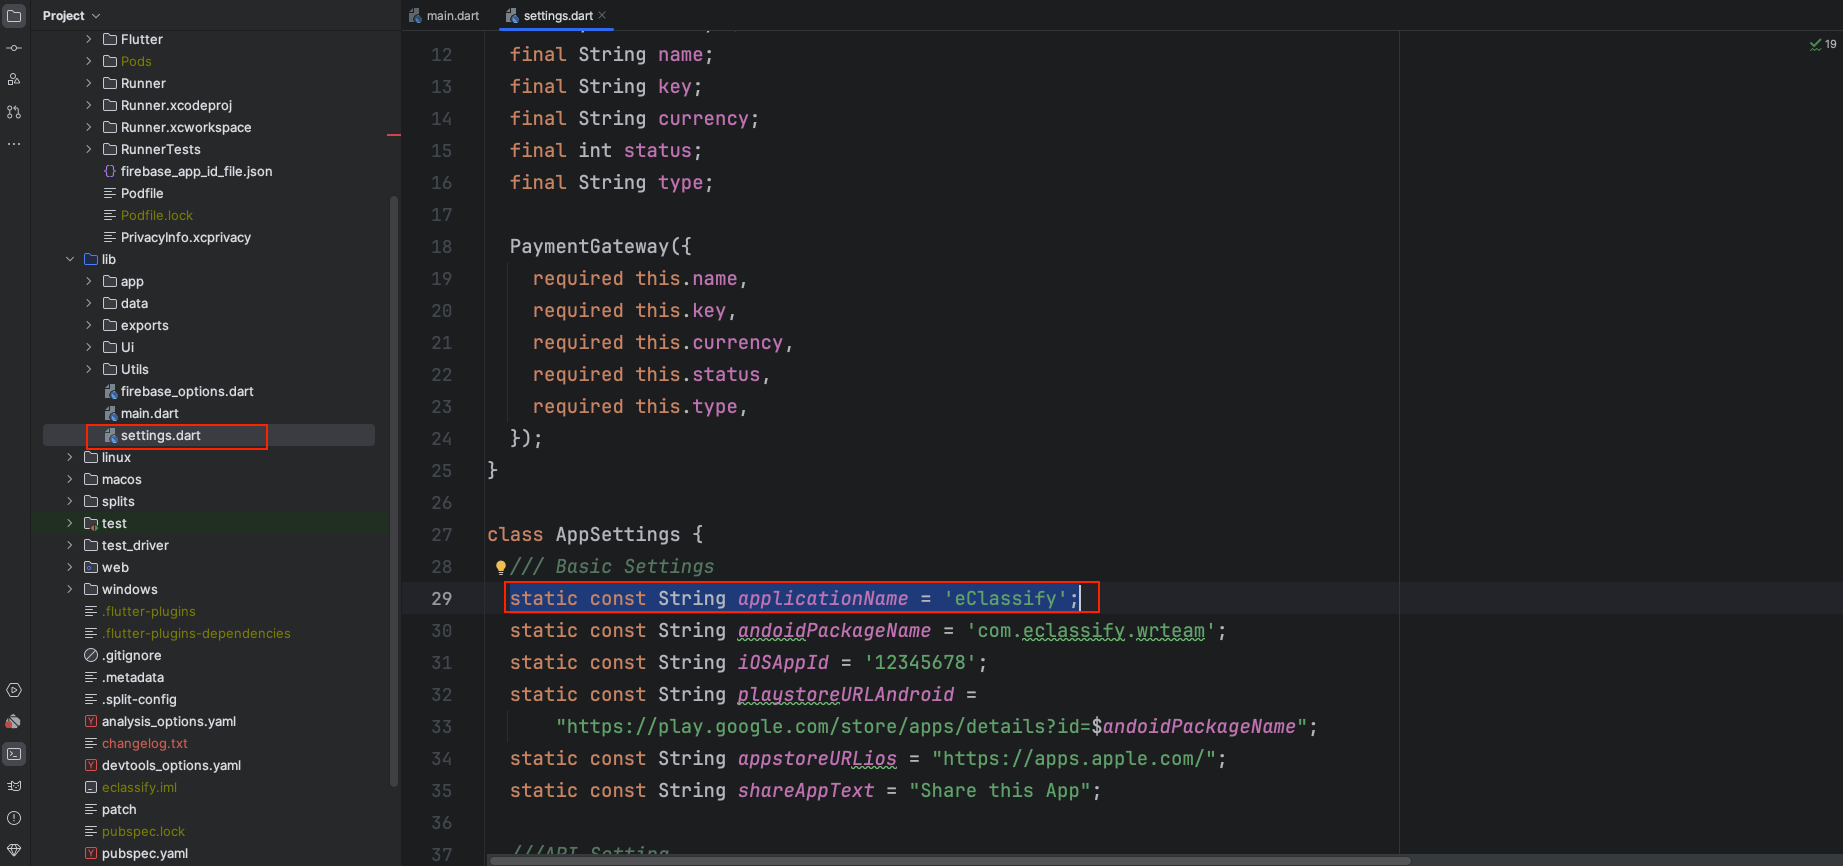
Change app name in lib -> settings.dart file as shown in image.
How to Change Splash Screen Image in app
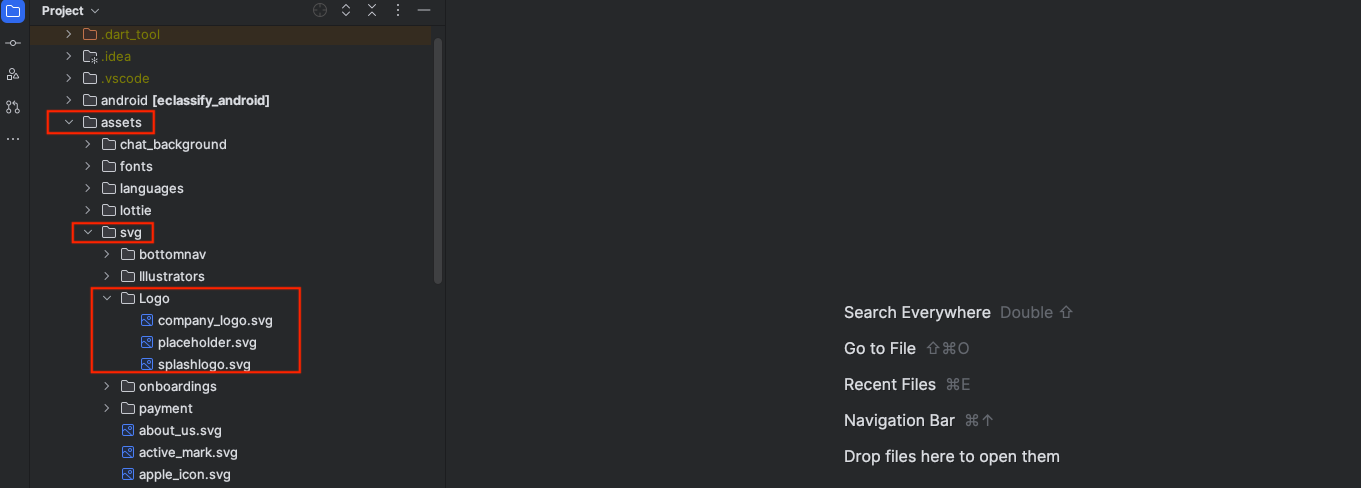
- Go to assets folder -> svg -> Logo folder. You can change your image to exist image with same name.
How to Change Images in app
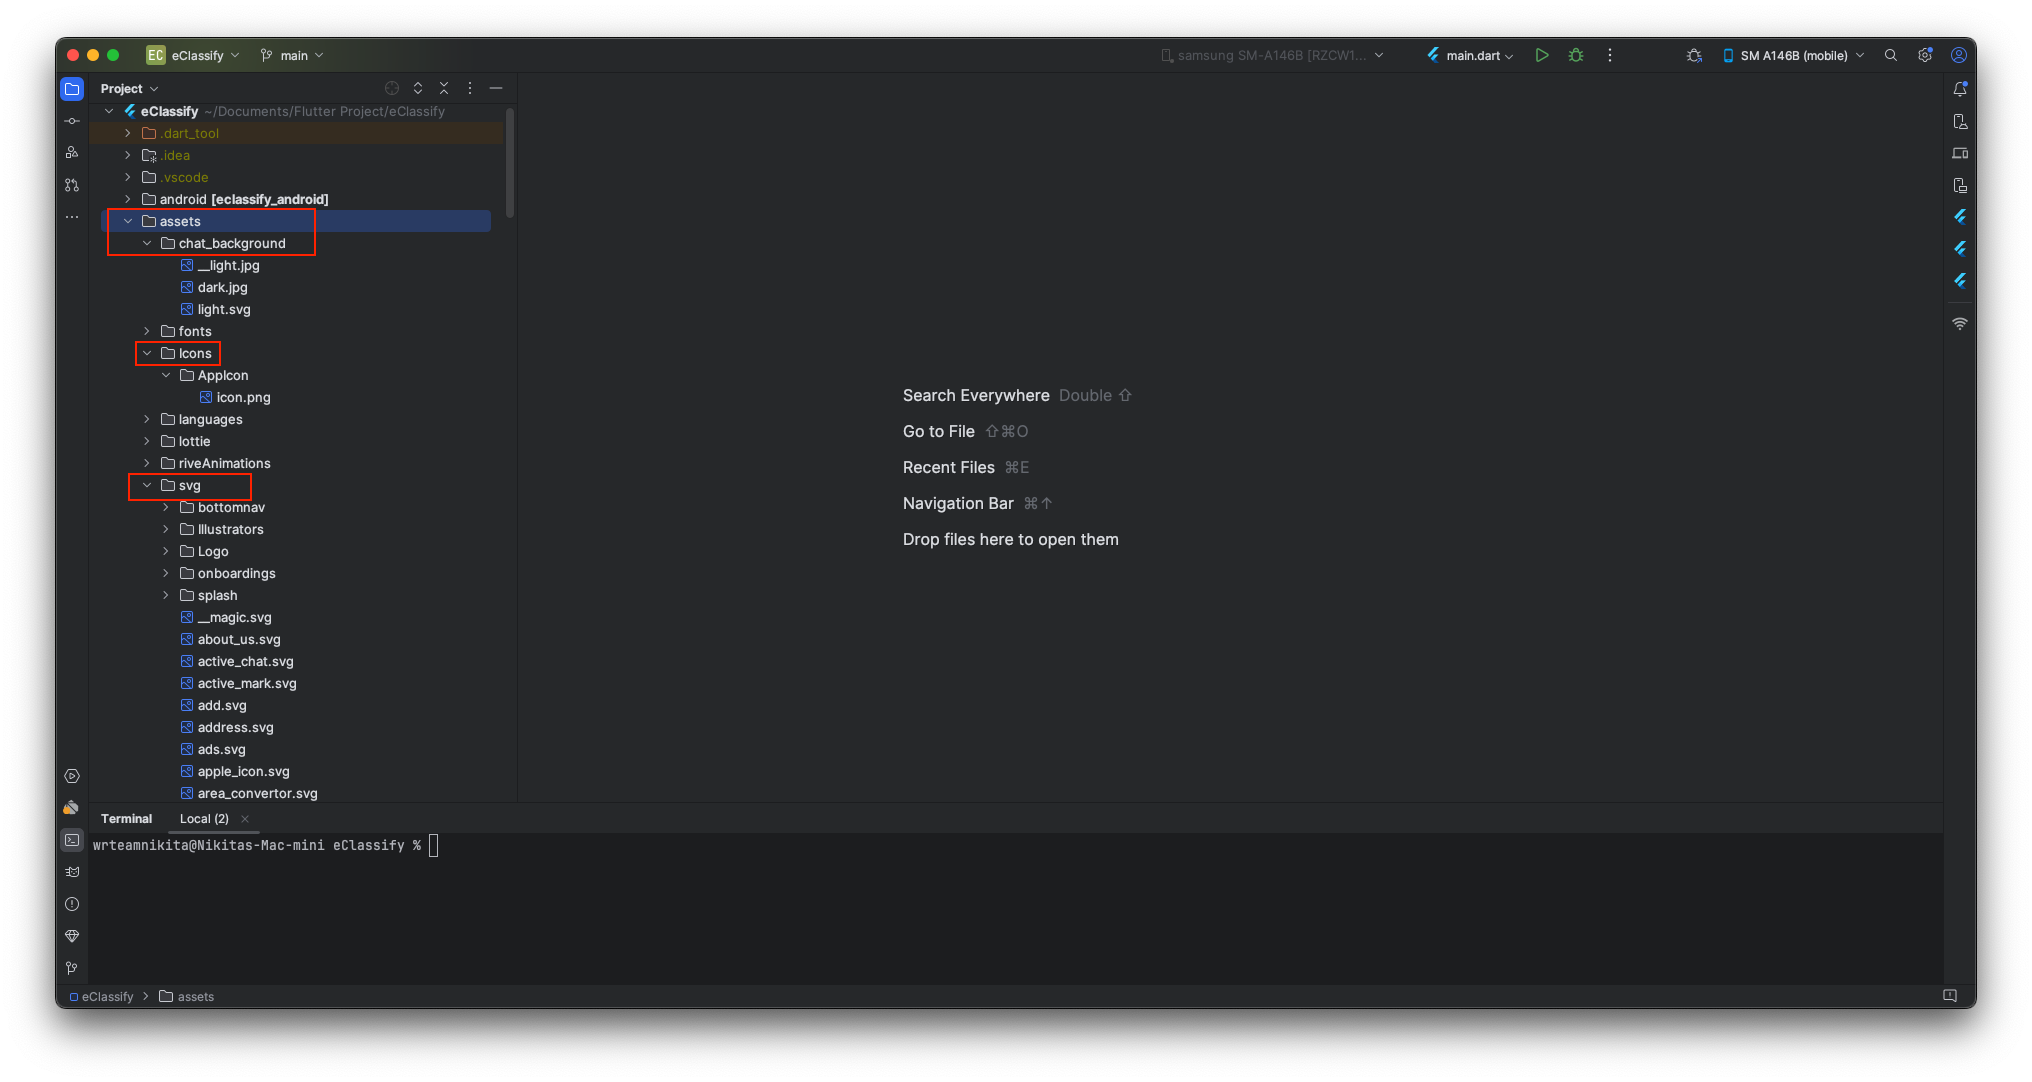
- Go to assets folder. You can change your image to exist image with same name.
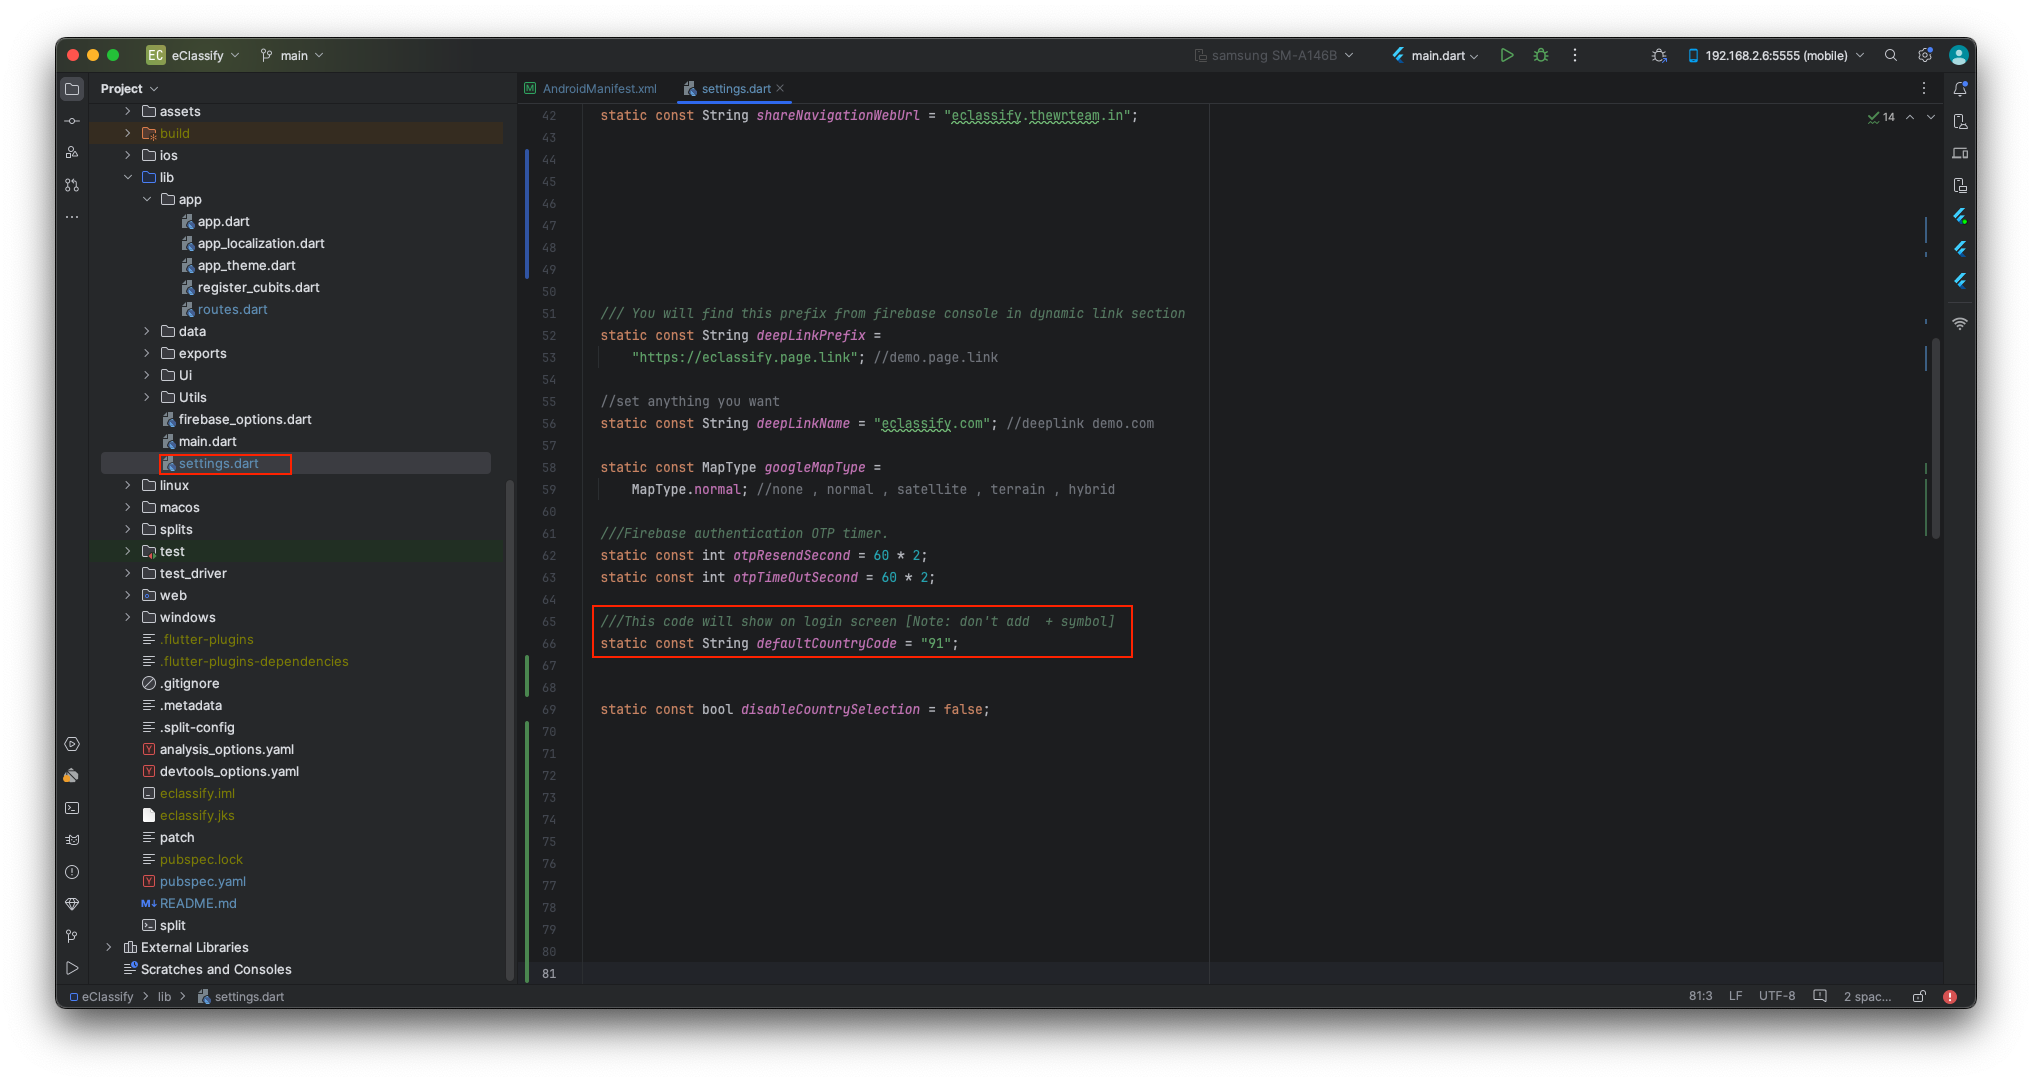
How to Change Default Country Code in app
- Go to lib -> settings.dart file.. Here you can add your default country code.
Run this app
Open your terminal, navigate to your project path and execute the following command to run this app.
flutter run
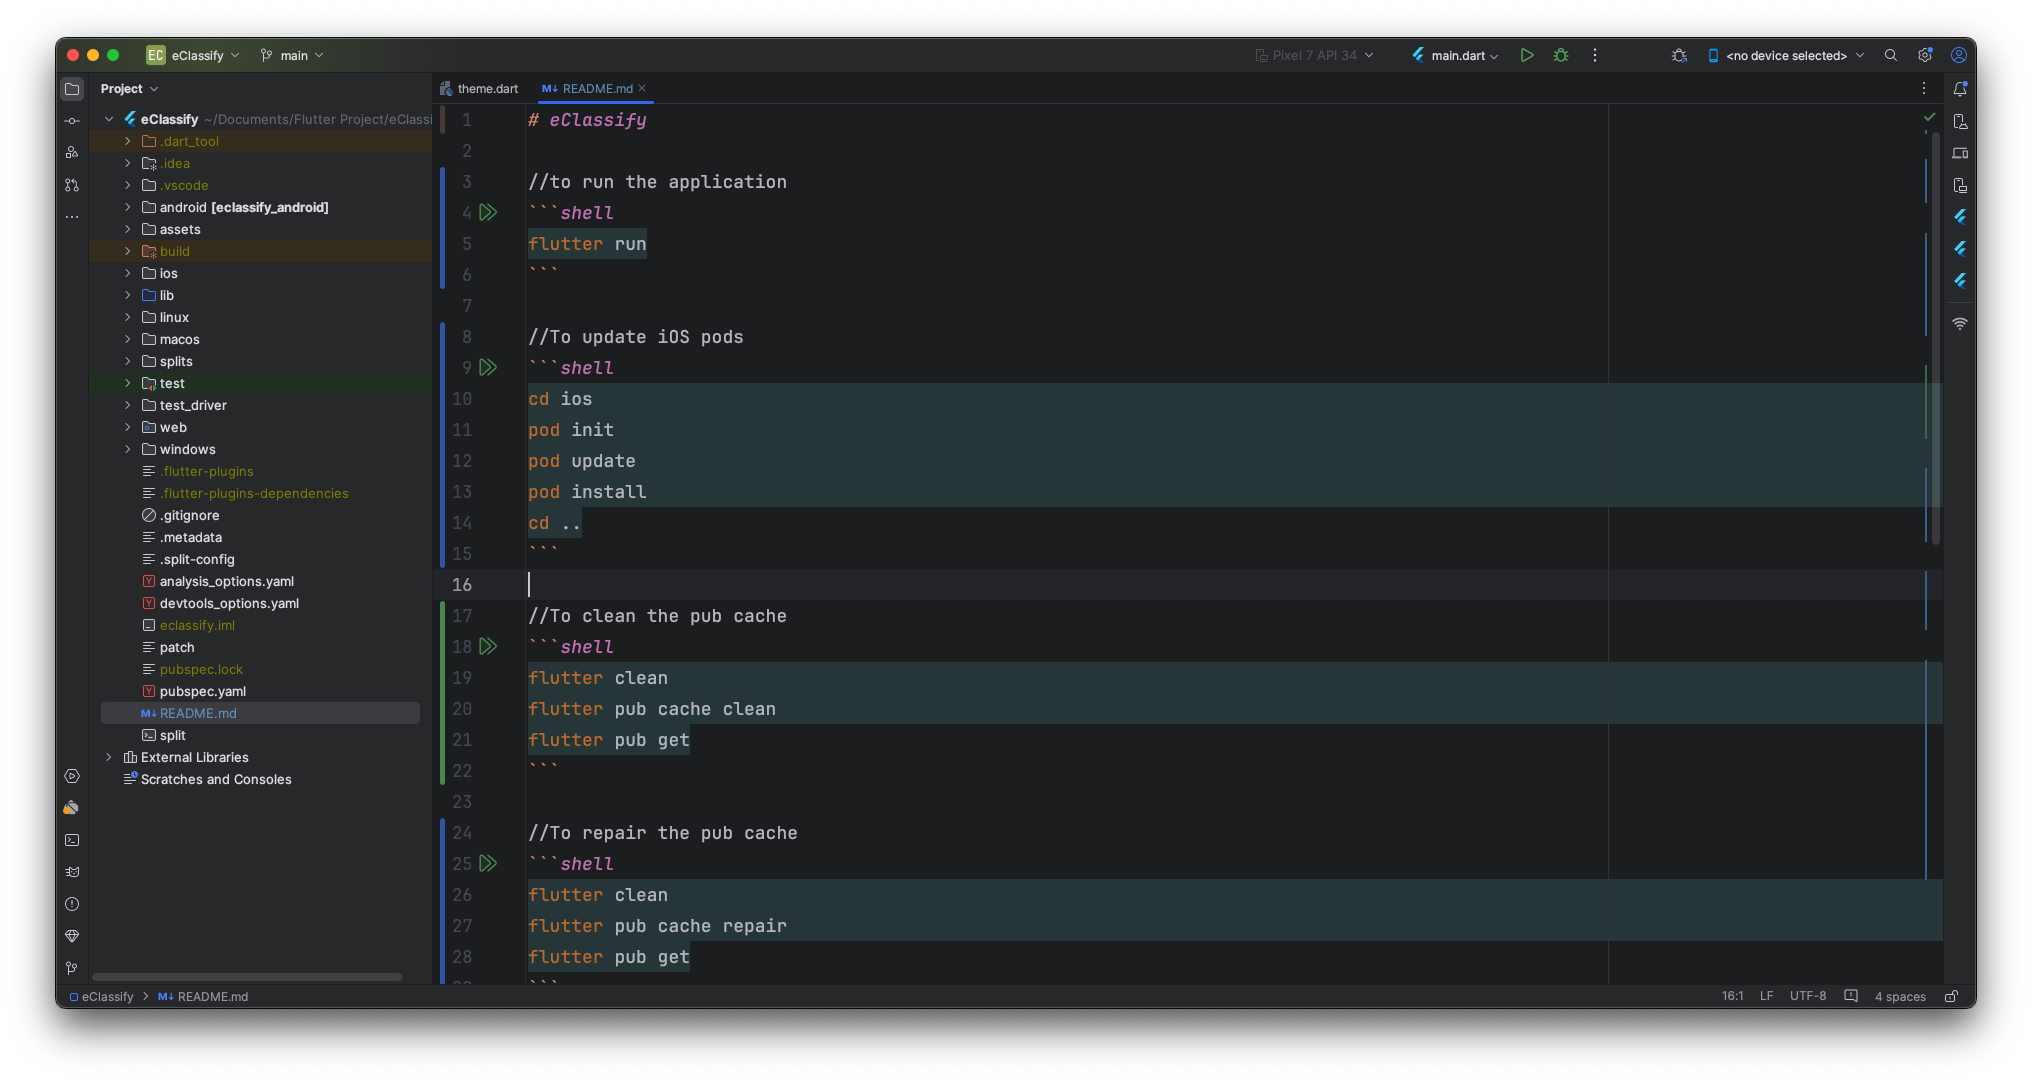
Go to README.md file to check all the commonly used commands to fix issues that you may encounter while running the app. You’ll also be able to run the shell script directly if you’re using Android Studio.
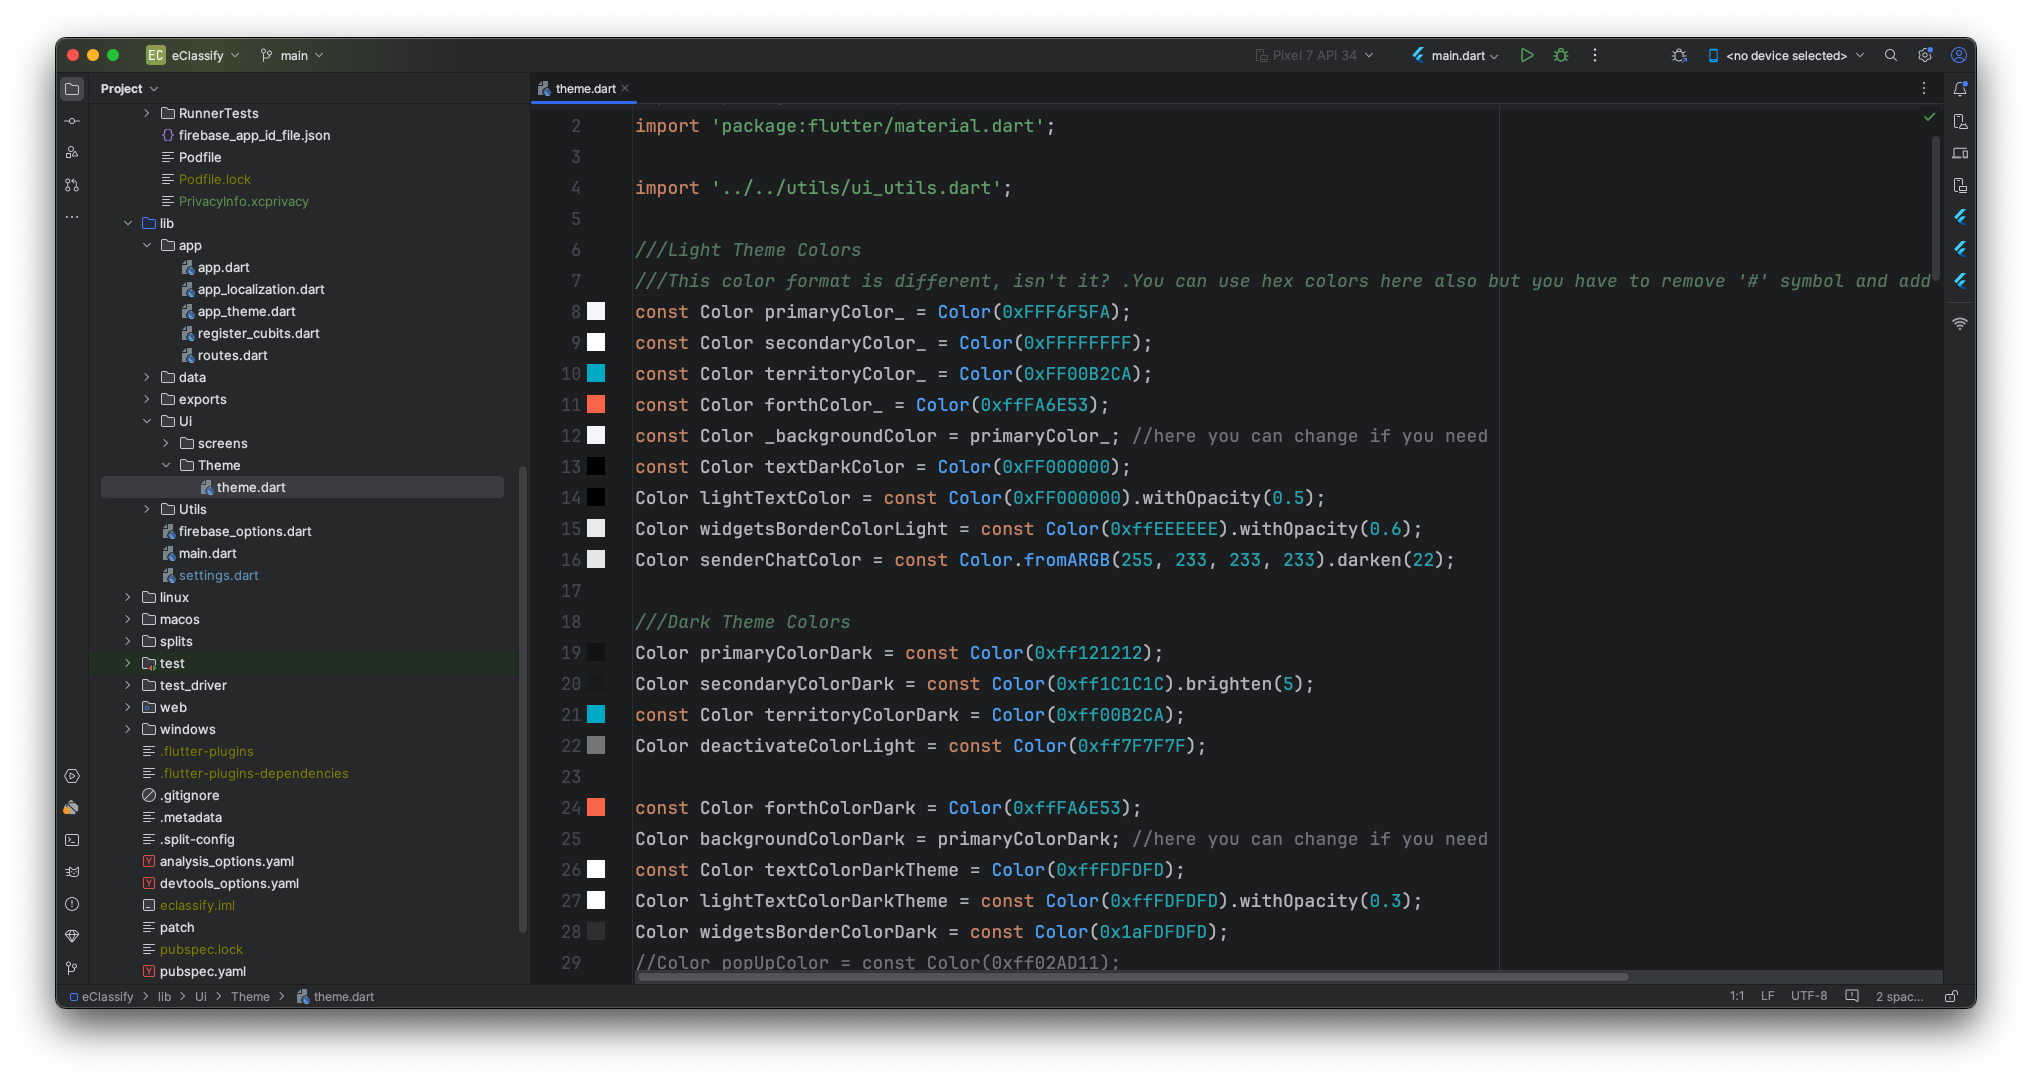
Change app theme
Go to lib/Ui/Theme/theme.dart and set your theme colors.
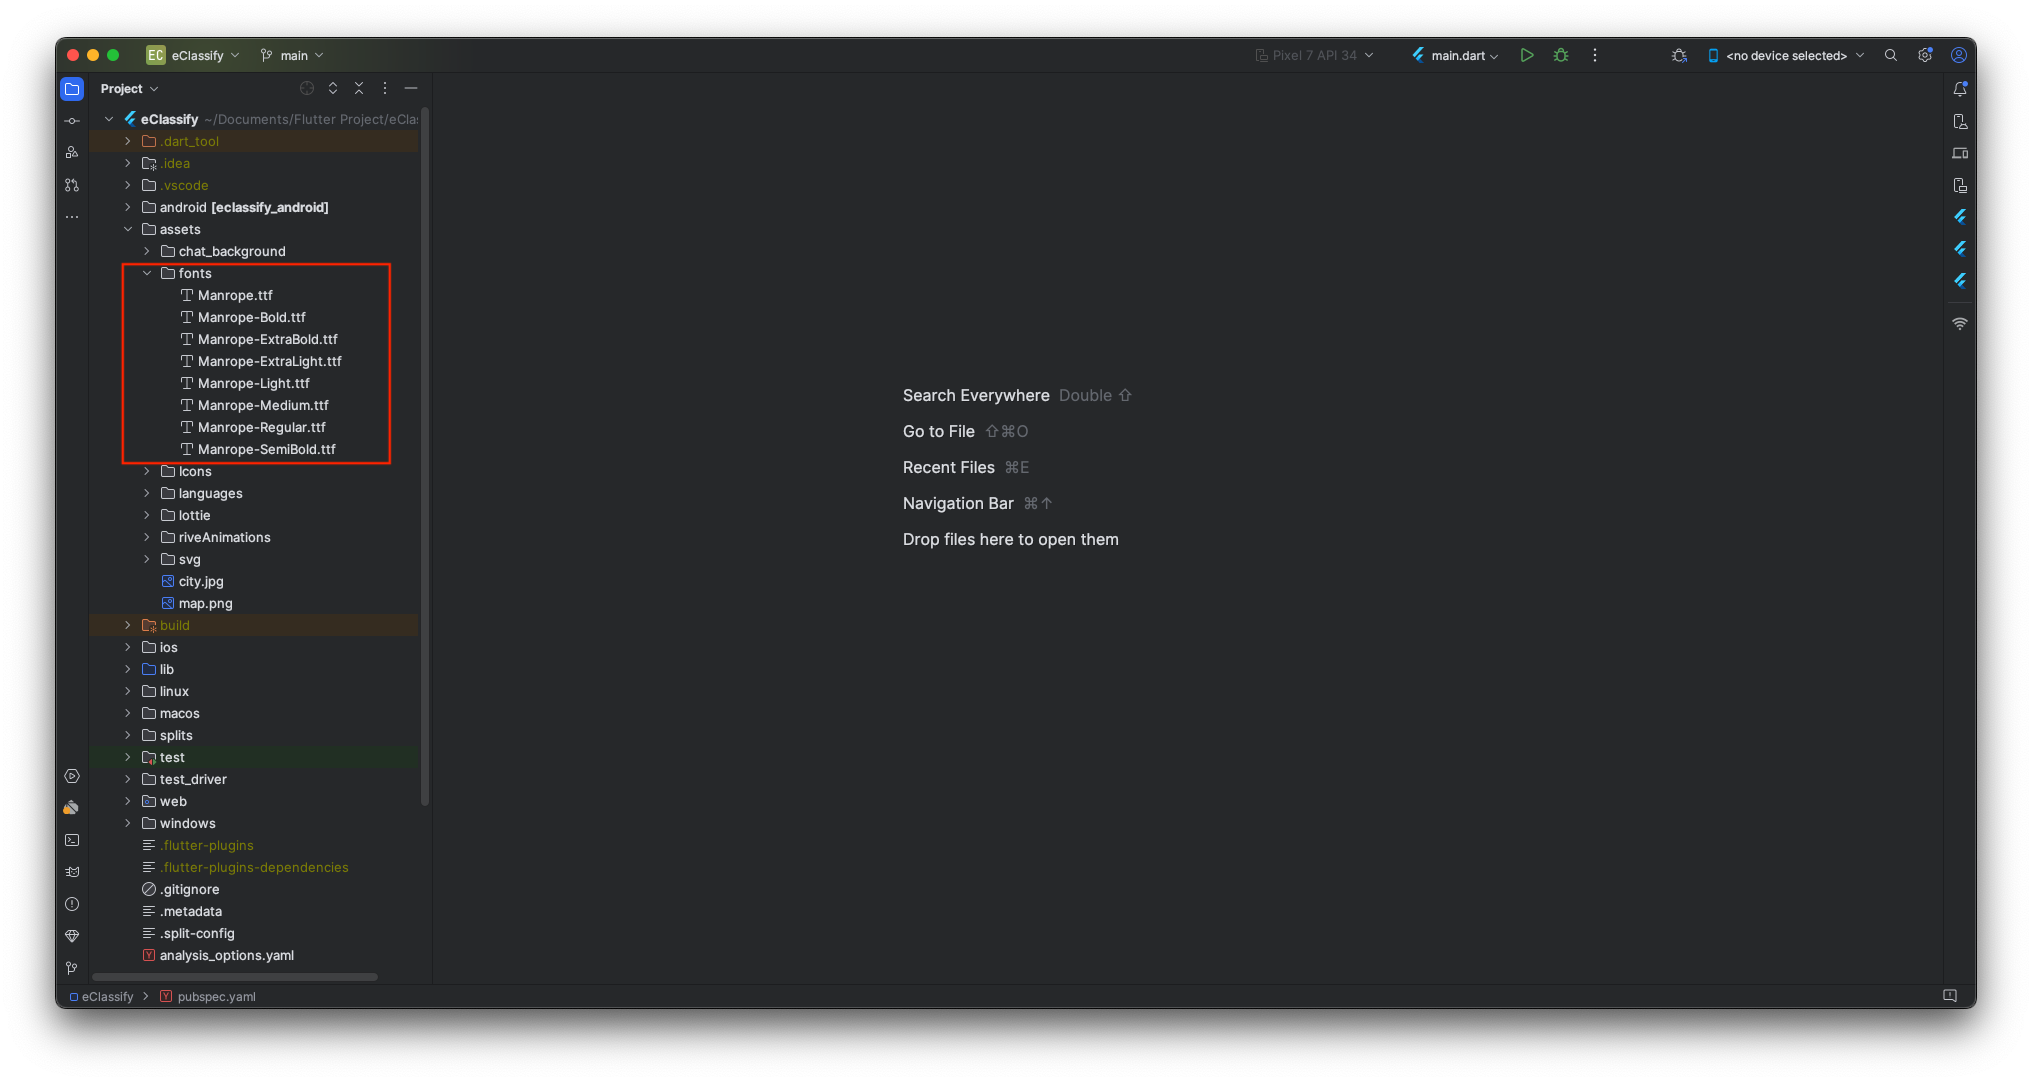
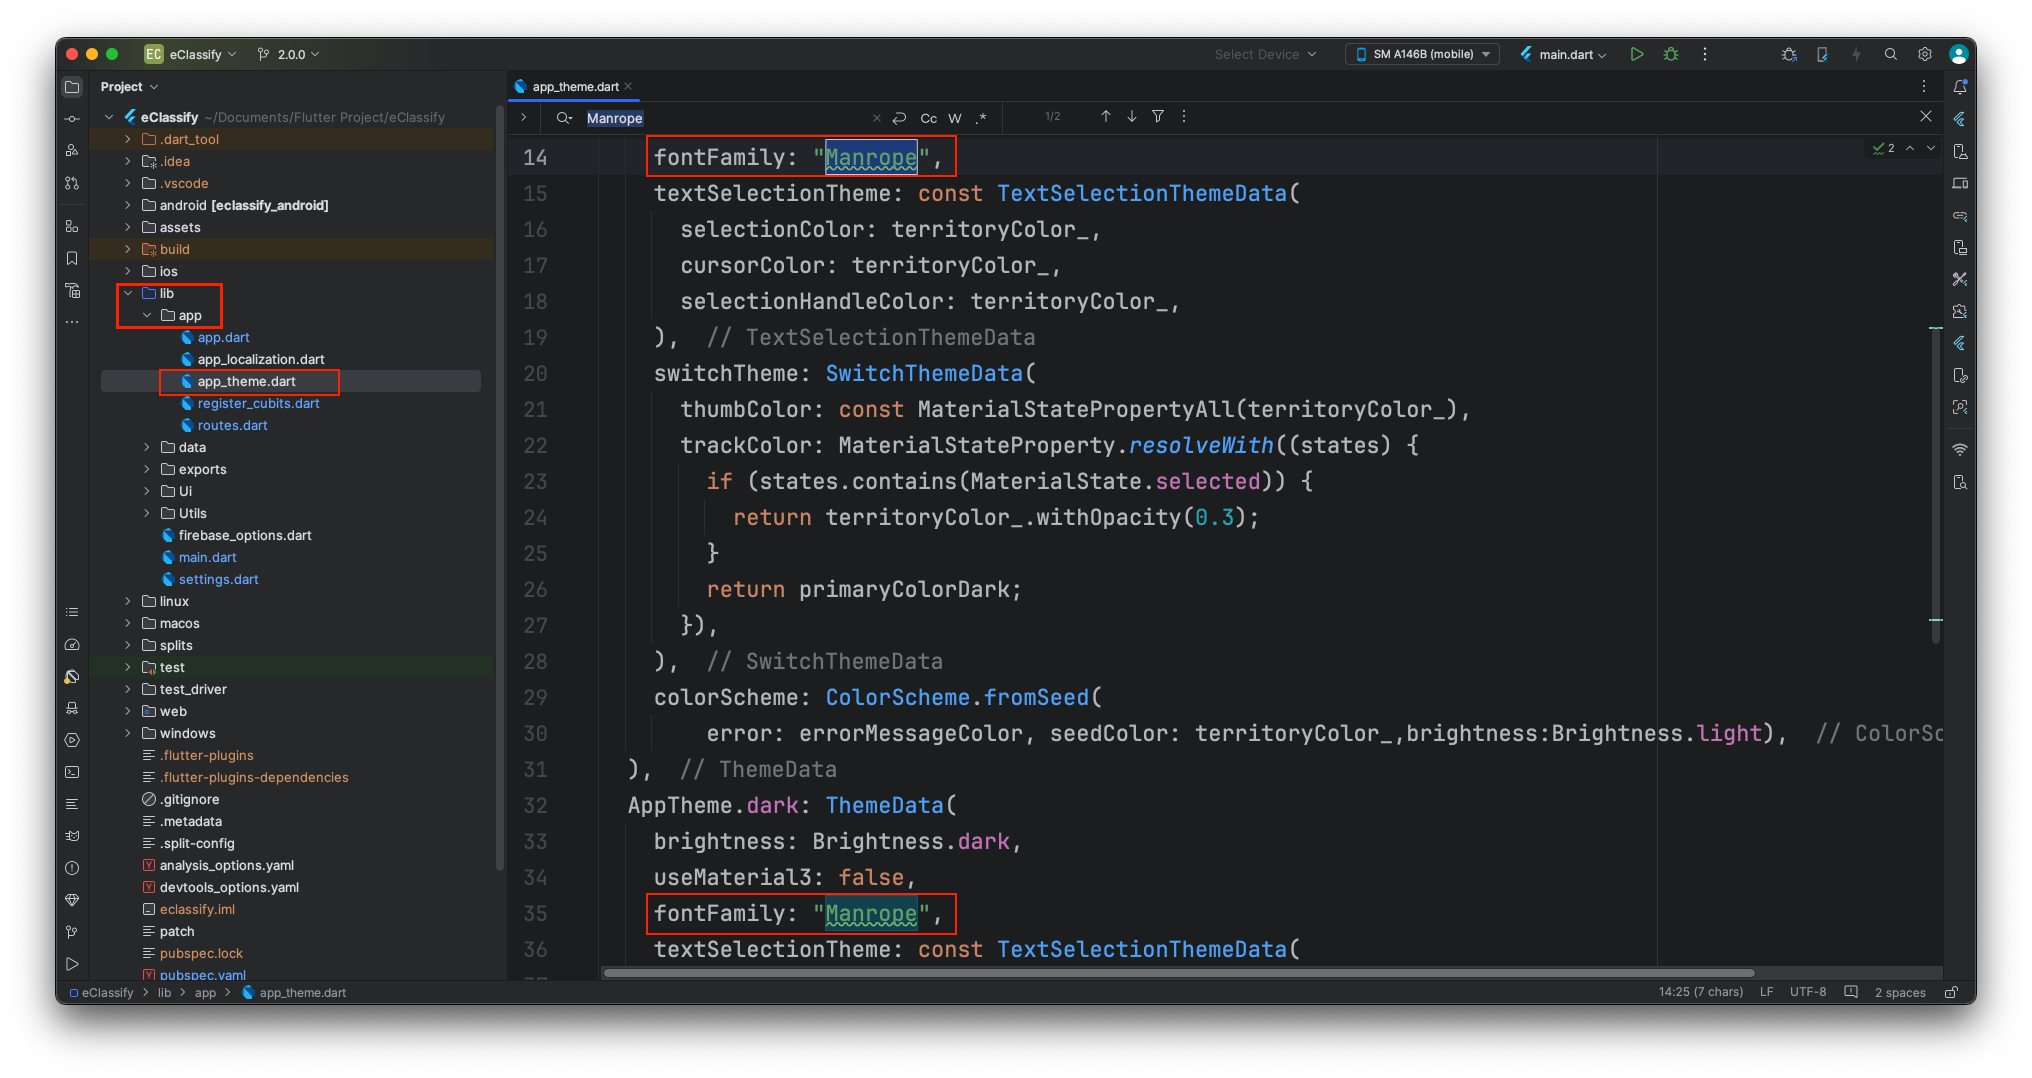
Change font in app
-
Go to assets/fonts/ and add .tff files of fonts.
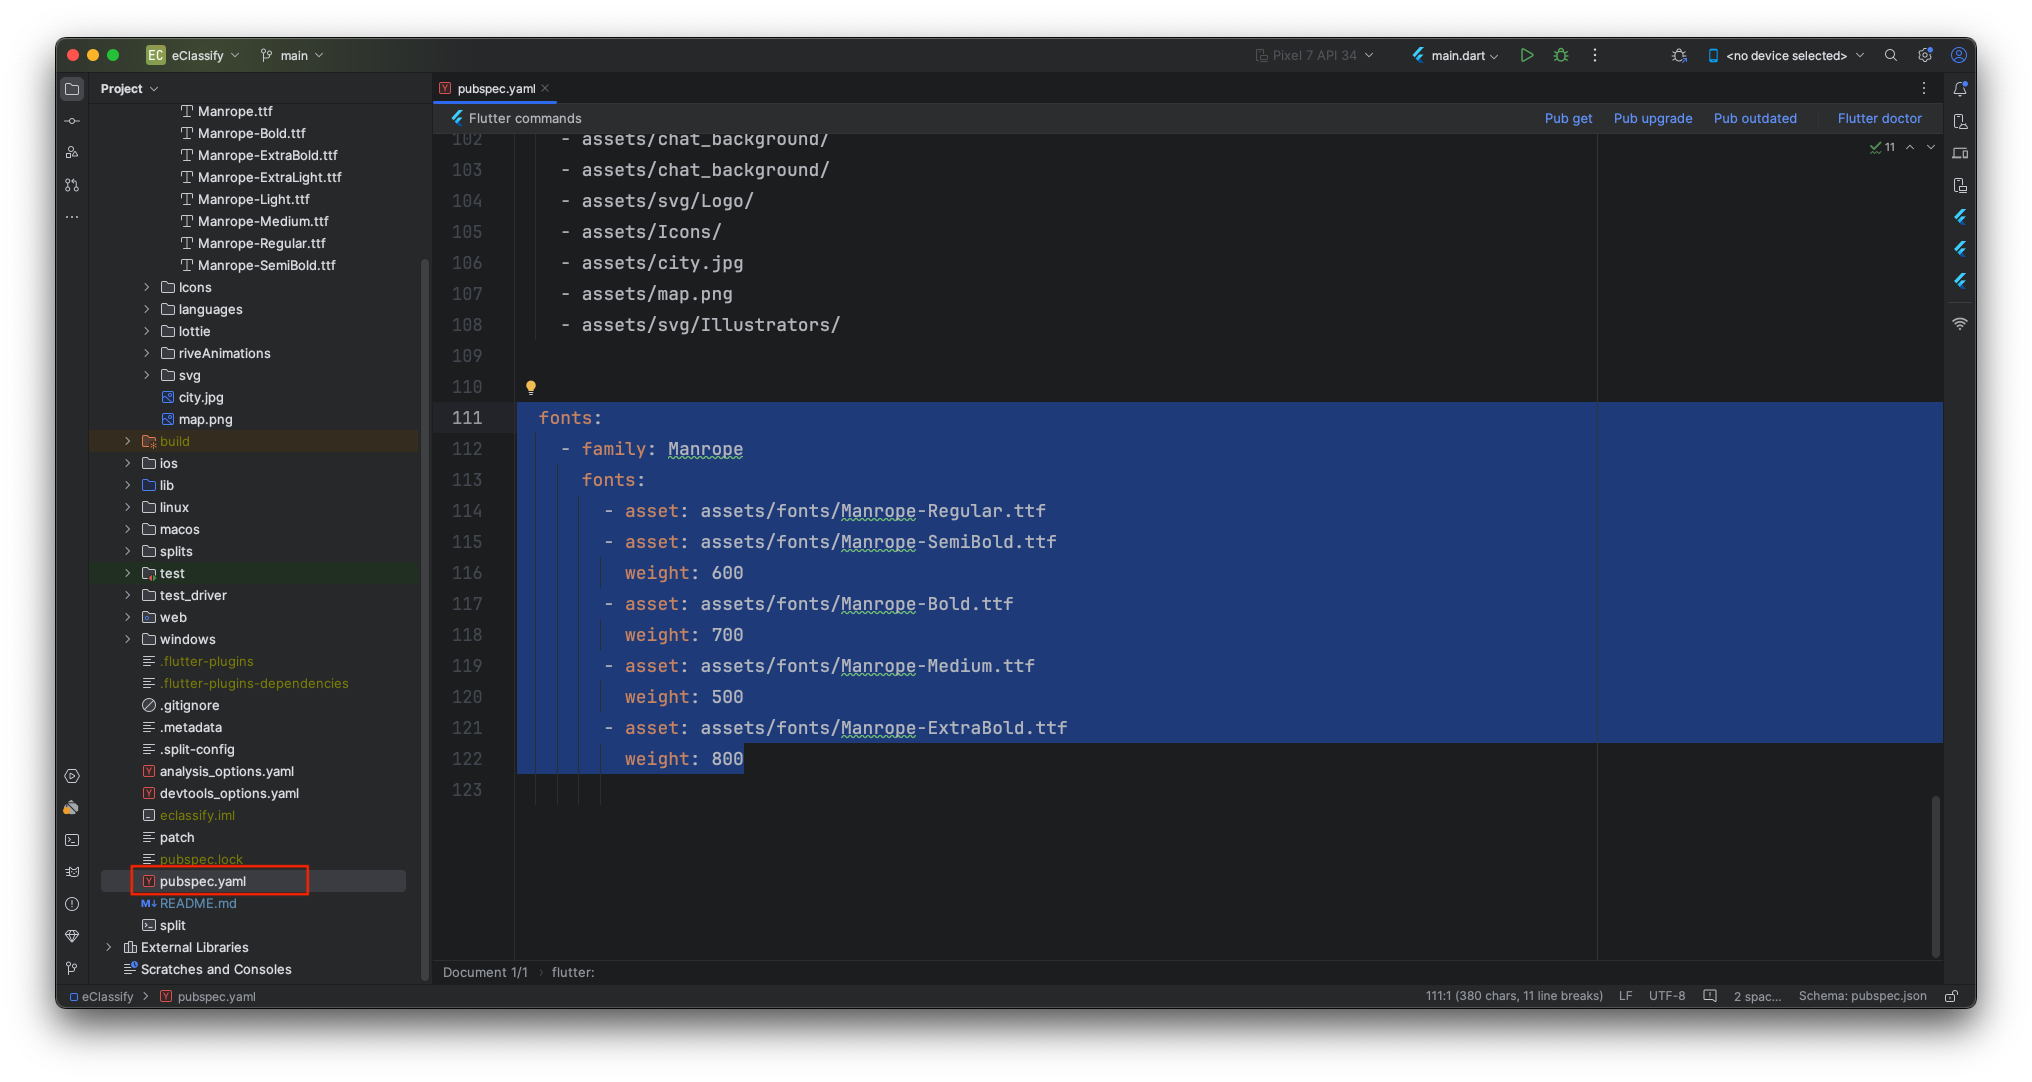
-
Go to pubspecs.yaml and add your font as shown in image.
-
Go to lib -> app -> app_theme.dart file and change fontFamily with your font name as shown in image.
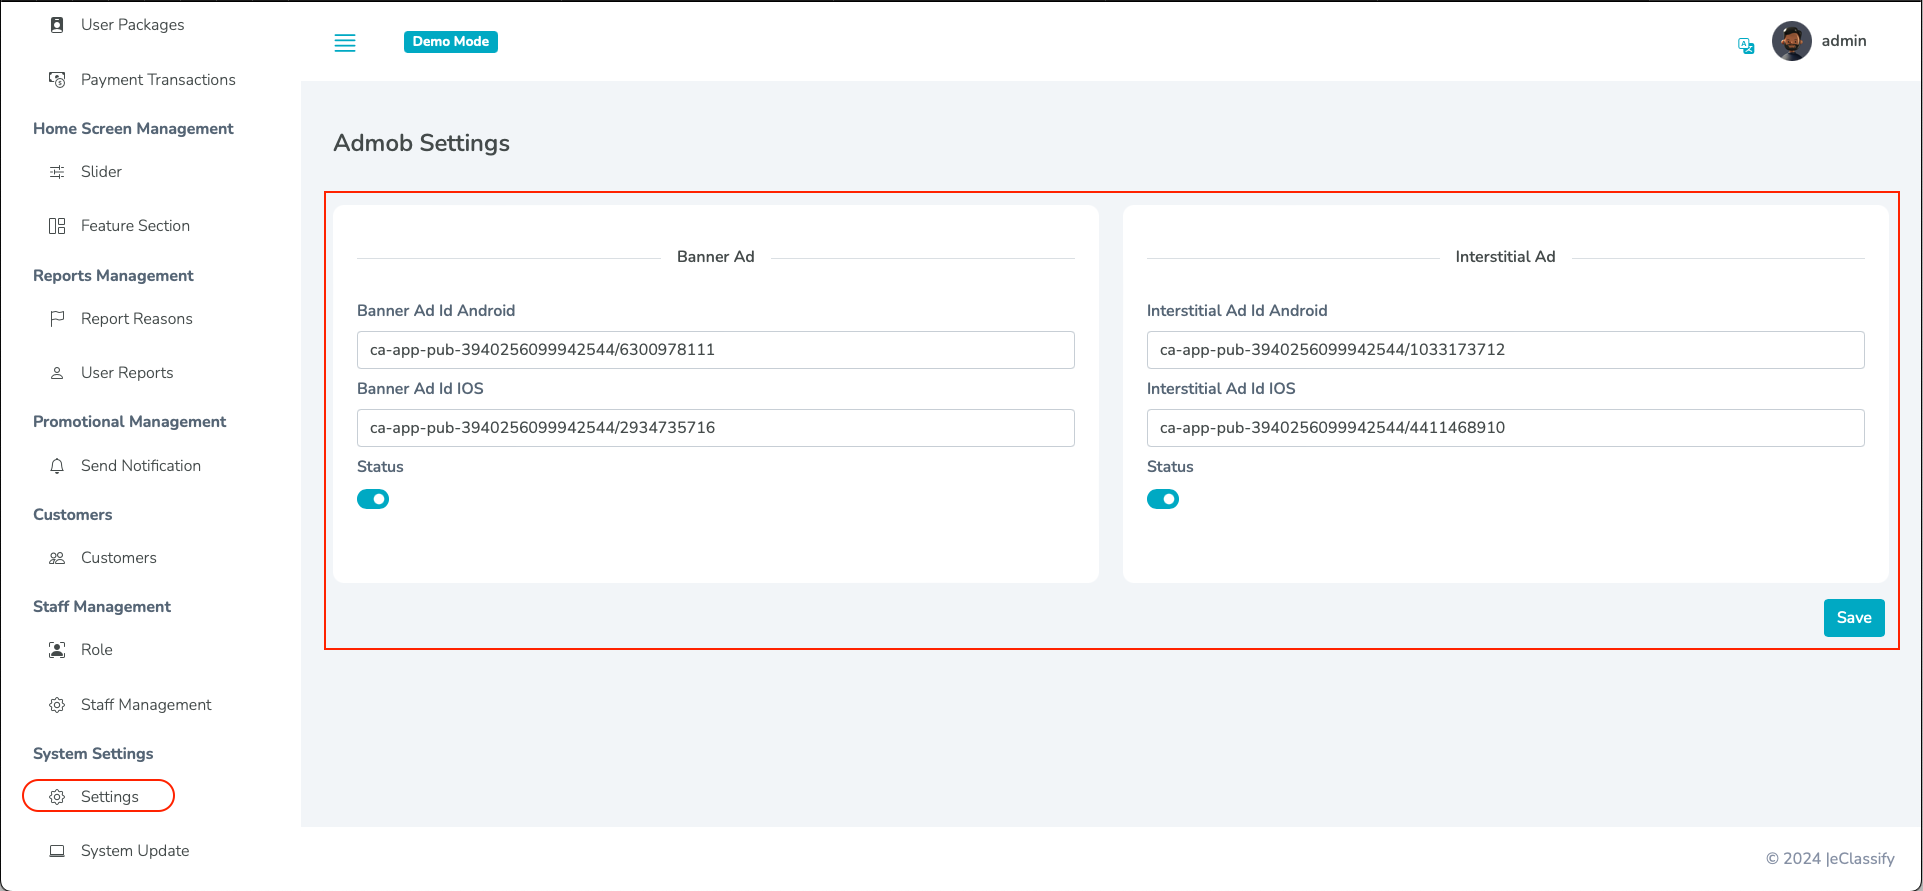
How to enable/disable and admob settings
-
-
If you want to disable google admob then you can disable from admin panel -> settings -> admob settings
-
Create android and iOS app in google admob account. You can create google admob account from here. https://admob.google.com/home/
-
Create banner and interstitial ads and copy those ads id.
-
Paste those ads id in admin panel -> settings -> admob settings..
-
-
-
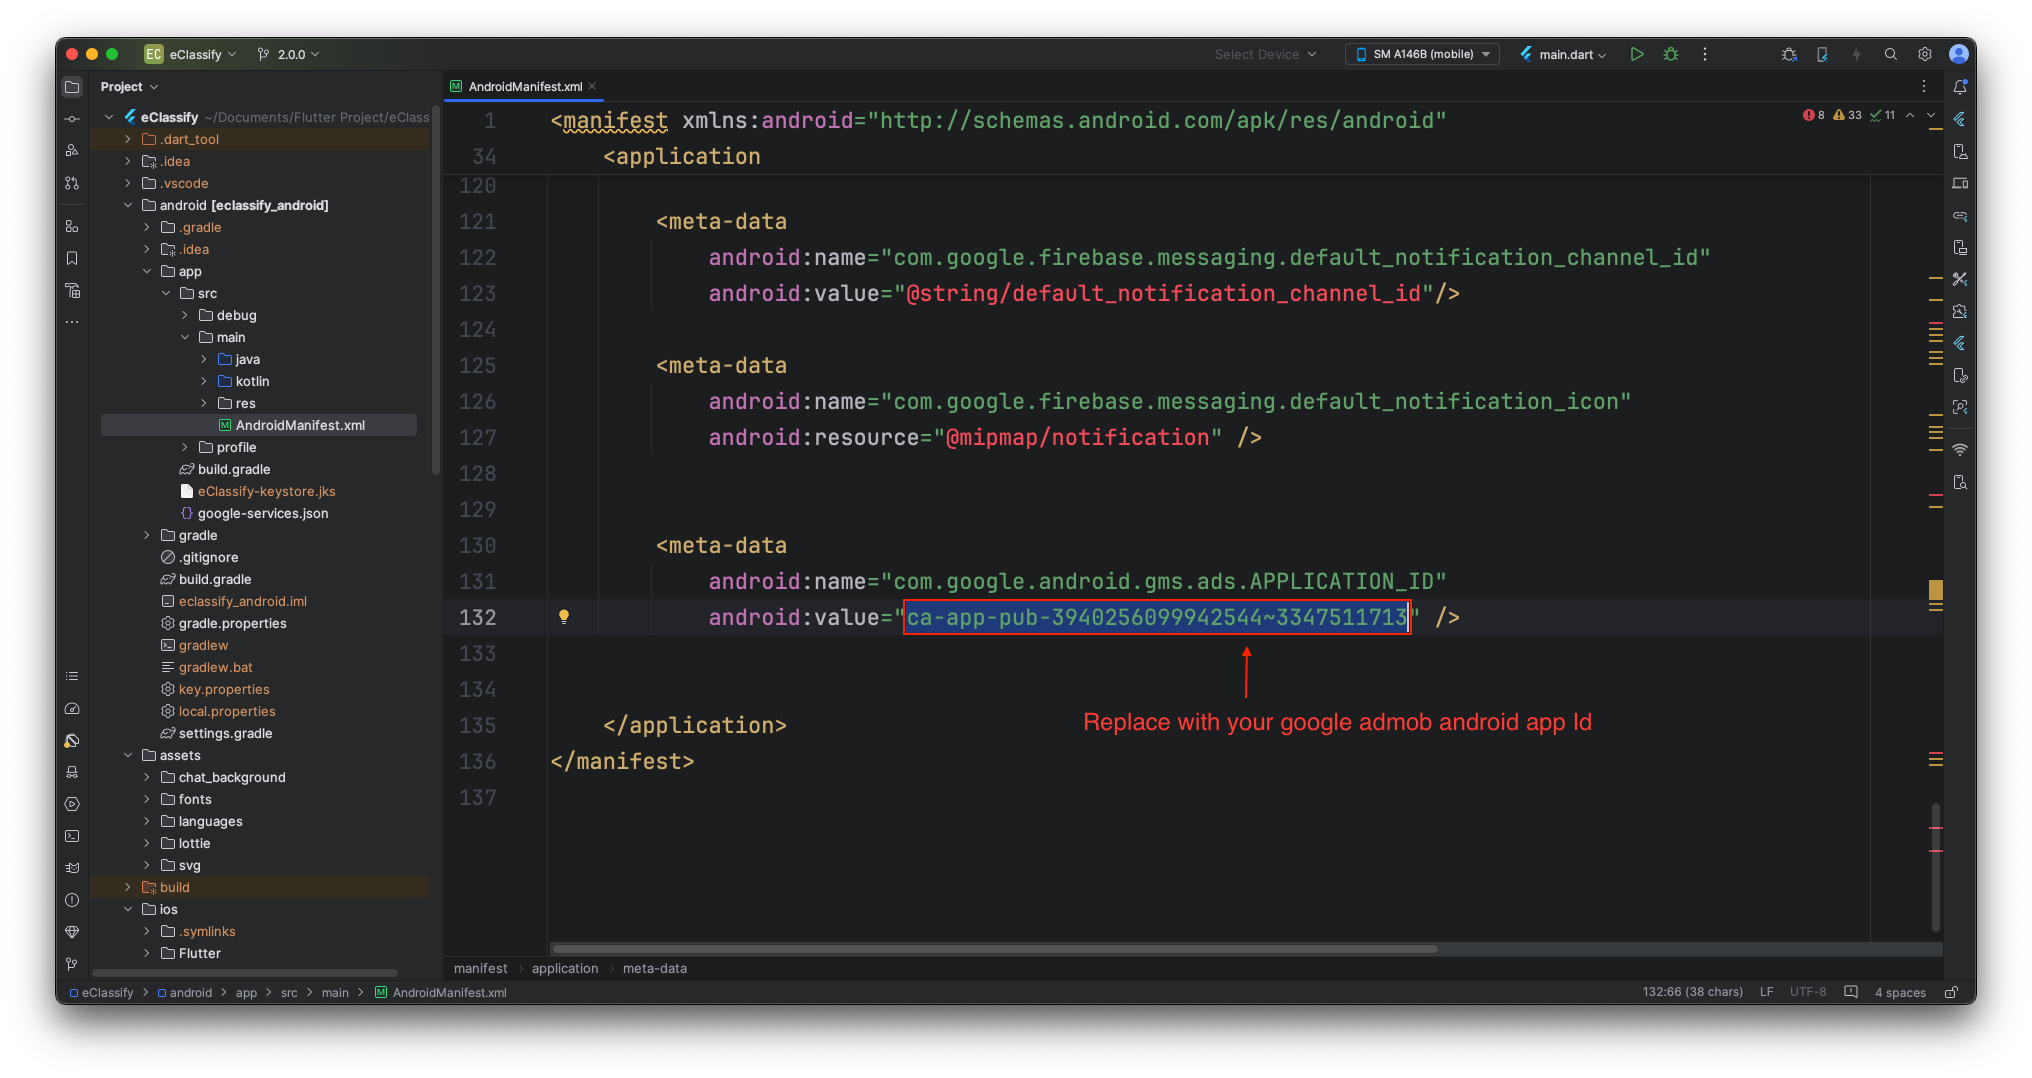
You have to setup google admob app id for both Platform.
-
Android Setup
-
- Next, open android ‣ app ‣ src ‣ main ‣ AndroidManifest.xml and paste Google Admob Android App Id meta data tag into your application tag before the activity tag, placing the Admob Android App Id you copied before.
iOS Setup
-
-
Next, open the ios ‣ Runner ‣ Info.plist file and paste the following code at shown in image.
-
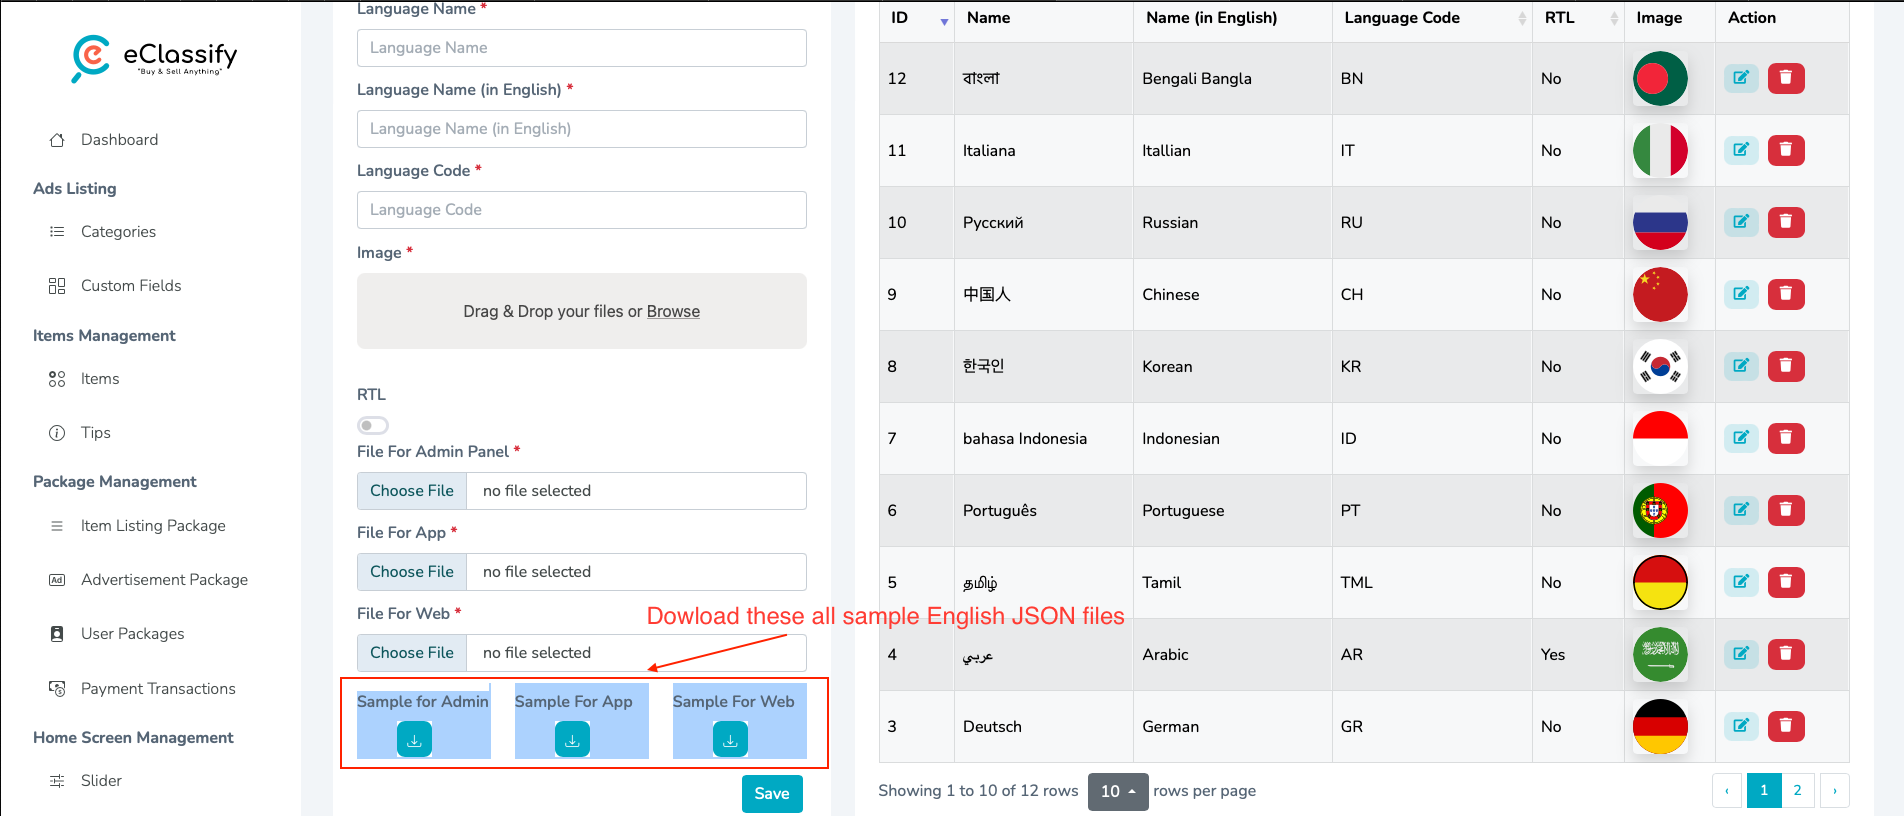
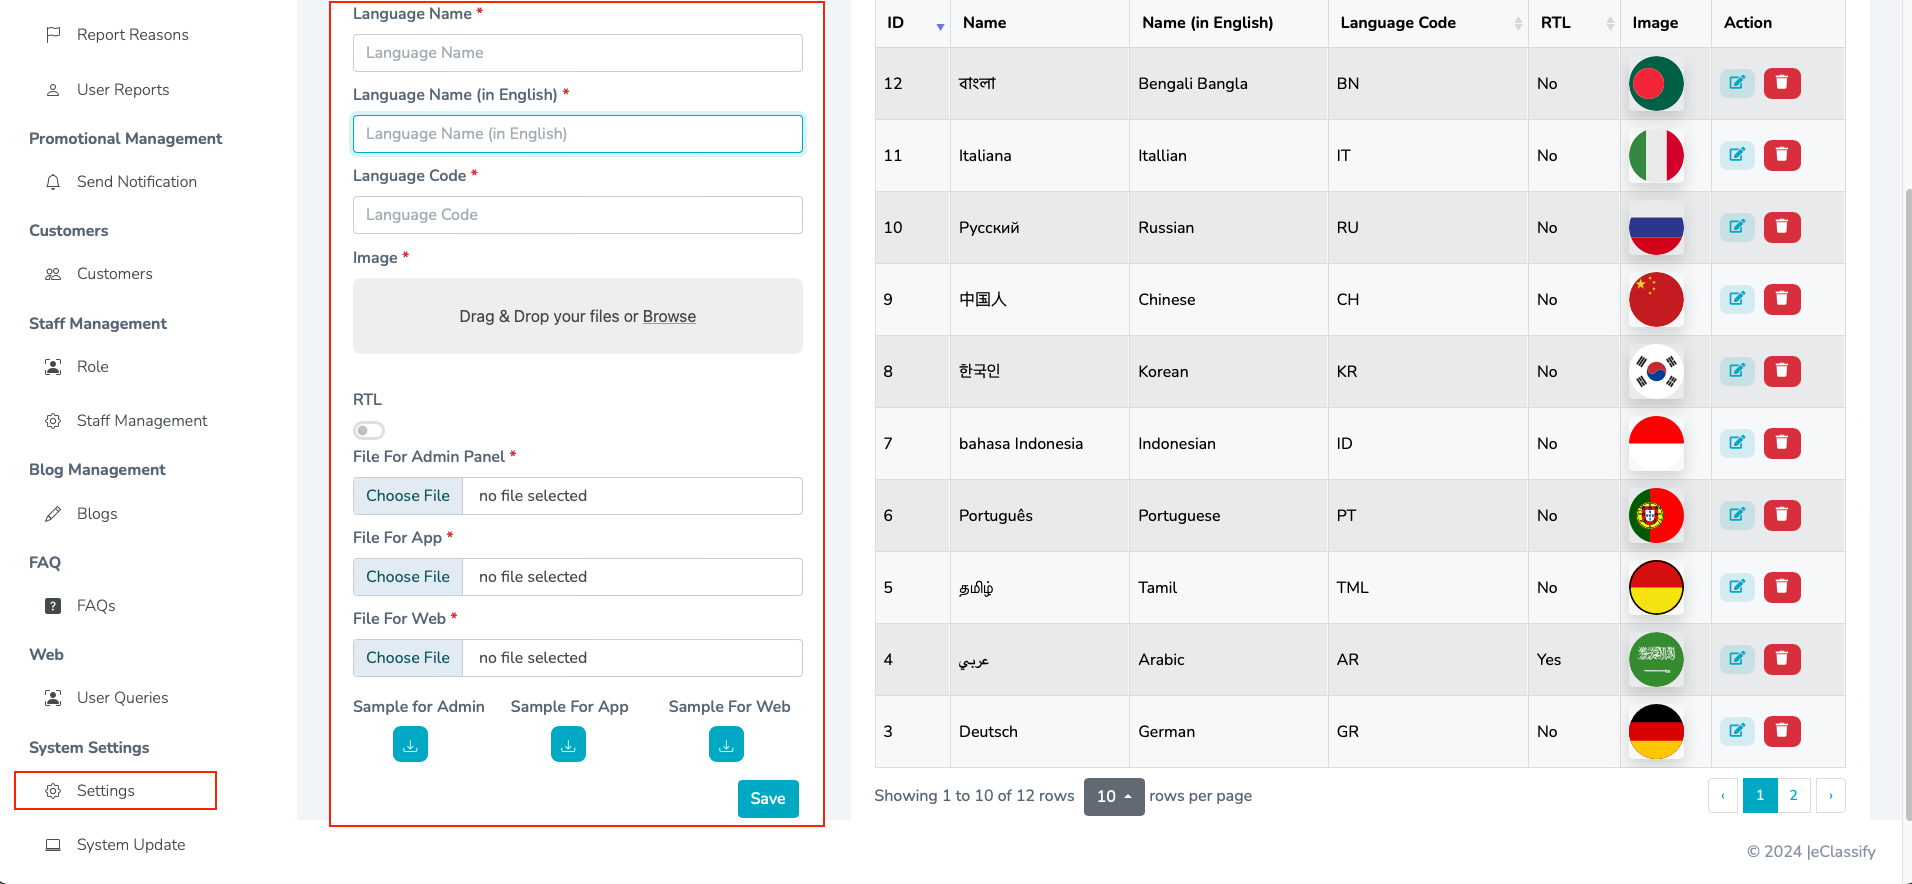
Add languages
-
Go to your admin panel Settings -> Languages. Download all sample JSON files as below image.
-
Translate these all JSON files in your respective language.
-
Now Add all fields which is required for adding languages and add your respective language translated JSON files and save it as below image.
Change default language
-
By default, default application language is english. If you want to change default language, go to your admin panel settings -> settings -> Default Language, and select your respective language shown in below image.

Generate release version
Create and add Keystore file for Android:
-
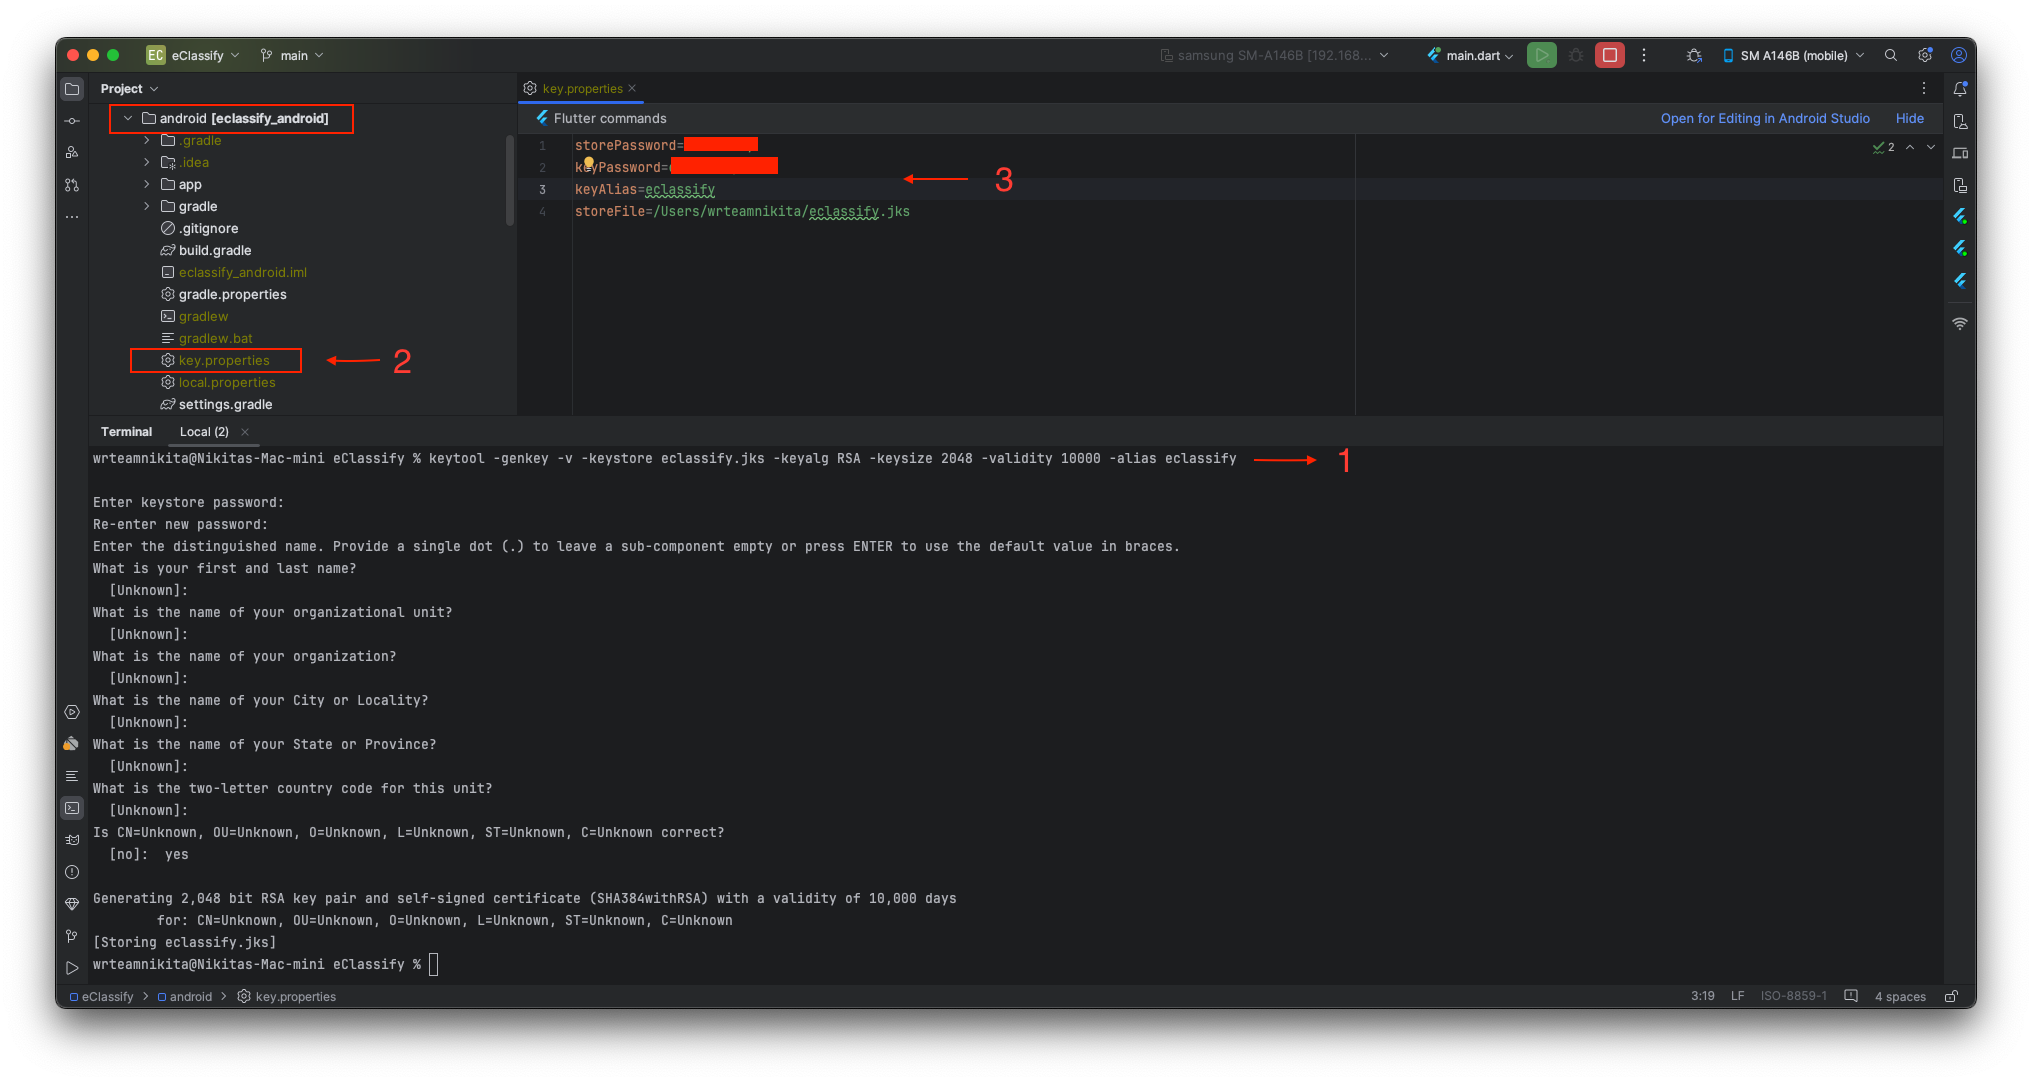
To generate a keystore file, run the following command:
keytool -genkey -v -keystore your-keystore-file.jks -keyalg RSA -keysize 2048 -validity 10000 -alias your-alias
You can replace your-keystore-file.jks with your preferred filename, but ensure you keep the “.jks” extension. Similarly, you can change your-alias as needed, but make sure to remember it. During this process, you will be prompted to set a password; please note that the password characters won’t be visible on the screen.
Additional information may be requested, but you can simply press Enter to skip those as they are optional fields.
-
Go to android -> key.properties file and add the following details, which correspond to the information you used in the previous step:
storePassword= [your-password-from-previous-step]
keyPassword= [your-password-from-previous-step]
keyAlias= [your-alias-from-previous-step]
storeFile= [your-keystore-file-location]
Replace the placeholders (“[]” brackets) with the actual details you used. Once these two steps are completed, you can generate either an APK file using the following command:
flutter build apk
Or an app bundle file for the Play Store upload with:
flutter build appbundle
Follow these links for more information on generating the release version:
-
To generate release android app-bundle and publish to Playstore follow https://flutter.dev/docs/deployment/android
-
To generate release ios apk and publish to appstore follow https://flutter.dev/docs/deployment/ios
eClassify Web App
eClassify Web Version is built with Next JS v14.0.3 so you need to setup your Local Computer First.
MANDATORY
- Your Admin panel must be on sub-domain like (example:- admin.yourdomain.com)
- Your Web must be on main-domain like (example:- yourdomain.com)
- The Web domain must be SSL for security reasons
Web Installation Video
eClassify Website Installation Process
Recommended tutorial is below 👇
- How to setup Web Version
Install Node JS
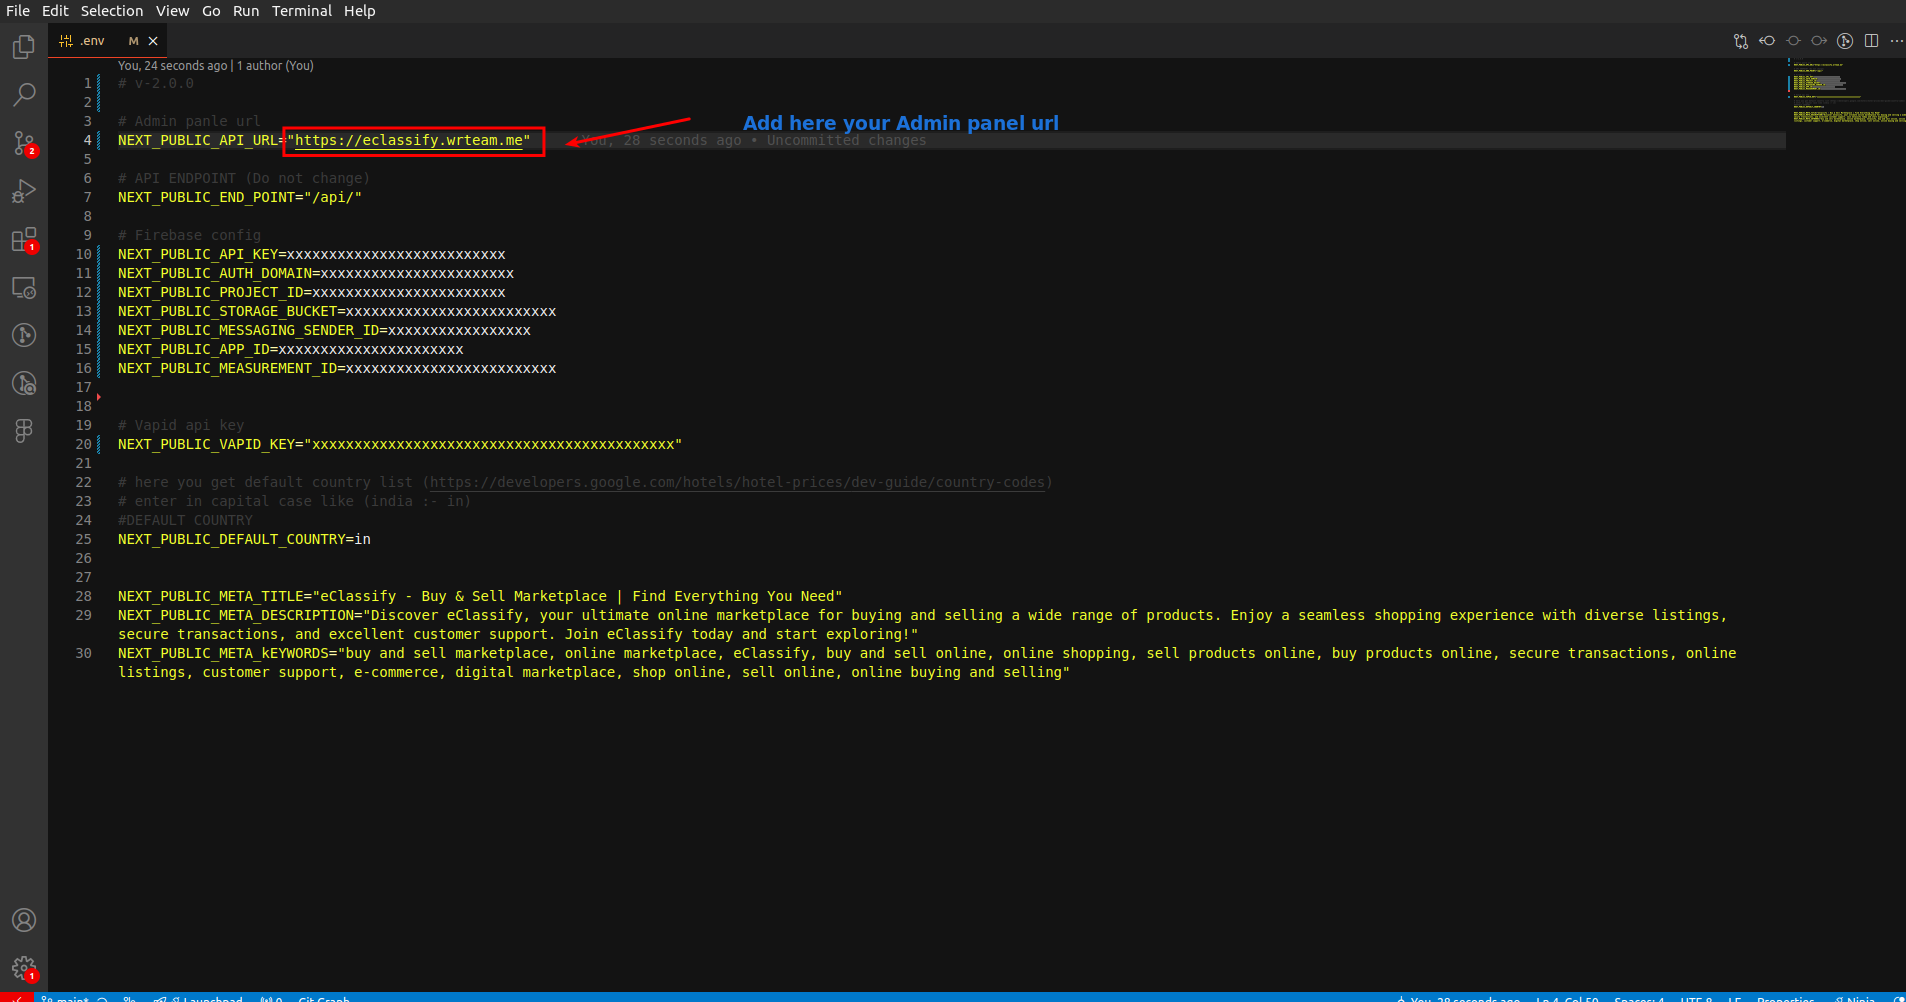
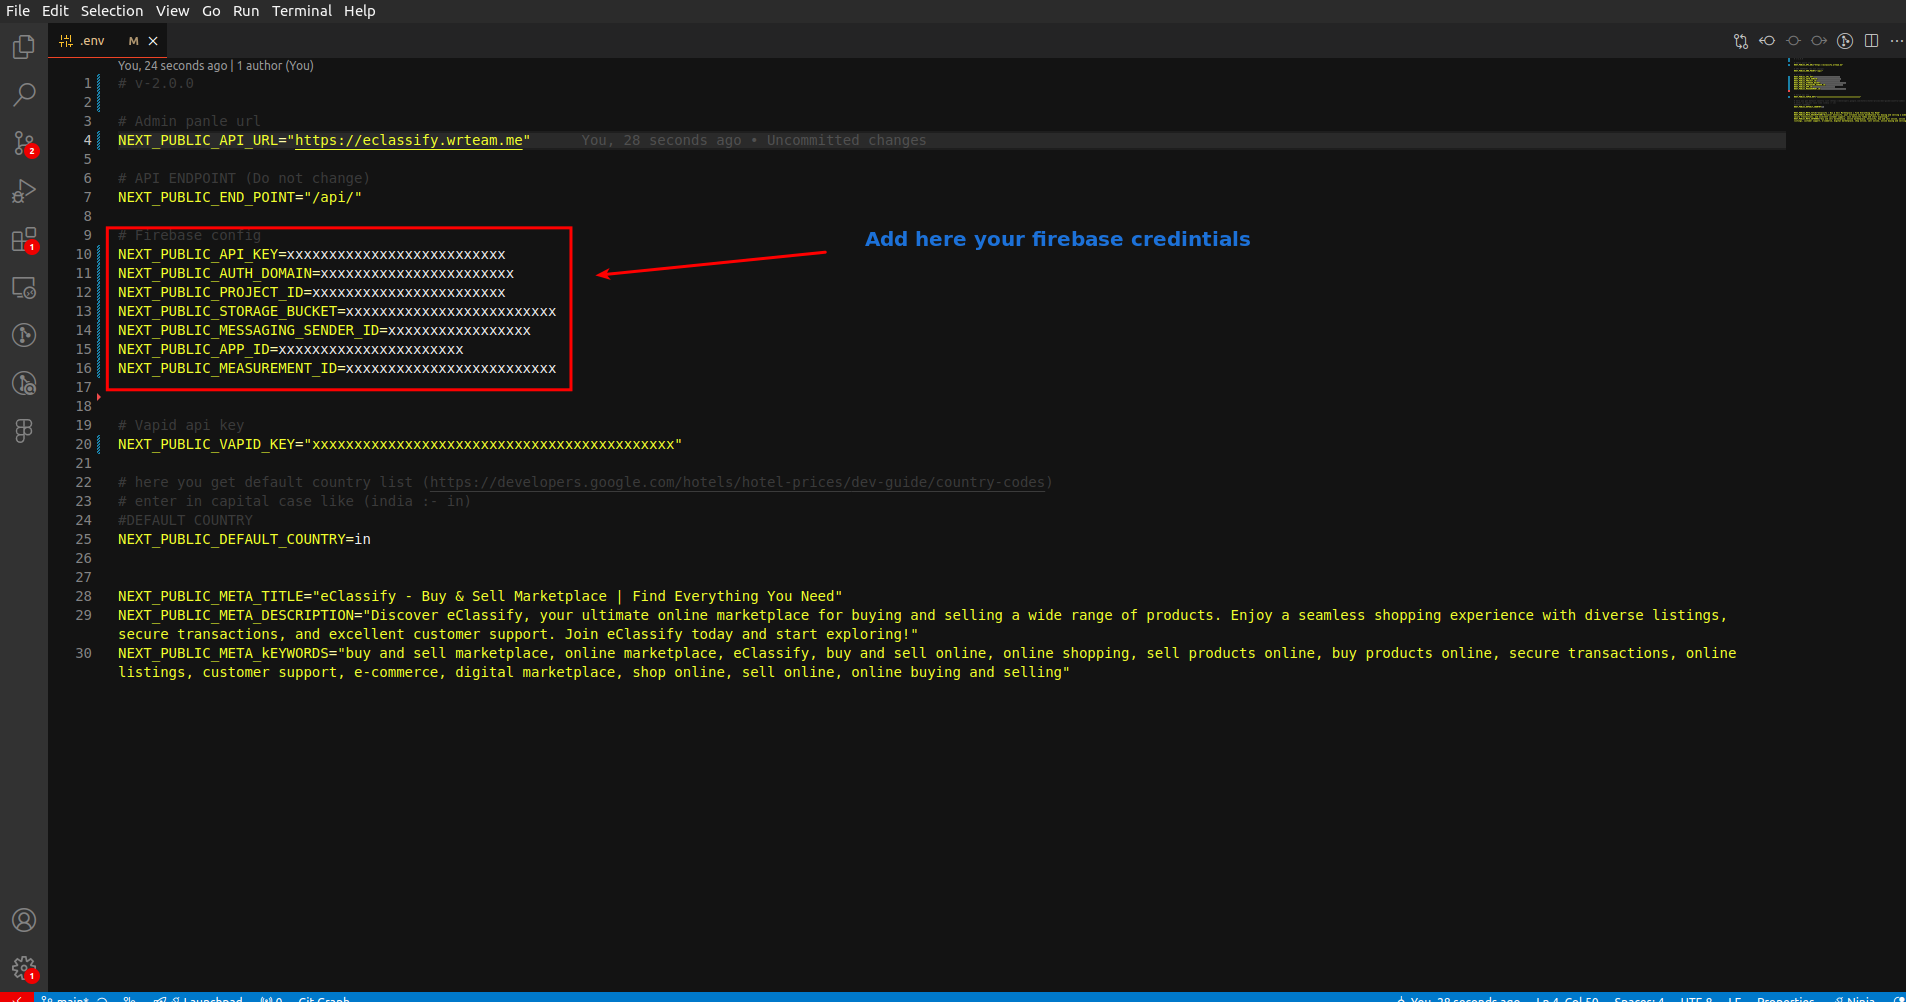
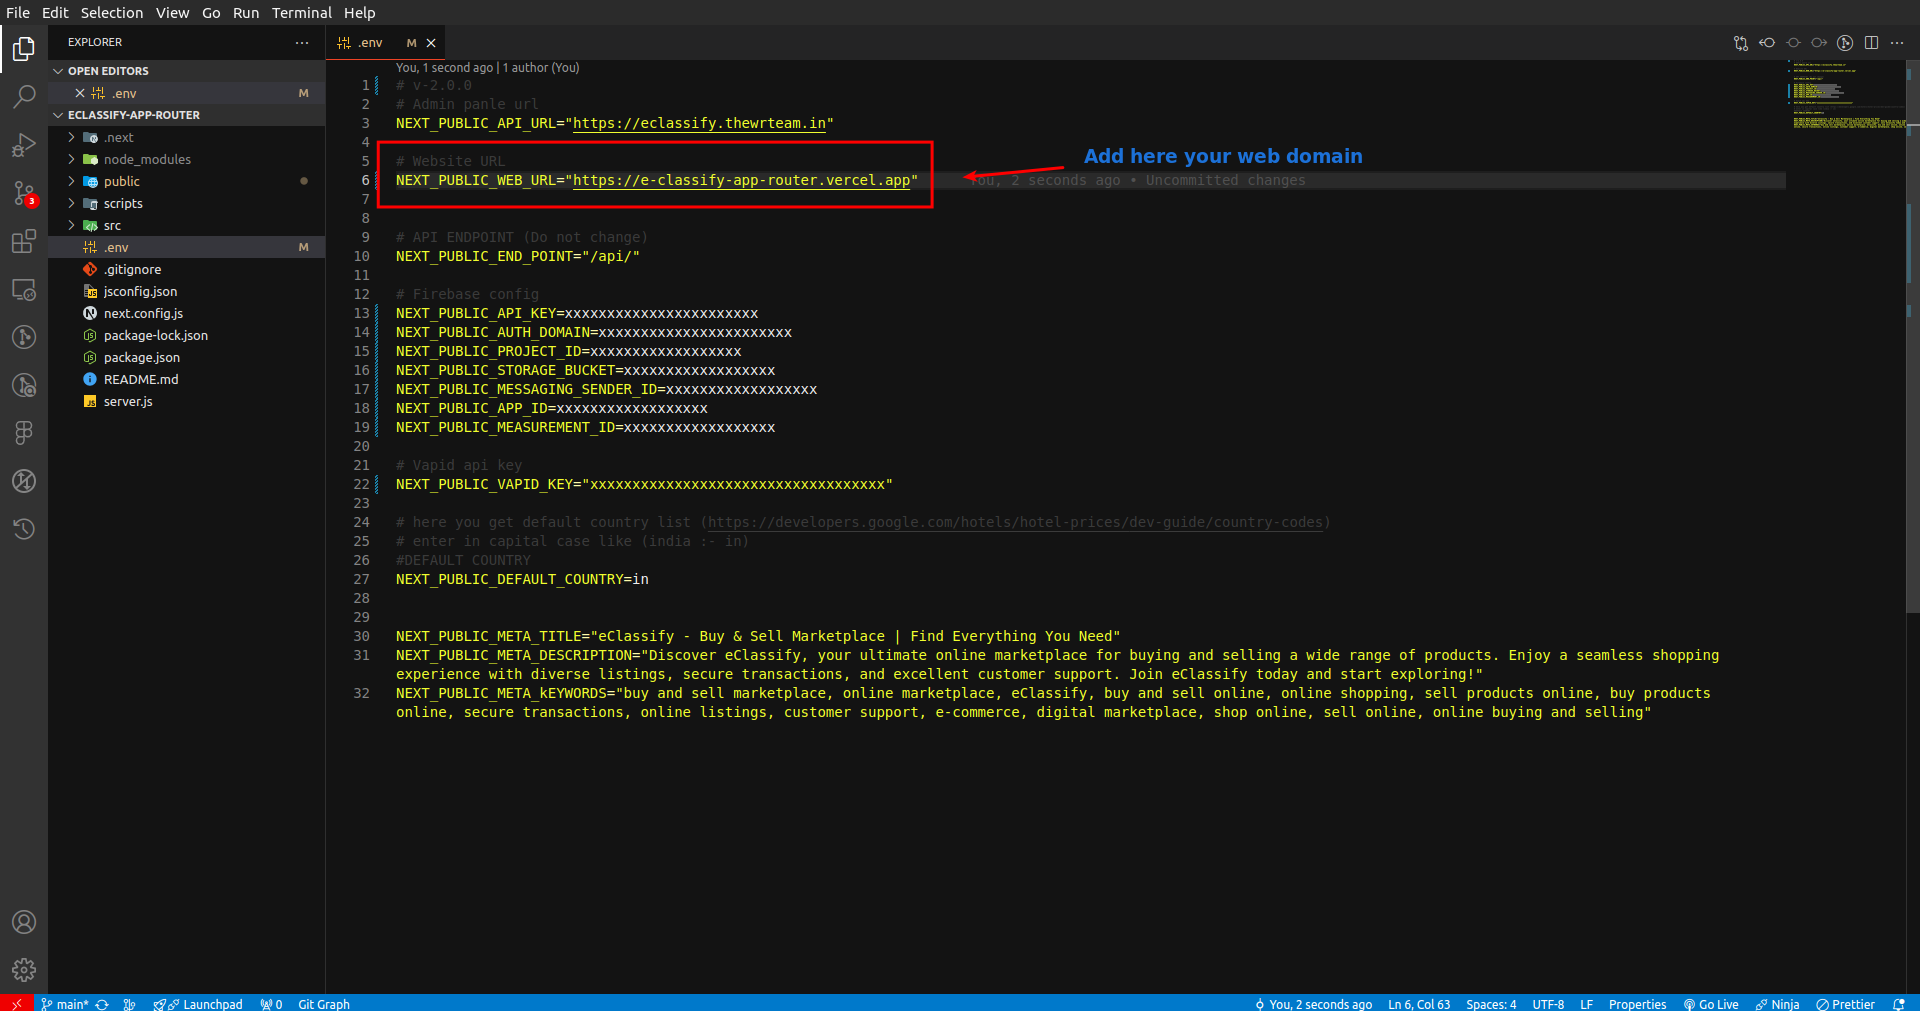
- Where to set API URL (Admin)
API Url is your admin panel url which is used to fetch the data from admin panel
Open .env file and change the following details
- How to Connect Firebase with your Web eClassify.
-
-
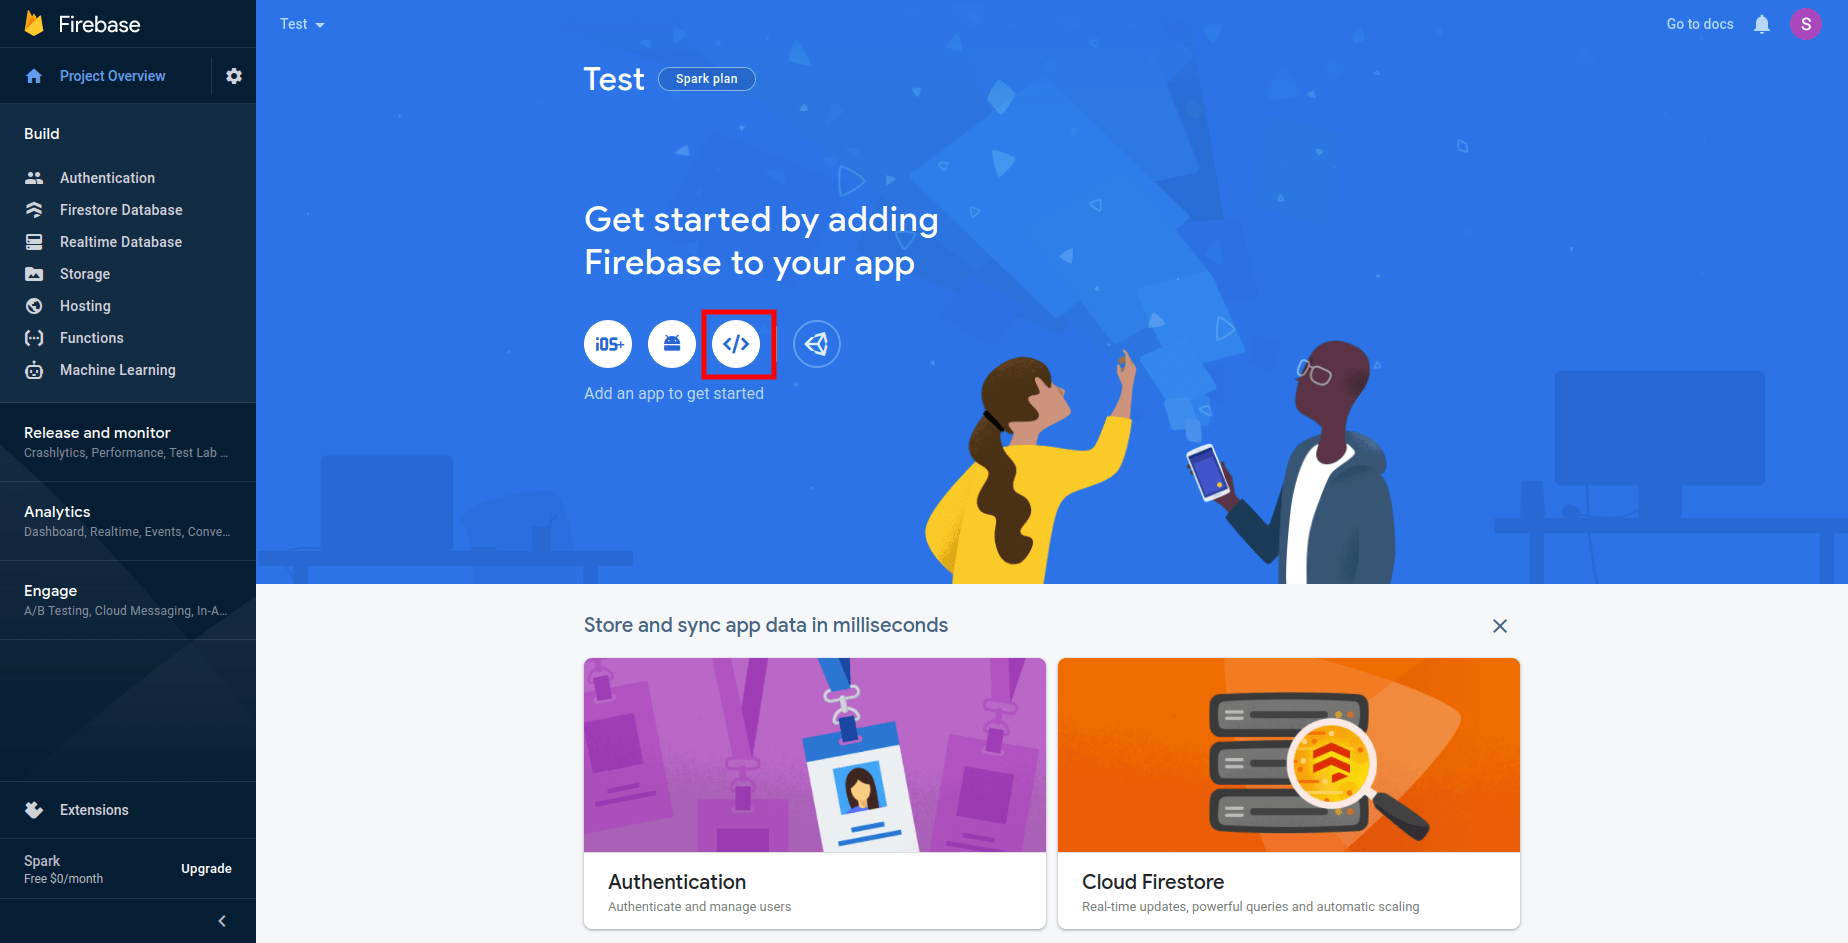
Create firebase project in your account
-
-
-
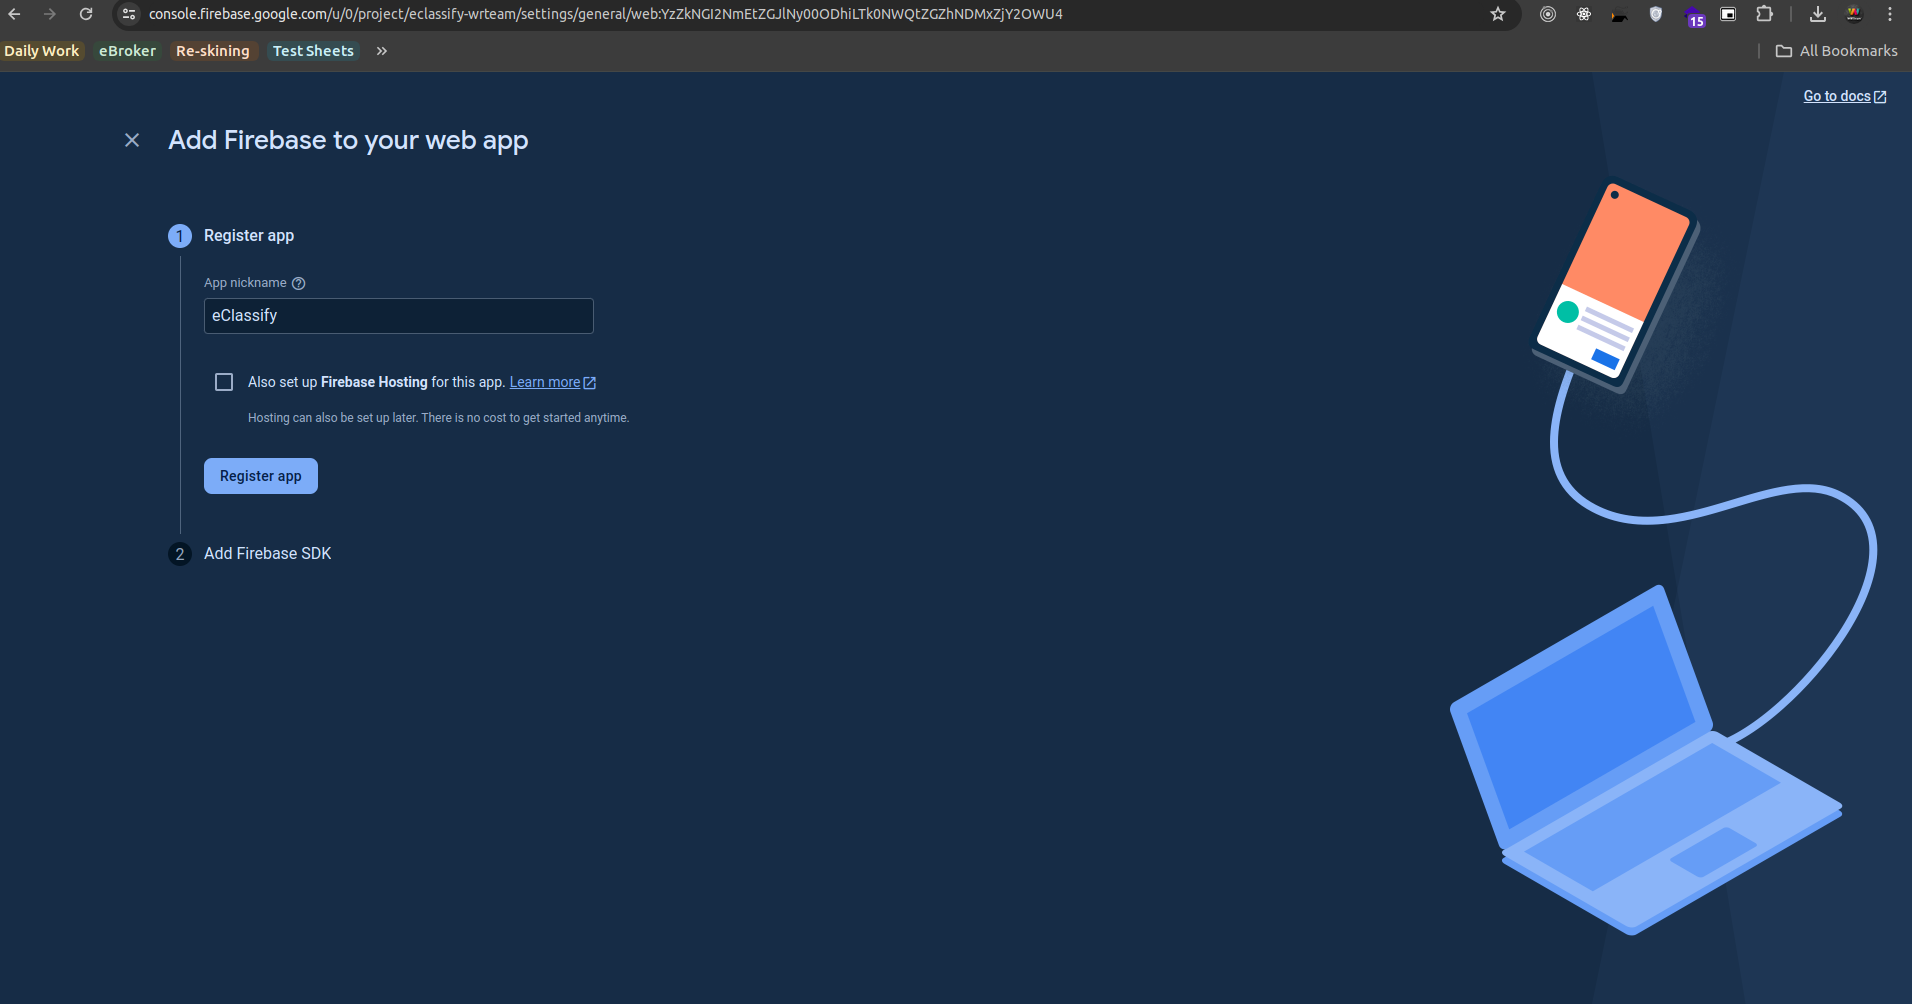
Add web application to your firebase project
-
-
-
Enter the App Name and Click on Register App
-
-
-
Now Copy this Firebase Credentials.

-
-
-
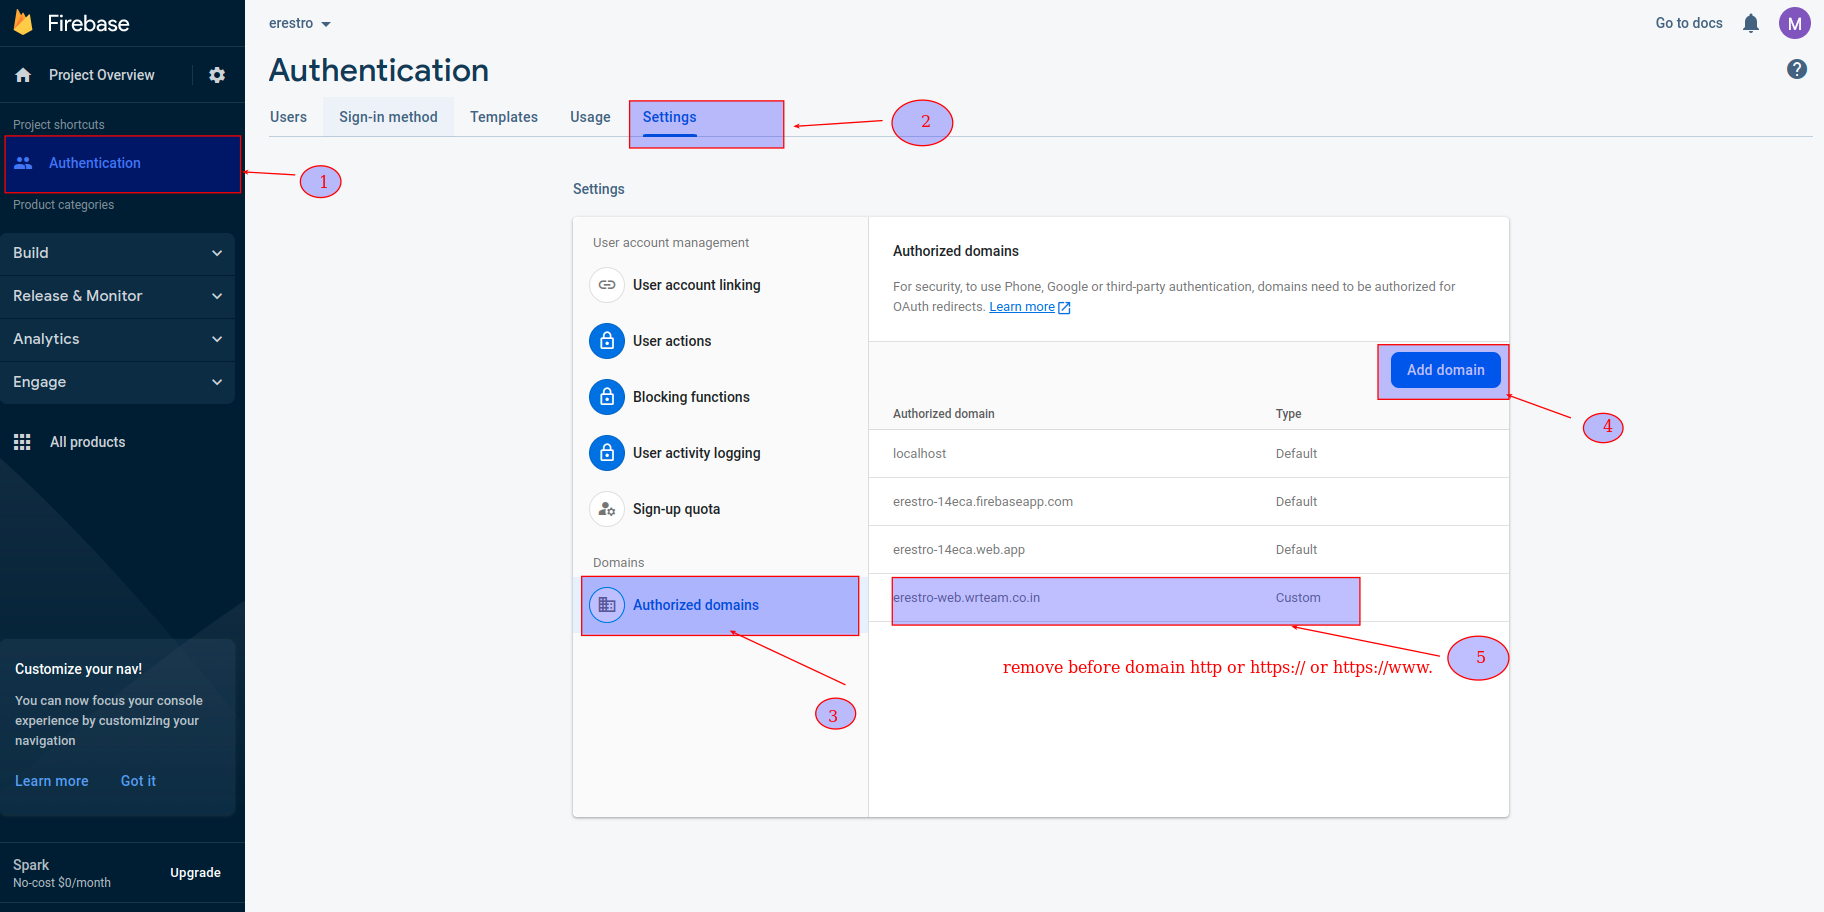
How to configure domain in firebase console
-
-
-
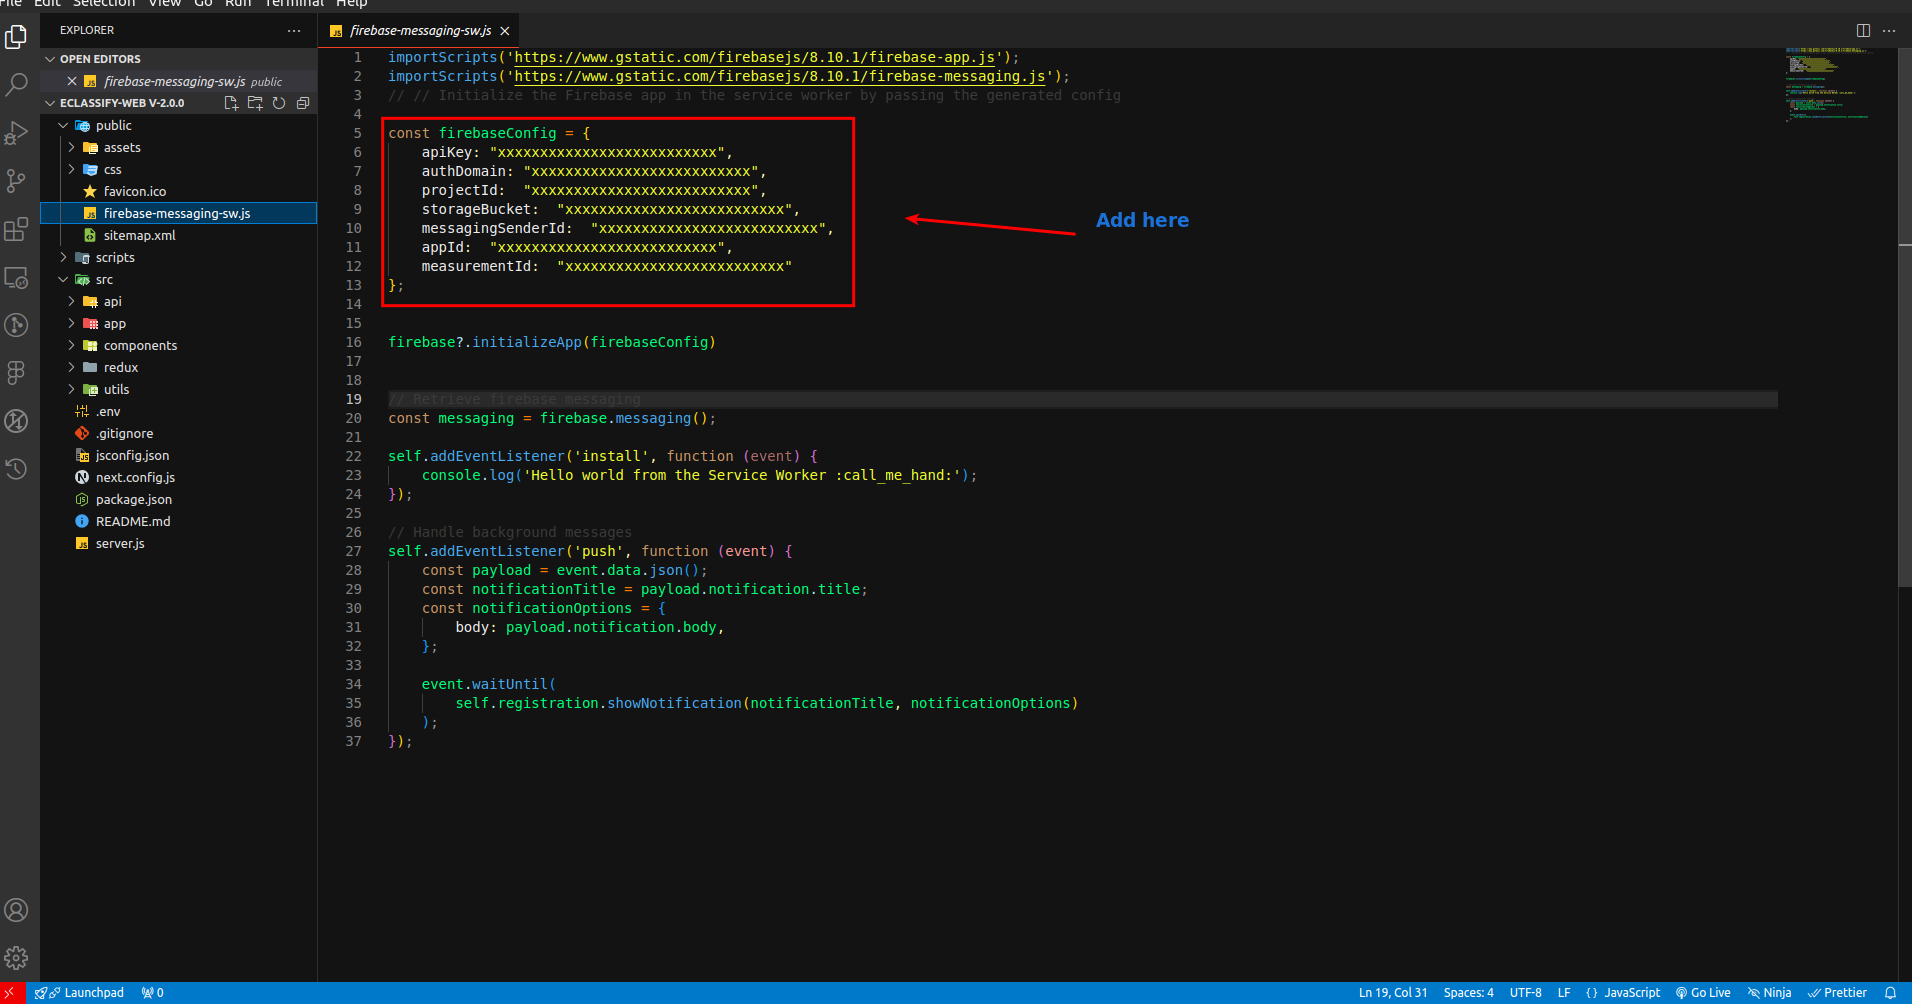
And paste this your Credentials in .env and public/firebase-messaging-sw.js File.
-
-
-
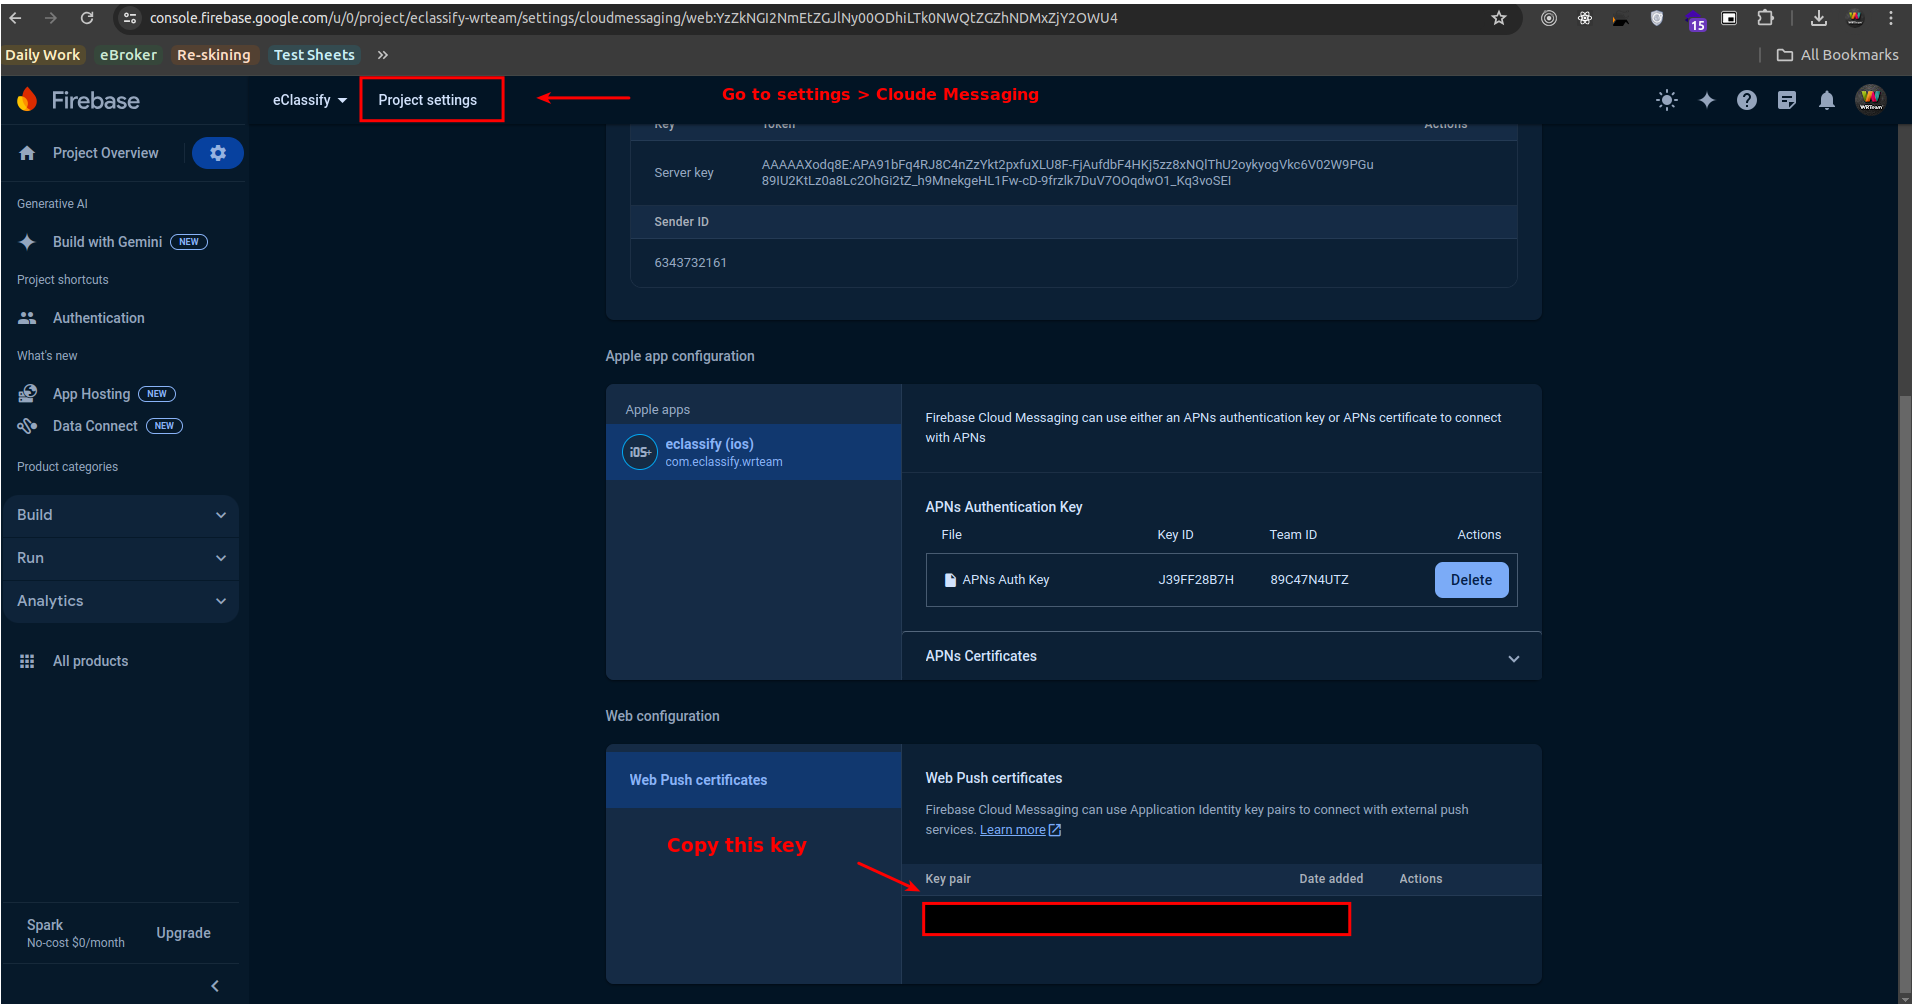
open firebase account go to project settings -> cloud messaging -> Web configuration and select key and paste in .env file

-
-
Congratulations. You have successfully connected your Web application to your firebase project. Now you are good to go ahead.
-
How to change Web Application name
-
-
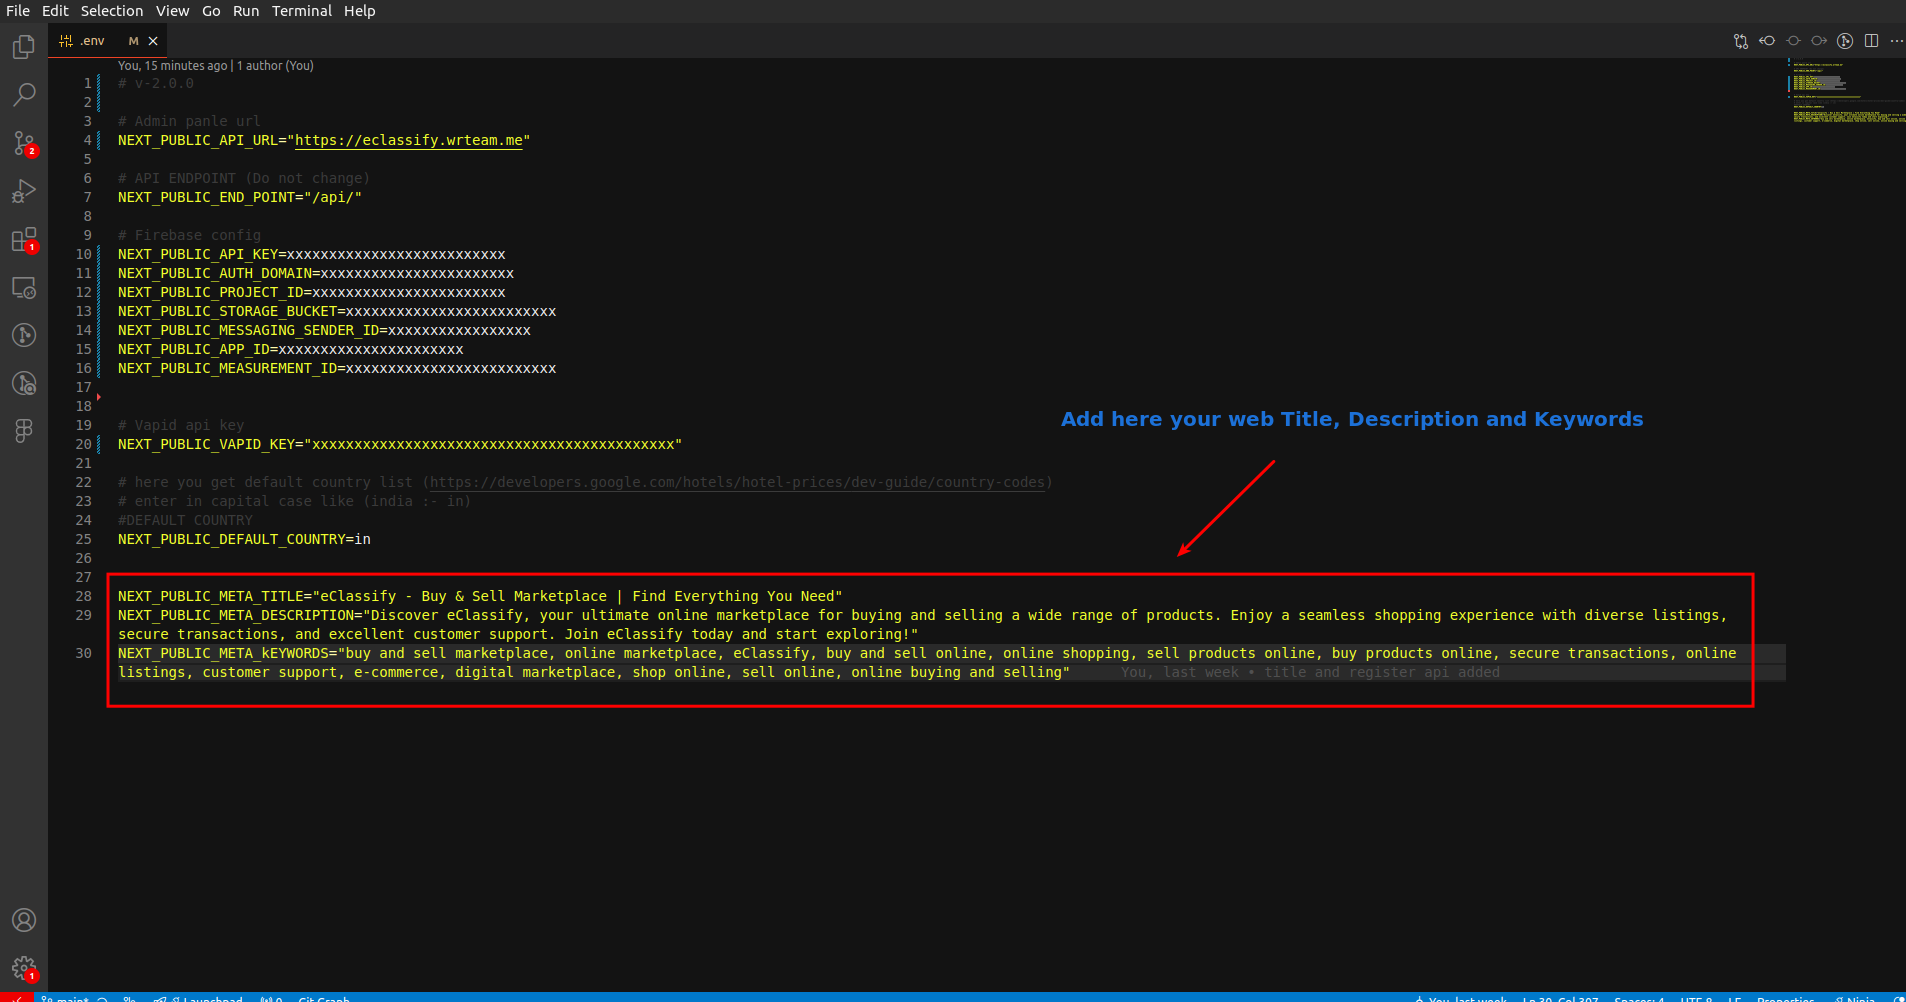
Change application name for your Web application. Go to .env file
-
- How to Change Fonts
-
-
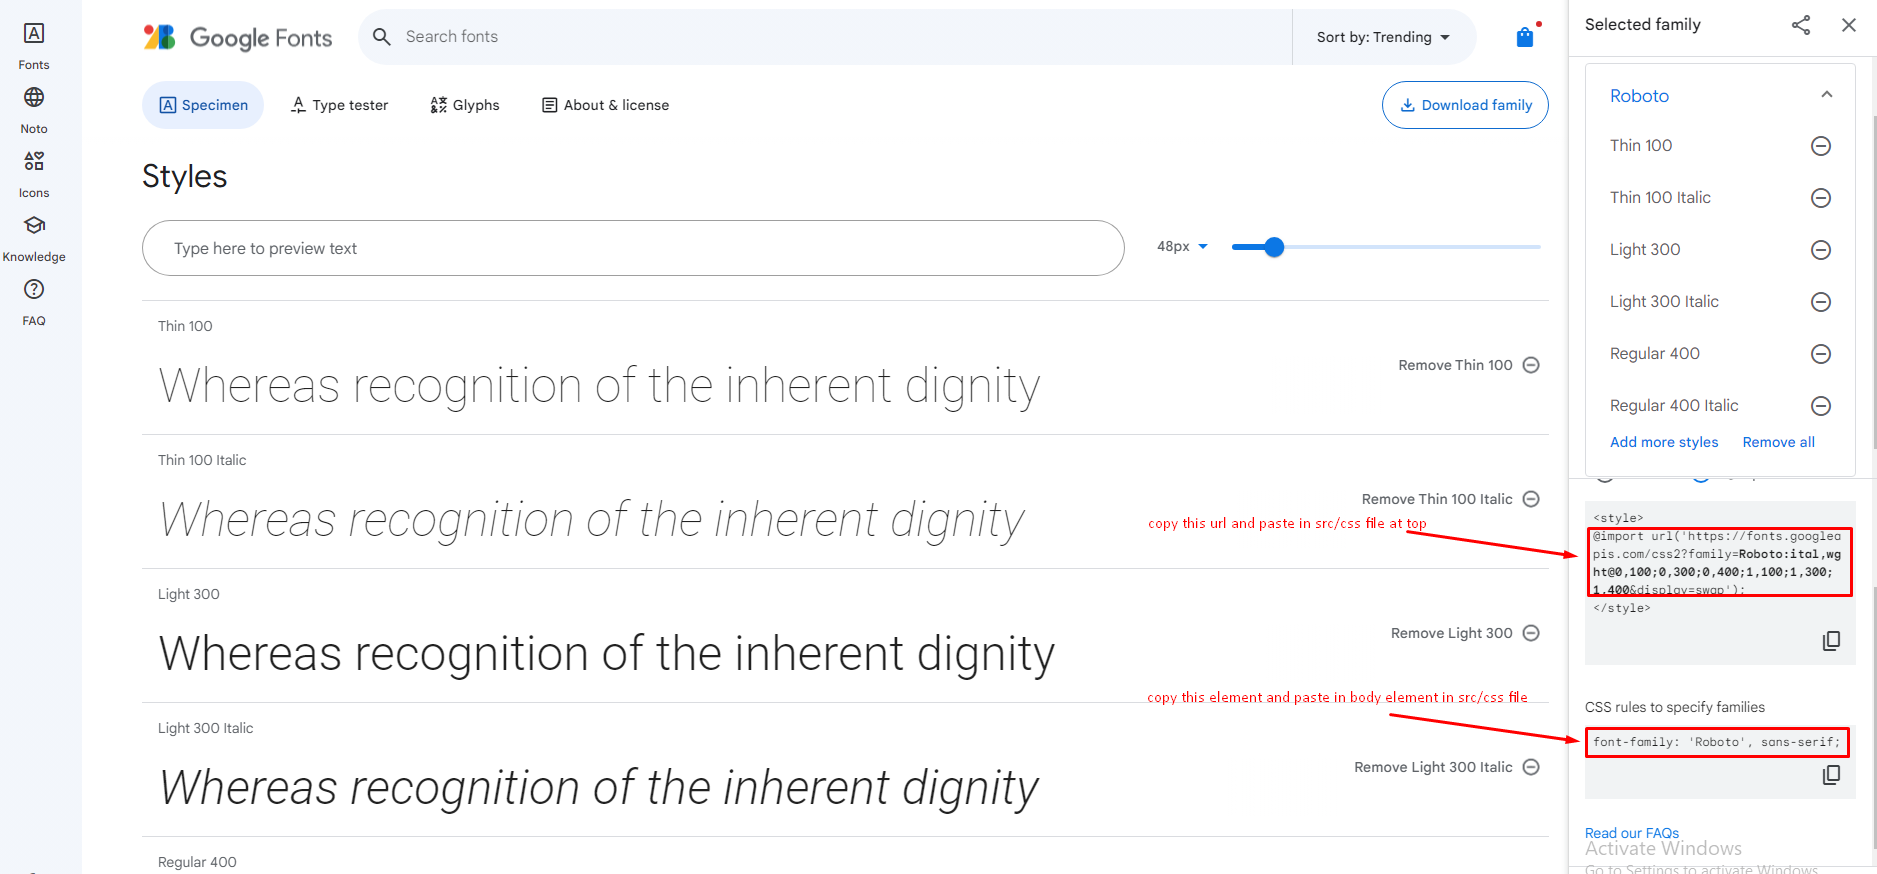
Open google font and select the font
-
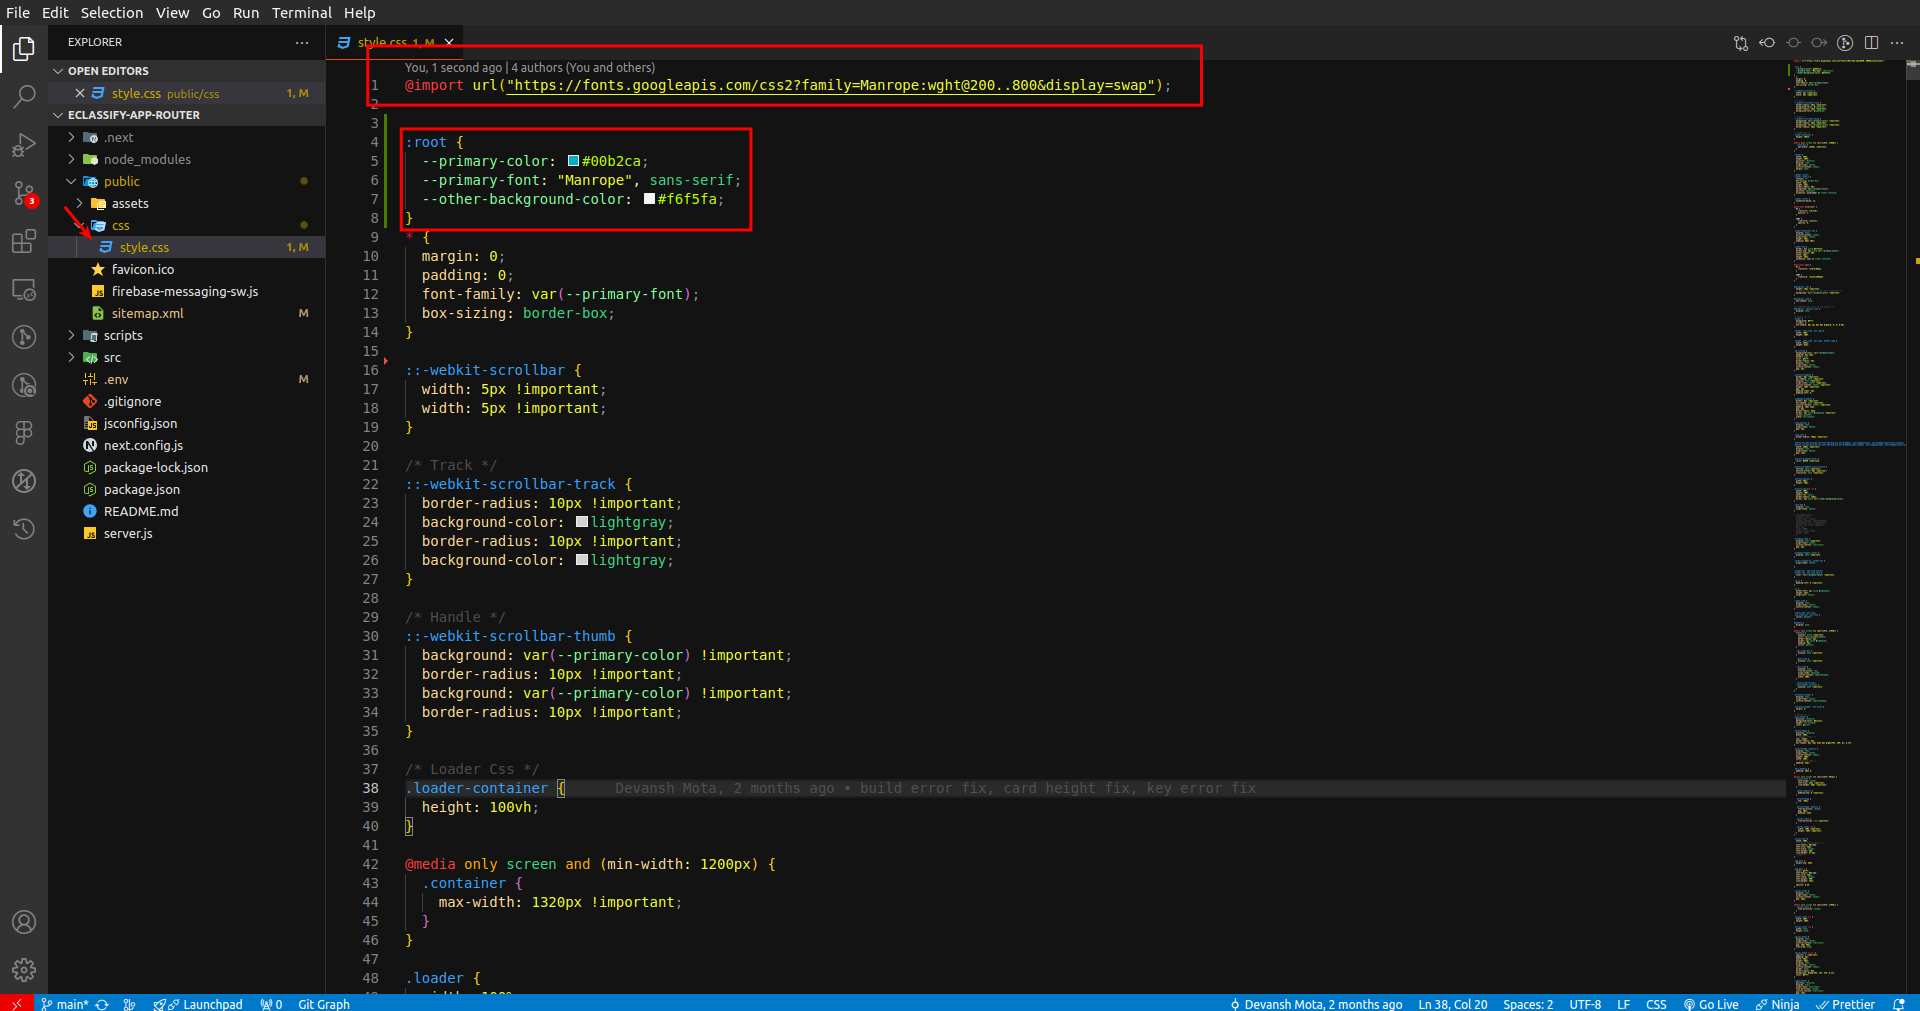
Open public/css/style.css file
-
- How to get map Place api key
-
-
Open cloud console and select your project
-
You have to enable this all API and Services Geocoding API, Places API, Geolocation APIs, Maps JavaScript API from ‘Enable API and Services’.
-
you have get place api key copy and paste to your system settings in admin panel check here
MANDATORY
Make sure you have you have enabled billing account otherwise location search will not work in web.
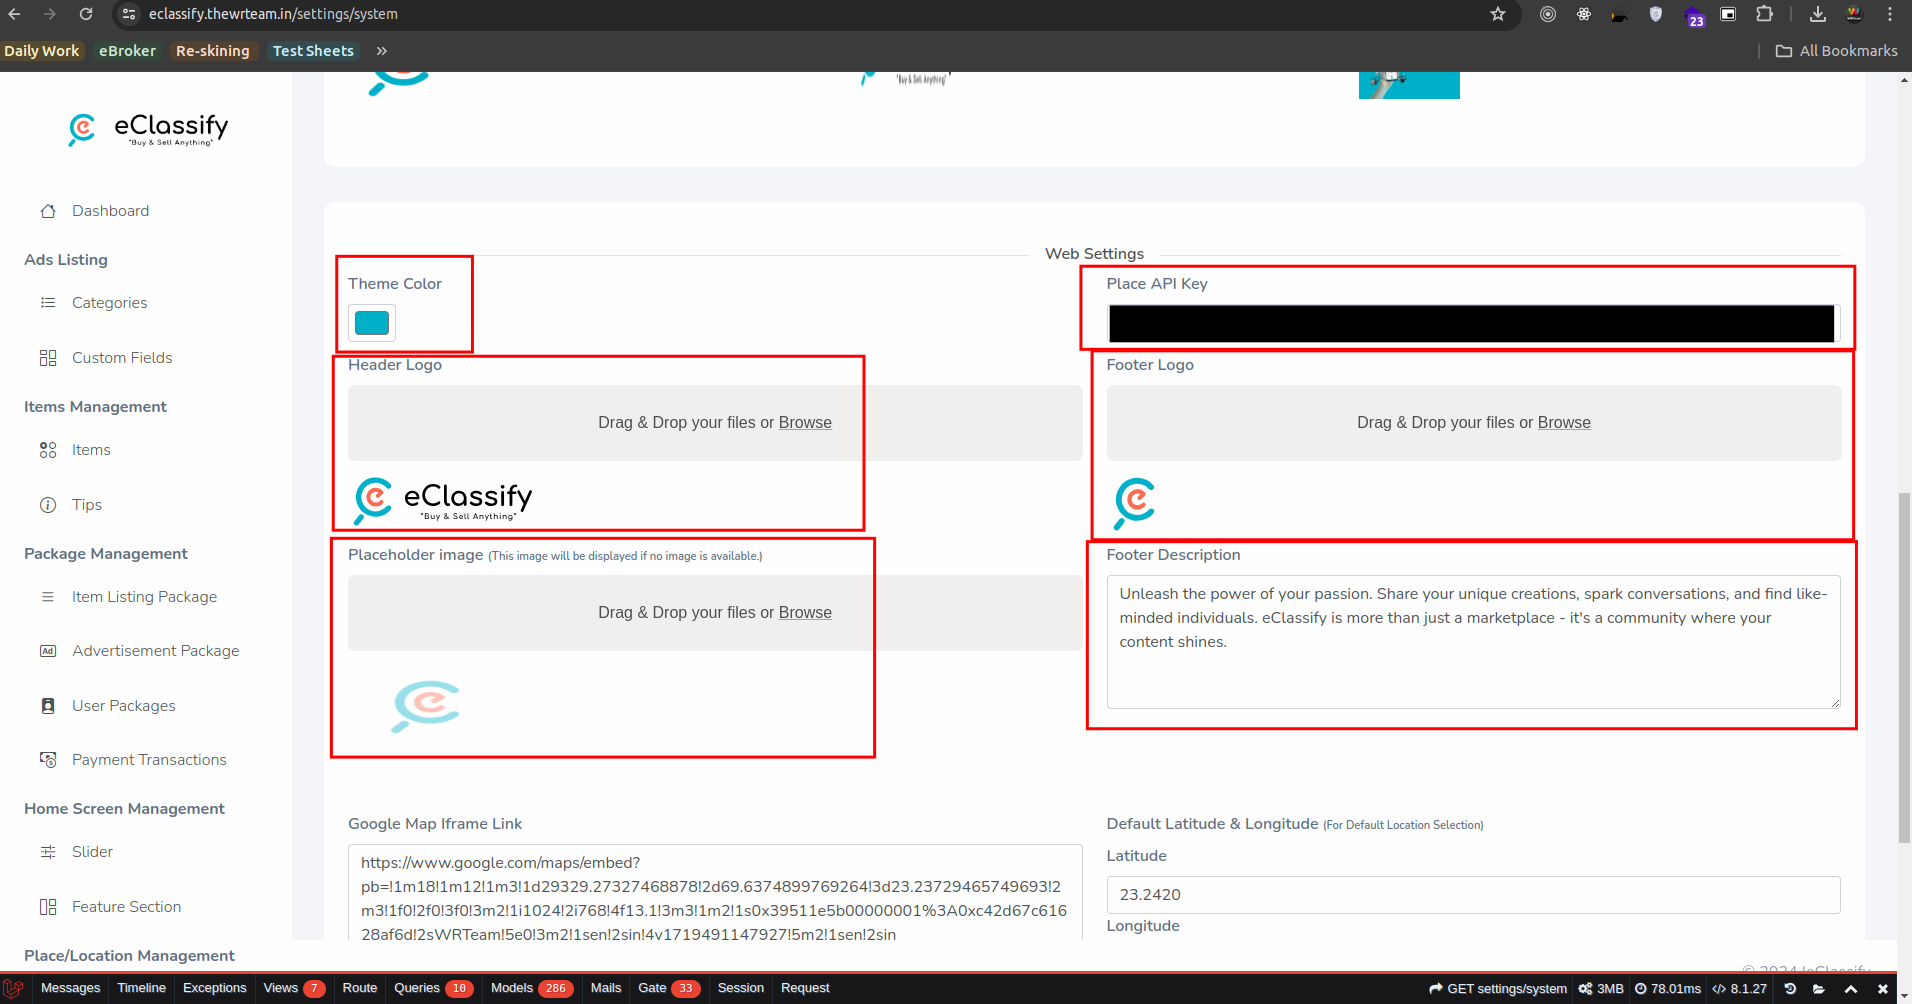
- How to Set Logo, Theme Color, Web Name, Footer Logo, Footer Description, Google Place api key etc
-
-
go to admin panel -> settings
-
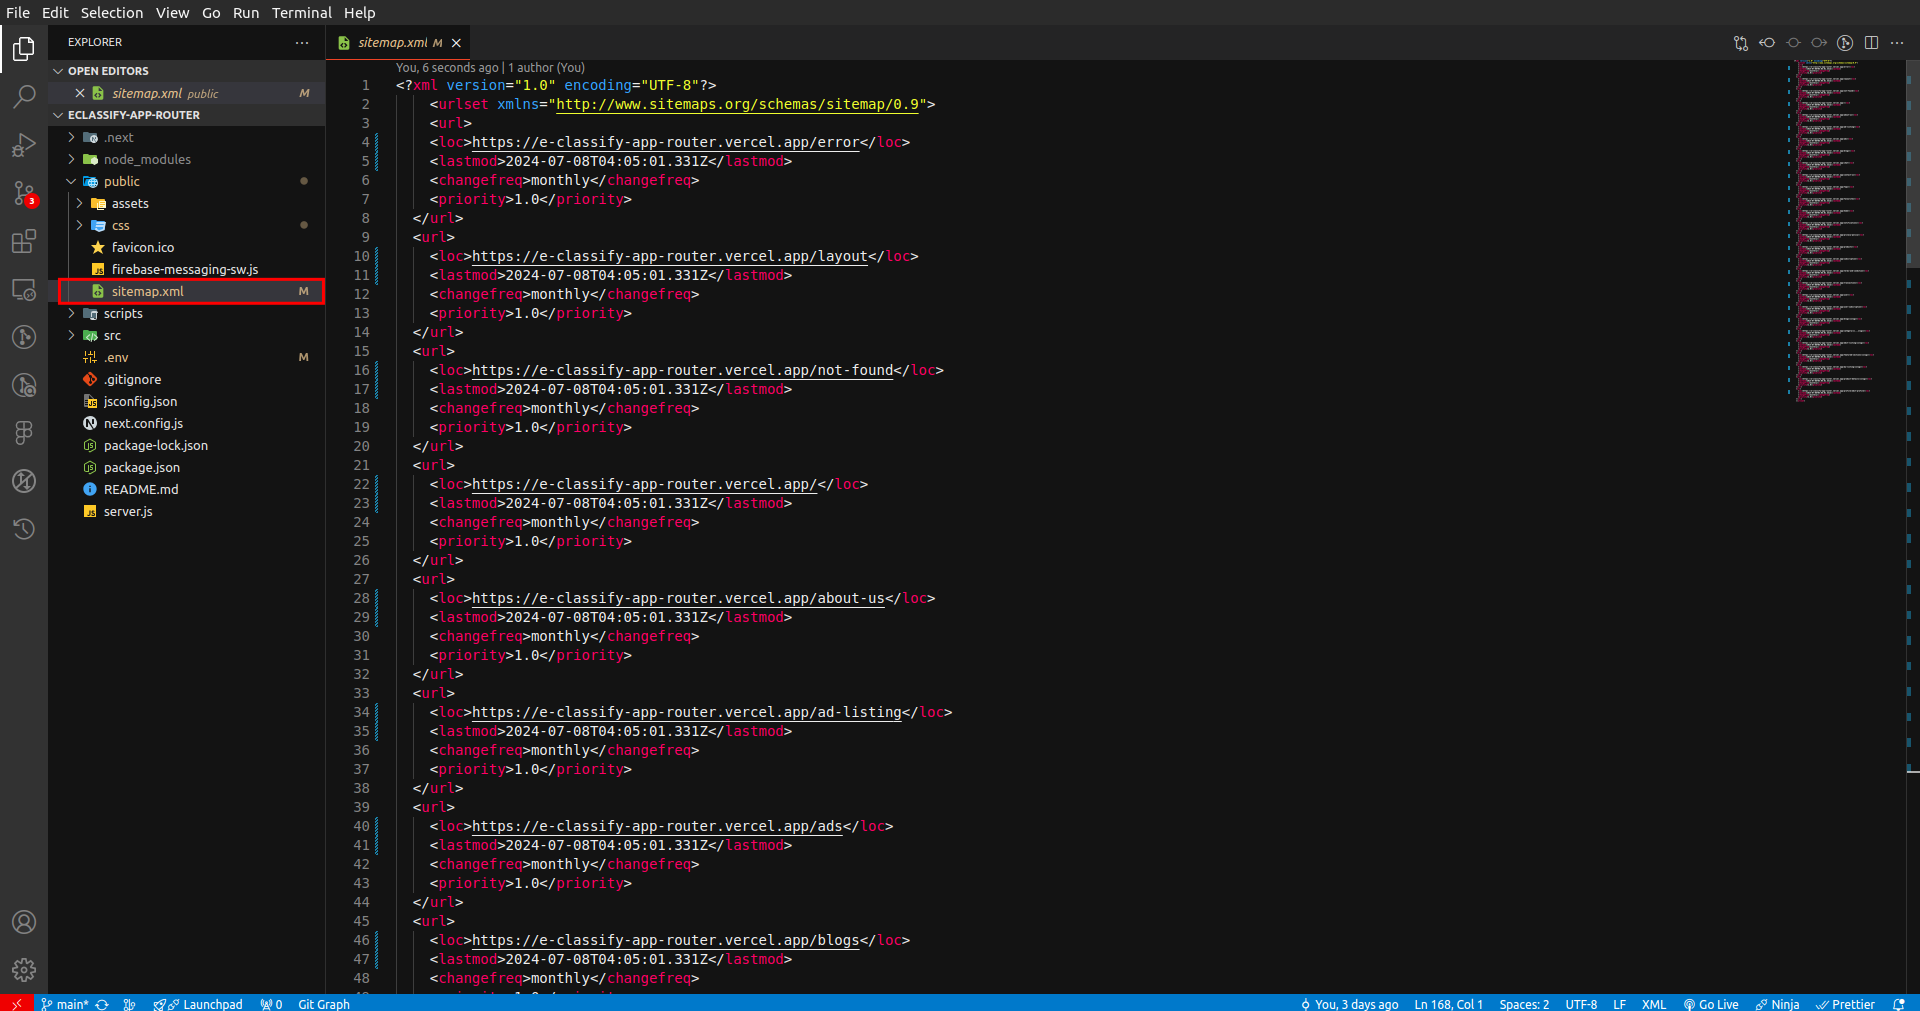
- How to Setup Sitemap
- add web domain or subdomain url in .env File
- generate sitemap use command :-
npm run dev - if you want to customize the sitemap then go to public->sitemap.xml file
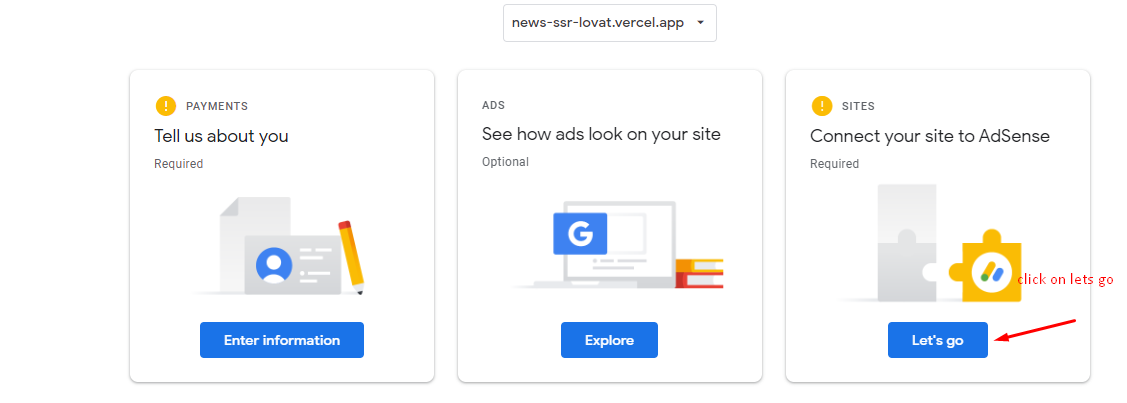
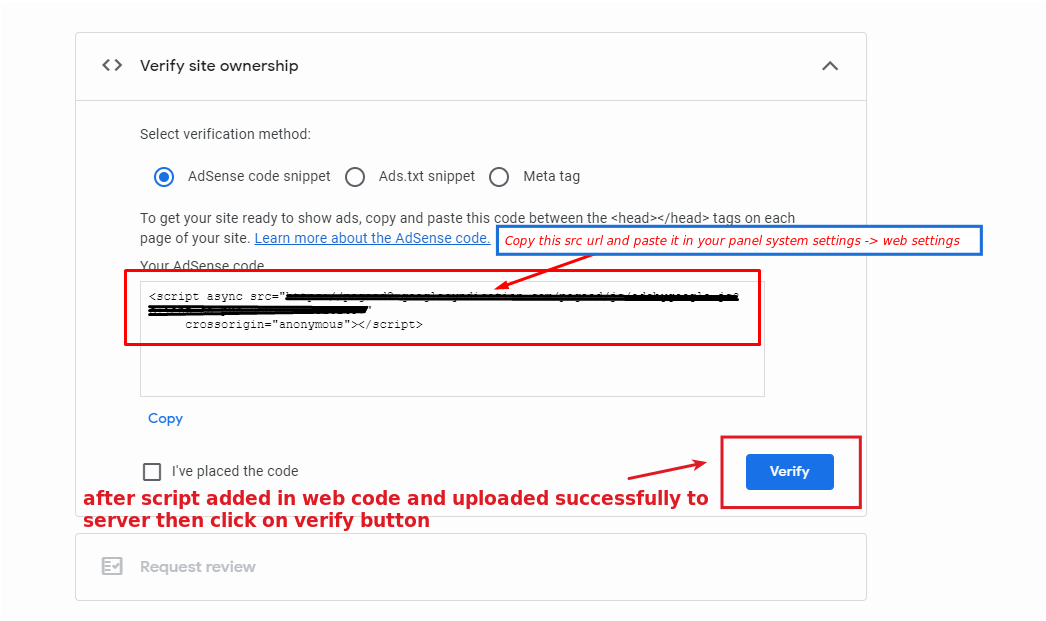
- How to Add Google AdSense
-
-
Go to Google AdSense and sigin your account and Add site as per Image
-

-
-
click on Let’s Go button
-
-
-
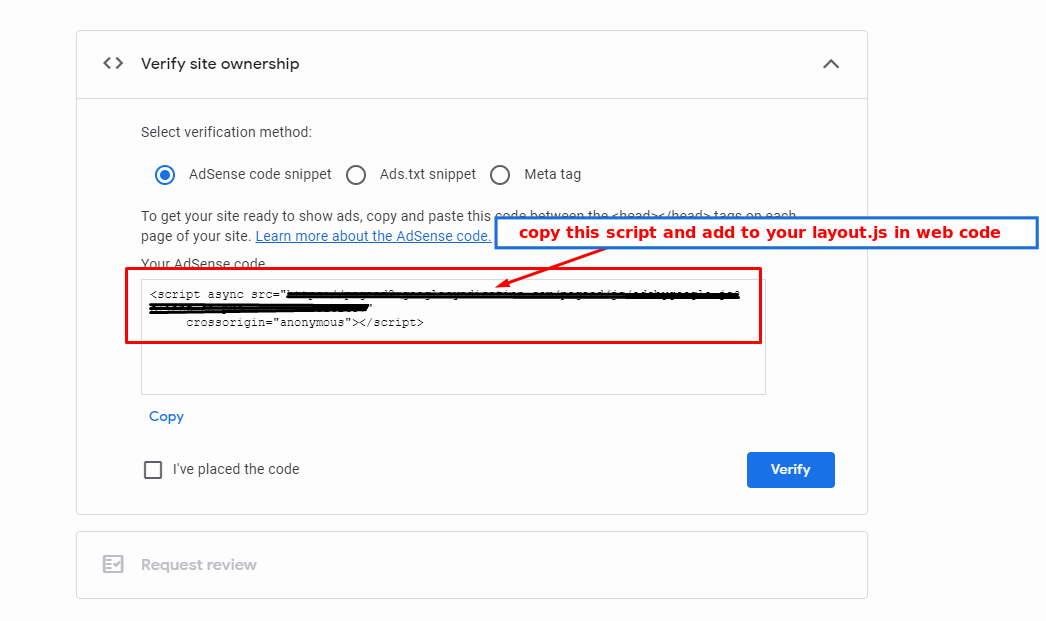
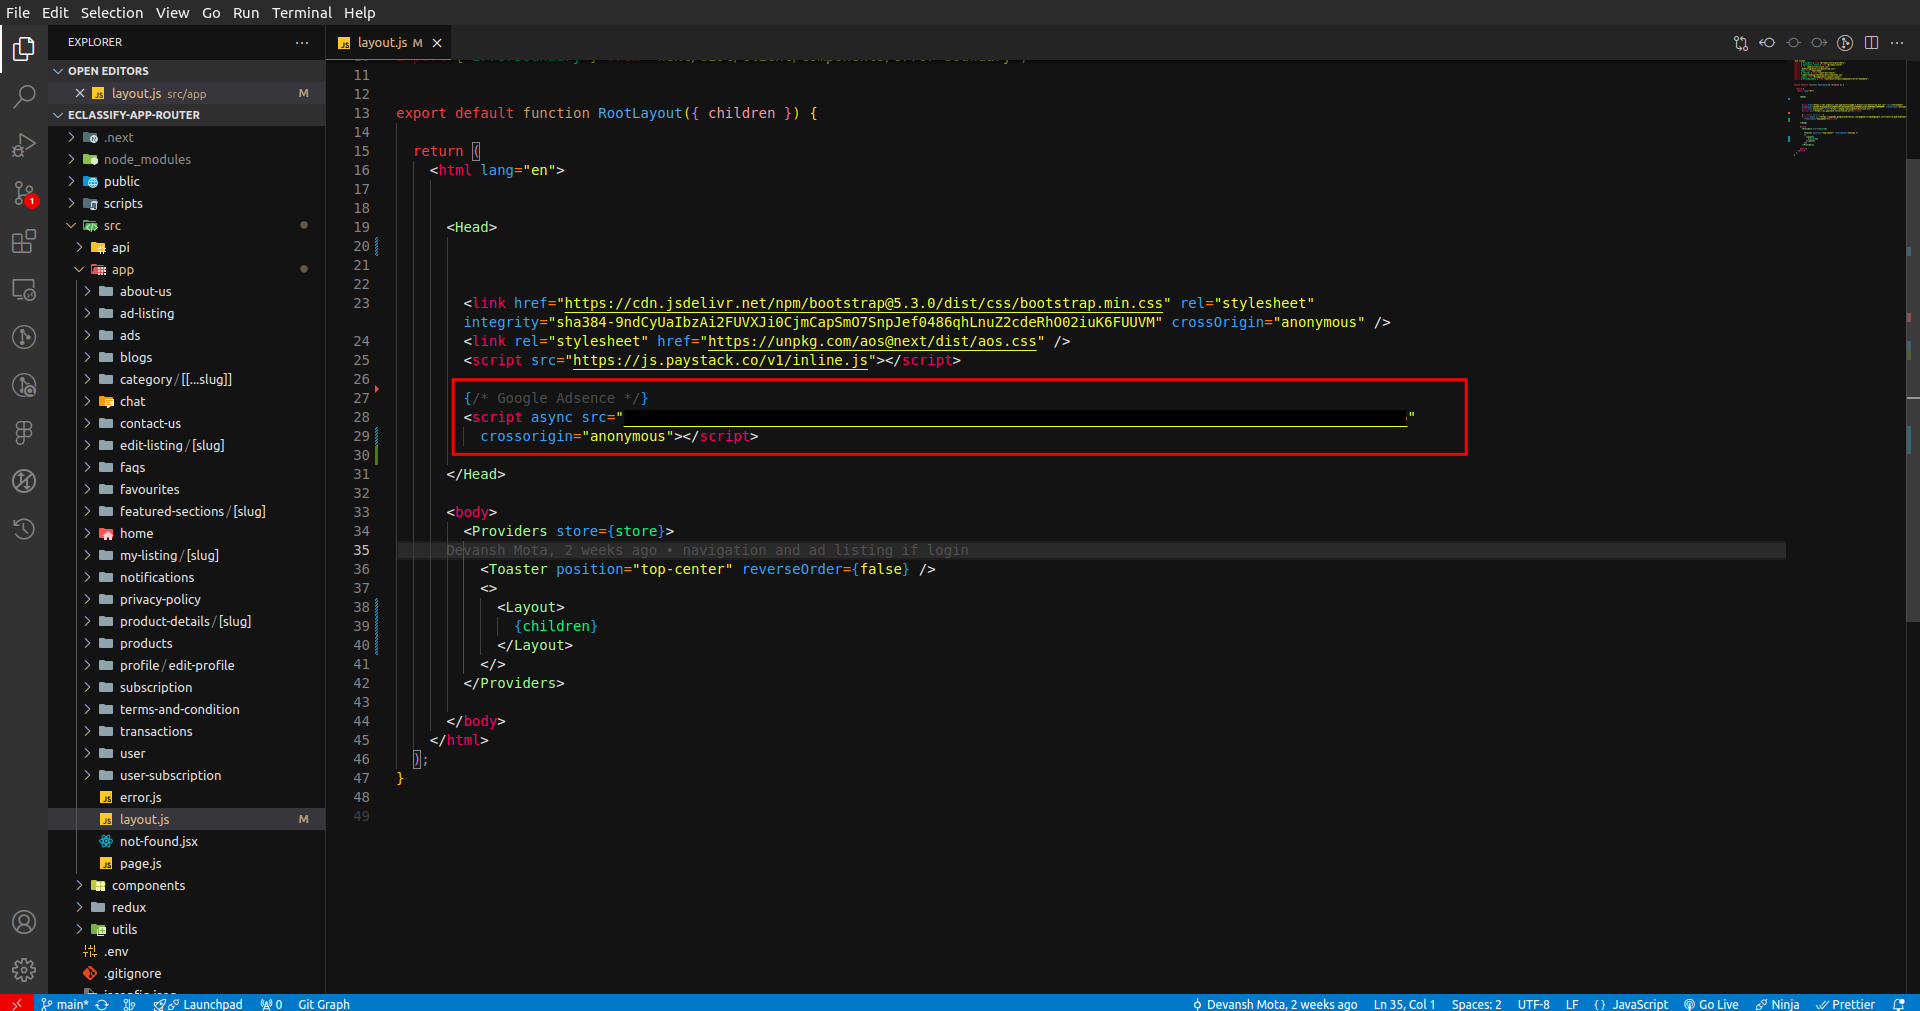
Copy this script code and paste to your admin panel -> system settings -> web settings
-
-
-
after script add you need to run command for build folder npm run export and upload to your server. and after click on verify button in google adsense
-
-
-
If it says “Getting ready…,” your account is still under review and your site will not display ads until it has been approved.

-
- How to run this project
-
-
Unzip the downloaded code. After unzipping you will have eClassify – Web Code Folder.
Open it in Visual Studio Code.
-
-
-
Open VS Code teminal by typing CTRL+J in Windows/Linux, and for MacOS CMD+J and execute the command –> npm install
This will take some time to download a few Packages so wait for a few minutes.
-
-
After npm install finishes run this command –> npm run dev.
This Command will Start the development mode.Check If everything is working fine then your are good to go ahead.
- Deploy to the Server
Web Automatic Deployment
INFO
Upload your web code to your server, open the terminal, navigate to your web code directory, and run the ./install.sh command.
Web Manually Deployment
Support
Its our pleasure to serve and support our customers. Please contact our support team if you encounter any issues or have any questions related to Eclassify.
Customer Support Head for Eclassify : Nikita Bhanderi
To help our customers, we constantly be in touch with every customer if they need any assistance regarding our product.
We offer our customers a support from Mon – Fri 9.00am to 6.00pm IST (GMT +5.30) – We are a Team located in India – Asia. Typically we reply our customers for all the questions and queries within 24 hours of time via comments, support forum or emails.
FAQs
1. Why I’m getting unknown host issue while configuring the Database ?
Possible reason may be nd_pdo_mysql extension is not installed. Install that and try again. If you are still having the same issue Contact Us.
2. Do I have to install admin from scratch to get the Latest features ?
No, Fresh installation is required only for the first time.You need use System Update menu to update your system.
3. Then How to do I update my Admin Panel to get the benefits of the latest featured ?
When we release new updates, We provide zip files of the Updates under the Admin Panel Code. Follow this steps to update your system :
- Open you Admin Panel
- Now go to System Update menu , which you can see as the last Option in Sidebar.
- In the System Update form you need to fill your Purchase code with the update version zip file.
- Hit Submit. Voila ! your System is updated now.
4. Images are not loading in App / Web / Admin Panel ?
This issue will be fixed from the Admin Panel code. So Open the Admin Panel in Server file manager. Then Perform this below steps :
- Open your public folder rename storage folder to storage-old (Skip this step if storage folder does not exists.)
- Open your_domain.com/storage-link -> you will see the blank page
- After this check the images are loading or not.